Blog

  • desktop

    Gatsby Desktop

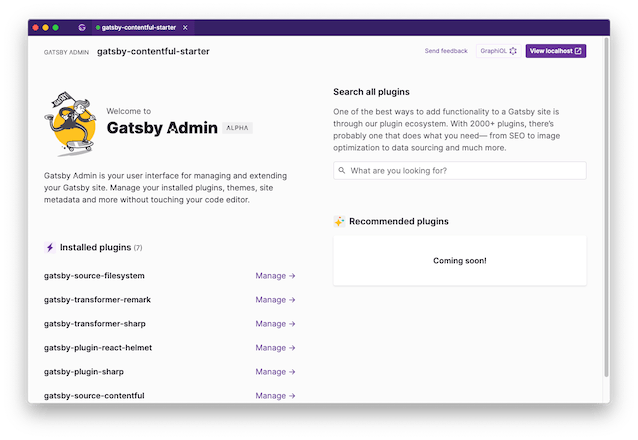
    A proof-of-concept desktop app for managing your Gatsby sites.

    Installation

    ⚠️ Warning: Gatsby Desktop is no longer being maintained

    Installing built packages

    1. Click on releases and choose the installer for your platform.

    Installing from source

    1. Clone the repo
    2. Run yarn
    3. yarn develop

    Screenshots

    Gatsby Desktop Gatsby Admin Logs

    Architecture

    Gatsby Desktop is an Electron app. All Electron apps have two primary processes:

    1. “main”, which is a Node.js script which handles windowing, menus and similar native bits. Think of it as the server. It opens BrowserWindows which contain:
    2. “renderer”: this is the UI of the app, which is HTML + JS. In Gatsby Desktop, this is of course a local Gatsby site. Unlike a regular web app, Electron renderers can import and use built-in Node.js modules, such as fs and child_process.

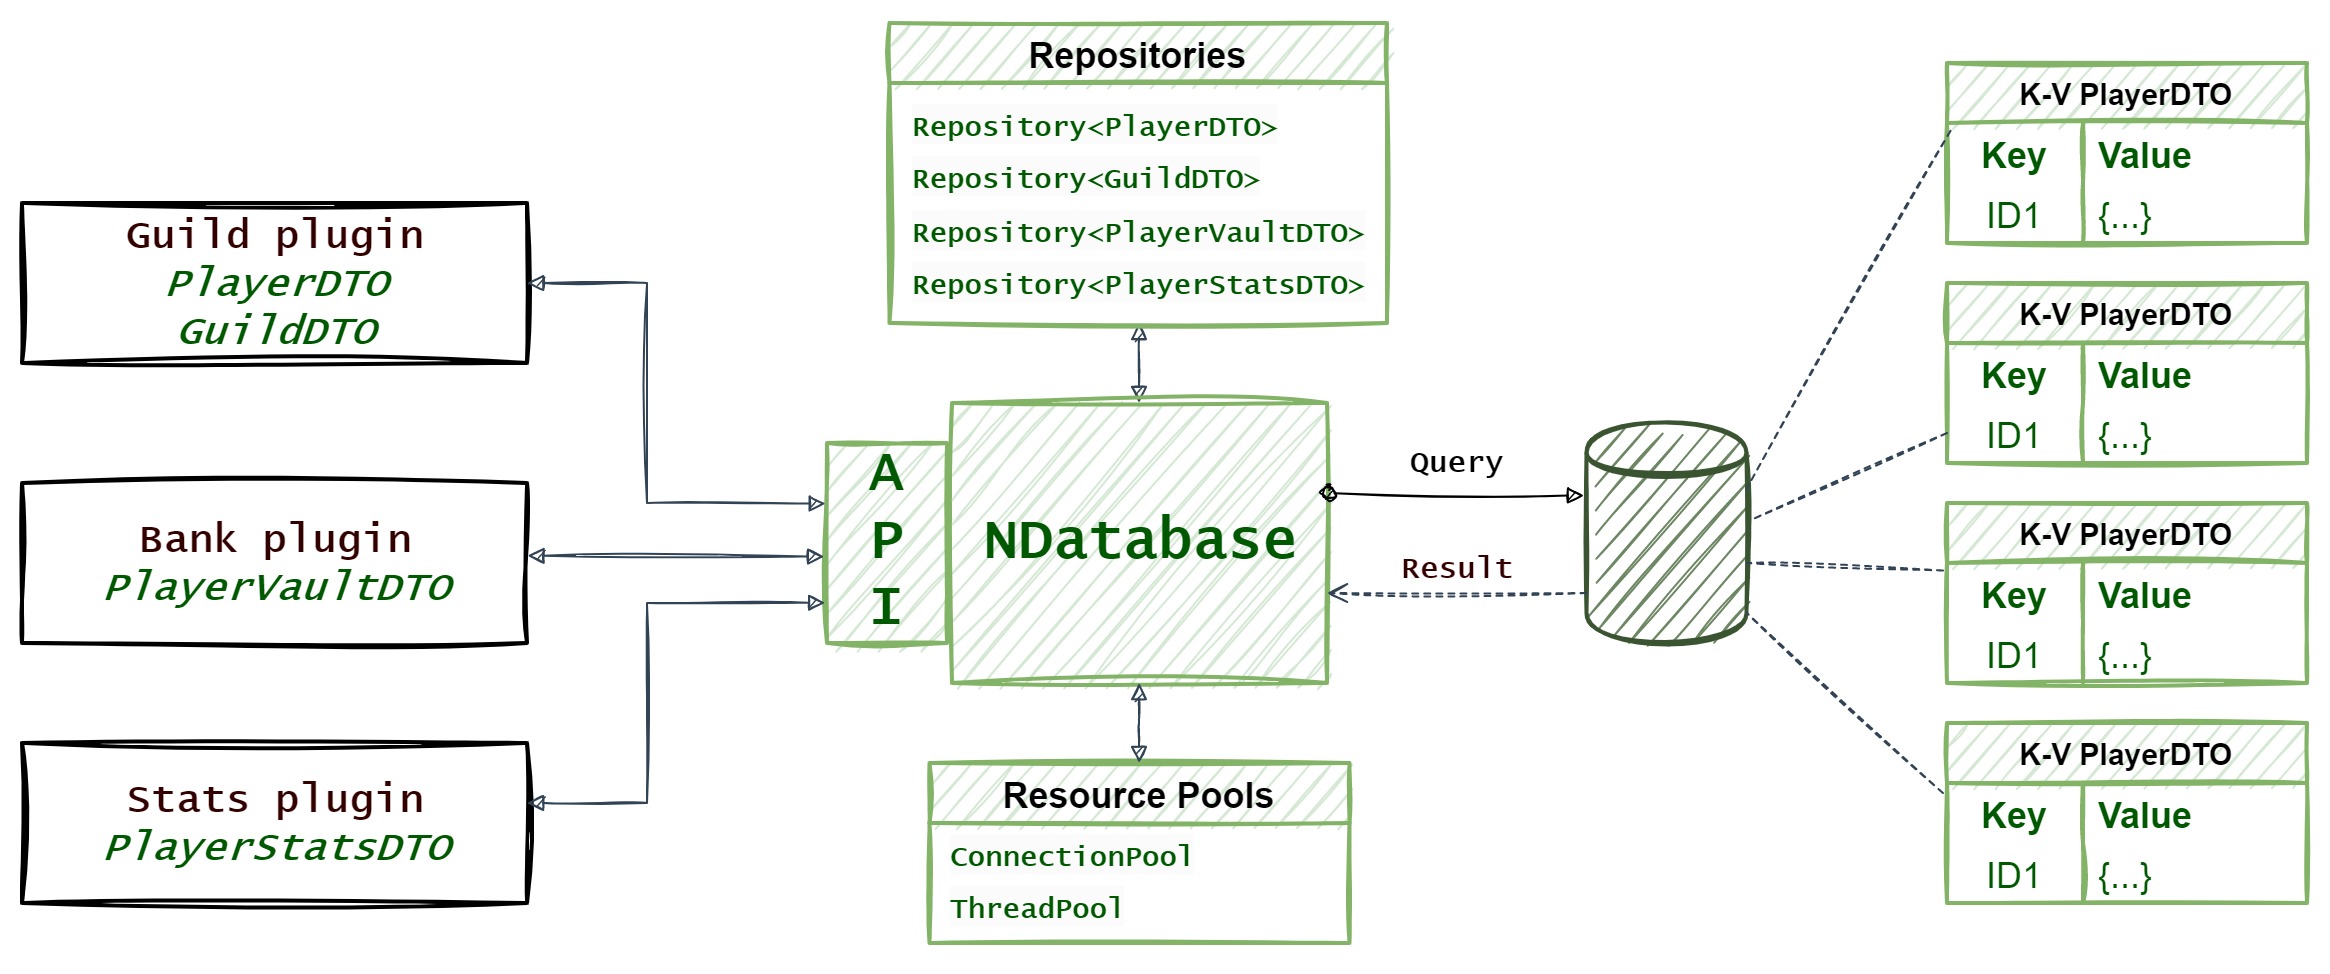
    Gatsby Desktop can launch and run your local Gatsby sites. We spawn these in the main process, which maintains a list of running site. The renderer gets this list over IPC and stores it in React context. There are React hooks to make it easy to access the list of sites and whether or not they’re running. The main process also auto-discovers any local Gatsby sites and watches these for changes.

    Development

    Gatsby Desktop is written in TypeScript. We use microbundle to compile and bundle the worker and main scripts. The renderer is a Gatsby site, which we run with gatsby develop during development, or SSR in production and serve from a local Express static server. yarn develop compiles and runs everything. It uses gatsby develop, so you have hot reloading, but bear in mind that this doesn’t clean up the child processes properly, so if those are running you’ll need to restart the process. It also watches and compiles the worker and main bundles.

    To debug the renderer, use Chrome devtools and listen to port 8315.

    Telemetry

    If you opt-in to telemetry, the app sends anonymous information about how use it. This is mainly checking which features you use and how much you use them. This helps us prioritize which features to develop, and to improve the app. This is particularly important as it is a proof-of-concept. This is entirely optional though, so if you don’t opt-in we don’t track anything except the fact that you have opted-out. All other events are not sent. This setting is separate from the telemetry setting for Gatsby itself. You can see more details on telemetry in Gatsby at https://gatsby.dev/telemetry

    Release process

    Create a draft release in GitHub, with the tag as the new version number prefixed with v, e.g. v0.0.1-alpha.2. Update the version number in package.json to match, and commit. Push that to master and GitHub Actions should do a build and eventually attach the packaged files to the draft release. Once the build is complete, publish the draft release.

    Visit original content creator repository https://github.com/gatsbyjs/desktop
  • ts-twitch-api

    ts-twitch-api

    Very simple TwitchApi class and TypeScript interfaces for all Twitch API endpoints

    • Auto-generated from twitch-api-swagger
    • Uses fetch under the hood
    • Includes types for all endpoints
      • Request Query Parameters
      • Request Body
      • Response Body
    • Includes descriptions for the fields

    Installation

    npm i ts-twitch-api
    
    pnpm i ts-twitch-api
    
    yarn add ts-twitch-api

    Usage

    Types only

    import type {
      UpdateAutoModSettingsParams,
      UpdateAutoModSettingsBody,
      UpdateAutoModSettingsResponse,
    } from 'ts-twitch-api';
    
    const updateAutoModSettings = async (
      params: UpdateAutoModSettingsParams,
      body: UpdateAutoModSettingsBody,
    ) => {
      const searchParams = new URLSearchParams(params);
      const url = `https://api.twitch.tv/helix/moderation/automod/settings?${searchParams}`;
      const response = await fetch(url, {
        method: 'PUT',
        body: JSON.stringify(body),
        headers: {
          Authorization: `Bearer ${process.env.ACCESS_TOKEN}`,
          'Client-Id': process.env.CLIENT_ID,
          'Content-Type': 'application/json',
        },
      });
      return response.json() as Promise<UpdateAutoModSettingsResponse>;
    }

    TwitchApi class

    import { TwitchApi } from 'ts-twitch-api';
    
    const twitchApi = new TwitchApi({
      accessToken: process.env.ACCESS_TOKEN,
      clientId: process.env.CLIENT_ID,
    });
    
    const response = await twitchApi.chat.updateChatSettings(
      // query params
      { broadcaster_id: '1', moderator_id: '2' },
      // body
      { emote_mode: true },
    );
    
    if (response.ok) {
      console.log(response.data);
    } else {
      console.error(response.status);
    }
    
    const streams = await twitchApi.streams.getStreams(
      // some endpoints accept multiple ids like this: `id=1234&id=5678`
      { user_id: ['1', '2'] },
      // override accessToken and/or clientId for different requests
      {
        accessToken: '<accessToken>',
        clientId: '<clientId>'
      },
    );
    
    if (streams.ok) {
      console.log(streams.data);
    }
    
    // pass fetch options via RequestInit object
    const ac = new AbortController();
    const users = twitchApi.users.getUsers(
      { id: ['1', '2'] },
      { requestInit: { signal: ac.signal } },
    );
    
    ac.abort();

    Visit original content creator repository
    https://github.com/DmitryScaletta/ts-twitch-api

  • platform-repo-scaffolder

    Repository Scaffolder

    Overview

    Golang Template Integration Tests VueJS Template Integration Tests

    This repository is dedicated to maintaining a collection of project templates in various programming languages and facilitates the creation of new repositories. It plays a crucial role in initial (day-0) repository setup operations.

    Sequence of Scaffolding a Repository

    sequenceDiagram
        actor DEV as Developer
        participant PRT as Port IDP
        participant RRS as Repository:<br>platform-repo-scaffolder
        participant RNW as New Repository
    
        DEV ->> PRT: Scaffold a new repository
        PRT ->> RRS: Initiate workflow:<br>repository-scaffolder.yaml
        RRS ->> RRS: Prepare a template<br>using Cookiecutter
        RRS ->> RNW: Create a new repository
        RRS ->> PRT: Add the new entity
    
    Loading

    Sequence of Deleting a Repository

    sequenceDiagram
        actor DEV as Developer
        participant PRT as Port IDP
        participant RRS as Repository:<br>platform-repo-scaffolder
        participant RTG as Target Repository
    
        DEV ->> PRT: Delete a repository
        PRT ->> RRS: Initiate workflow:<br>repository-delete.yaml
        RRS ->> RTG: Clone the repository
        activate RTG
        RTG -->>RRS: Get content
        deactivate RTG
        RRS ->> RRS: Backup the repository as an artifact
        RRS ->> RTG: Delete the repository
        RRS ->> PRT: Delete the entity
    
    Loading

    Key Functions

    • Maintenance of project source-code templates
    • Verification of functionality for source-code templates
    • Verification of functionality for related template images
    • Automating the setup of new repositories (day-0 operations)

    Tech Stack

    Development & Contribution

    To set up your development environment and learn about contributing to this project, please refer to CONTRIBUTION.md.

    Workflows

    Name Description
    repository-scaffolder.yaml Called by Port IDP, it scaffolds a repository from the templates available (Golang and VueJS)
    repository-delete.yaml Called by Port IDP, it backups the repository content to the scaffolder articafts and deletes the repository afterward.
    golang-ci.yaml Ensures the Golang template is generated properly by Cookiecutter, the binary is executable by default and serving a HTTP server, and the Docker image is good to go
    vuejs-ci.yaml Ensures the VueJS template is generated properly by Cookiecutter, serves the specific content, and the Docker image is functional
    Visit original content creator repository https://github.com/PashmakGuru/platform-repo-scaffolder
  • NDatabase


    Issues Closed issues Forks Stars jitpack License

    NDatabase

    NDatabase is a lightweight and easy to use indexed key-value store database framework mainly aimed for minecraft servers and is multi-platform (Bukkit / Spigot / Sponge). It can be used as a plugin, so you can install it once and use it everywhere without having to configure a database and duplicate connection pool each time you develop a new plugin. The API provide a fluent way to handle Async data fetch and server main thread callback with async to sync mechanism. NDatabase can support multiple databases (currently MySQL, MariaDB, SQLite, and MongoDB implementation). NDatabase can support java 8 from 18 and higher and all minecraft server version (tested from 1.8 to 1.19+).

    NDatabase WIKISpigot page

    I used NDatabase in my own server that could handle 500 concurrent players, you can have more interesting technical details in this repo

    Benefits of using NDatabase

    • Fast to use, you don’t have to write any Repository class or write SQL: this framework is designed in a way that you just have to create your data model object (DTO) and a fully usable repository will be created automatically. See NDatabase Installation & Quickstart
    • Install once, use it everywhere: It’s obvious that a server always have a lot of plugins, most of them require a database, and you need to re-implement, and configure your database for every plugin. Connection pool duplication cost a lot of resources. With NDatabase, you just install the plugin once, and you can use the API in every plugins without configuration needed.
    • Indexed key-value store: by design, a key-value store is very easy and fast to operate but is not indexed. But in some case we really need to retrieve data by field’s value. NDatabase provide you a very easy way to index some of your fields and query your data. find more infos how key-value store are indexed
    • Fluent Async to Sync API: You are probably aware that you should never do database and I/O operations in the minecraft main-thread, NDatabase natively expose an API that can be used to retrieve data asynchronously and consume in synchronously.
    • Database type agnostic: You can develop your plugin once with NDatabase, and multiple database types will be supported through the same API. If you are a plugin creator, and you sell plugins it’s very convenient because you don’t have to care about if your customer use MongoDB, MySQL etc.

    How does it work & API usage

    If you want to use NDatabase for your minecraft server, you can install it as a plugin easily, see NDatabase Installation. When NDatabase is running on your server, Creating the schema and repository for your data model is very easy, you can actually do that with one line of code.

    Repository<UUID, PlayerStats> repository = NDatabase.api().getOrCreateRepository(PlayerStats.class);

    Your repository is now ready, and you can now use it for operations such as insert, update, delete, get, find, etc. Note that you can recall the same method to get your repository from anywhere as the repository instance for this class type is cached.

    Here is an overview about how it works and how can it be used with multiple plugins.

    drawing

    Fluent async to sync API

    As you may know, a minecraft server has a main thread which handle the logic game tick and synchronisation, the server can tick up to 20 times per seconds (50 ms per tick) which mean, if you are doing heavy process in the main thread and it lead the server to take more than 50 ms to tick, your server will lag and tick less often.

    That’s why you should always process heavy task and I/O task asynchronously, but there is another issue, you can’t/should not mute the game state (eg: call Bukkit methods) asynchronously because it will break the synchronization or even crash your server. Most of server software will simply prevent you from doing that.

    In the scenario where you want to retrieve data asynchronously and use it inside your game context, you can do that by using the bukkit scheduler. The idea is to get the data in another thread and then schedule in the main thread, a task that is consuming your retrived data. It’s doable by using the Bukkit methods but NDatabase provide you a fluent API to do that.

    Async and Sync examples:

    Repository<String, BlockDTO> blockRepository = NDatabase.api().getOrCreateRepository(BlockDTO.class);
    // Async to Sync (get data async and consume it in the main thread)
    blockRepository.getAsync("id")
            .thenSync((bloc, exception) -> {
                if(exception != null) {
                    // Handle exception
                    return;
                }
                placeBlockInWorld(bloc);
            });
    
    Repository<UUID, PlayerDTO> playerRepository = NDatabase.api().getOrCreateRepository(PlayerDTO.class);
    // Full Async (get data async and consume it in the same async thread)
    playerRepository.getAsync(joinedPlayer.getUUID())
            .thenAsync((playerDTO, exception) -> {
                if(exception != null) {
                    // Handle exception
                    return;
                }
                loadPlayer(playerDTO);
            });

    Query Example : Get best players, which have score >= 100 or a specific discord id

    List<PlayerData> bestPlayers = repository.find(NQuery.predicate("$.statistics.score >= 100 || $.discordId == 3432487284963298"));

    drawing

    • Async to sync: in the first example we retrieve the data of a block asynchronously, as we know we should not change the game state asynchronously, we give a consumer callback that will be scheduled and run in the main thread. This approach doesn’t affect main thread’s performances as we retrieve the data in another thread.

    • Full async: in the second example, we retrieve the data of a player who just connected to the server asynchronously and consume this data in the same async thread, because we don’t necessarily have to do bukkit operation but just cache some informations, so all this can be done of the main thread. Keep in mind that you should use concurrent collections to avoid getting ConcurrentModificationException

    Documentation

    NDatabase is designed to be fast and easy to use and still support value indexed as well. This framework will cover most of your use-case, but I recommend you to read the documentation to know about general best practices.

    NDatabase WIKI

    Build jar or API

    mvn clean install -DSkipTests

    It will create the complete jar in ndatabase-packaging-jar/target and the API in ndatabase-api/target

    Future objectives

    WIP

    • find((predicate)) parse predicate into a query that use index using bytecode manipulation
    • migration mecanisms
    Visit original content creator repository https://github.com/NivixX/NDatabase
  • python-colored-console-output

    Python Colored Console Output

    image image

    Author: Andrew Gyakobo

    Intro

    In Python, you can change the color of the text printed to the console by using ANSI escape sequences. These are special codes that can change the color and style of the terminal text.

    Methodology

    Here is a simple example:

    # ANSI escape sequences for text colors
    RED = "\033[31m"
    GREEN = "\033[32m"
    YELLOW = "\033[33m"
    BLUE = "\033[34m"
    MAGENTA = "\033[35m"
    CYAN = "\033[36m"
    RESET = "\033[0m"
    
    # Printing text in different colors
    print(RED + "This is red text" + RESET)
    print(GREEN + "This is green text" + RESET)
    print(YELLOW + "This is yellow text" + RESET)
    print(BLUE + "This is blue text" + RESET)
    print(MAGENTA + "This is magenta text" + RESET)
    print(CYAN + "This is cyan text" + RESET)

    Here’s a breakdown of the escape sequences:

    • \033[: This is the escape character and the beginning of the ANSI code.
    • 31m, 32m, 33m, etc.: These are the codes for different colors.
    • 0m: This resets the text color to the default.

    The colors available with these codes are:

    • 30: Black
    • 31: Red
    • 32: Green
    • 33: Yellow
    • 34: Blue
    • 35: Magenta
    • 36: Cyan
    • 37: White

    You can also use libraries like colorama to make it easier to work with colored text, especially if you are writing cross-platform applications. Here’s an example using colorama:

    from colorama import Fore, Style, init
    
    # Initialize colorama
    init()
    
    # Printing text in different colors
    print(Fore.RED + "This is red text" + Style.RESET_ALL)
    print(Fore.GREEN + "This is green text" + Style.RESET_ALL)
    print(Fore.YELLOW + "This is yellow text" + Style.RESET_ALL)
    print(Fore.BLUE + "This is blue text" + Style.RESET_ALL)
    print(Fore.MAGENTA + "This is magenta text" + Style.RESET_ALL)
    print(Fore.CYAN + "This is cyan text" + Style.RESET_ALL)

    colorama handles the reset for you, making it a bit easier to manage. To install colorama, you can use pip:

    $ pip install colorama

    License

    MIT

    Visit original content creator repository https://github.com/Gyakobo/python-colored-console-output
  • storiette

    Welcome to Storiette! 👋

    Neutrans

    Storiette is a simple open source project used to read a collection of short stories in Indonesian. This storiette is suitable for use by small children who like to read short stories. Built using Framework7. 💖

    Demo Page    Documentation Page   

    💾 Requirements

    • Node.js – used for the entire application development process. Whether it’s making an API or something
    • Web Browser – can be used as an emulator to build applications. Example [Chrome, Firefox, Safari & Opera]
    • Internet – because many use CDN and to make it easier to find solutions to all problems
    • Composer – make it easier for developers to manage PHP project dependencies
    • Android SDK – to simplify the process of building applications
    • Gradle – function to perform application building automatically
    • Java Development Kit – used for support in developing or building an application

    🎯 How To Use

    Using the built-in ready to use from the release (Recommended)

    Download the latest project release from the Release Page. Open the Storiette project folder using a terminal and type npm run dev. To explore the source code you can use a text editor such as Visual Studio Code.

    Build manually

    • Before starting, make sure you have Node.js installed first
    • If you have installed Node.js. Run the command git clone which is https://github.com/RizkiKarianata/storiette
    • Install the dependencies using the node package manager of your choice. For example run npm install in terminal
    • To run the application you can run the command npm run dev. And the application will automatically open using port 8080 on your default browser

    Build to APK

    • You can run commands like in the NPM Scripts below by adding npm run. Example npm run build-dev-cordova-android on terminal

    🛠 NPM Scripts

    • 🔥 start – run development server
    • 🔧 dev – run development server
    • 🔧 build-dev – build web app using development mode (faster build without minification and optimization)
    • 🔧 build-prod – build web app for production
    • 📱 build-dev-cordova – build cordova app using development mode (faster build without minification and optimization)
    • 📱 build-prod-cordova – build cordova app
    • 📱 build-dev-cordova-ios – build cordova iOS app using development mode (faster build without minification and optimization)
    • 📱 build-prod-cordova-ios – build cordova iOS app
    • 📱 build-dev-cordova-android – build cordova Android app using development mode (faster build without minification and optimization)
    • 📱 build-prod-cordova-android – build cordova Android app

    📋 Documentation & Resources

    🧑 Author

    🤝 Contributing

    Please follow Contributing Guide before contributing.

    📝 License

    • Copyright © 2022 Rizki Karianata
    • Storiette is an open source project licensed under the MIT license

    ☕️ Suppport & Donation

    Love Storiette? Support this project by donating or sharing with others in need.

    Made with ❤️ Rizki Karianata

    Visit original content creator repository https://github.com/RizkiKarianata/storiette
  • csslex

    csslex

    This aims to be a very small and very fast spec compliant css lexer (or scanner
    or tokenizer depending on your favourite nomenclature).

    It is not the fastest, nor is it the smallest, but it chooses to trade size
    for speed and speed for correctness. Smaller lexers exist but they sacrifice
    speed and correctness. Faster lexers exist but they sacrifice code size, and the
    ability to easily run in the browser. More clearly written lexers exist, but
    usually at the sacrifice of both speed and size. For details on how fast, how
    small, and how correct, see below.

    What is this good for?

    The applications are quite limited. If you know what CSS is, and you know what a
    lexer/scanner/tokenizer is, then you probably know why you would want this. If
    you don’t know those things or how you could use them, then this probably won’t
    be helpful for you.

    How do I import this?

    If you’re using node.js then running npm i csslex which will install the
    dependency in your node_modules folder. Then import it with:

    import { lex, types, value } from "csslex";

    If you’re using Deno, then you can try the following line:

    import { lex, types, value } from "https://deno.land/x/csslex/mod.ts";

    If you’re using a Browser, you can import using unpkg or esm.sh:

    import { lex, types, value } from "https://esm.sh/csslex";

    How do I use this?

    If you can understand typescript, this will be helpful:

    type Token = [type: typeof types[keyof typeof types], start: number, end: number]
    lex(css: string): Generator<Token>

    The main lex function takes a css string, and creates an iterable of “Tokens”.
    Each “Token” is a tuple 3 (an array always with 3 elements inside it). The first
    item in the array is the number representing the type, the second is the start
    position of that token in the css string, the second is the end of that token in
    the string.

    So for example:

    import { lex, types, value } from "https://esm.sh/csslex";
    Array.from(lex("margin: 1px"))[ // -> output
      ([types.IDENT, 0, 6],
      [types.COLON, 6, 7],
      [types.WHITESPACE, 7, 8][(types.DIMENSION, 8, 11)])
    ];

    If you want to know the raw value of a token, simply take your original string
    and call .slice(start, end). However you can also give the string and a token
    tuple to value which will also do extra things like normalise escape
    characters and give you structural values:

    import { lex, types, value } from "https://esm.sh/csslex";
    value("margin: 1px", [types.IDENT, 0, 6]) == "margin";
    value("margin: 1px", [types.COLON, 6, 7]) == ":";
    value("margin: 1px", [types.DIMENSION, 8, 11]) ==
      { type: "integer", value: 1, unit: "px" };

    Test Coverage

    This uses css-tokenizer-tests which provides a set of difficult inputs
    intended to test the edge cases of the spec.

    It also uses “snapshot testing” to avoid regressions, it tokenizes the
    postcss-parser-tests series of css files, as well as open-props.

    Spec Conformance

    @romainmenke maintains a comparison of
    CSS tokenizers with scores pertaining to each. csslex aims to always
    achieve a perfect score here, so if you visit the scores page an it does
    not have a perfect score, please file an issue!

    Size Differentials

    This package aims to be the smallest minified css tokenizer codebase. Here’s a
    comparison of popular alternatives:

    Name Minified Gzipped
    @csstools/tokenizer 4.1kb 1.1kb
    csslex (this) 4.7kb 1.9kb
    @csstools/css-tokenizer 15.5kb 3.4kb
    css-tokenize 19.1kb 5.7kb
    parse-css 16kb 4.1kb
    css-tree 157.9kb 45kb

    Speed differentials

    You can run node bench.js to get some benchmark numbers. Here’s some I ran on
    the machine I developed the library on:

    Name ops/sec
    css-tree 3,080 ops/sec ±0.43% (96 runs sampled)
    csslex (this) 2,314 ops/sec ±0.45% (93 runs sampled)
    @csstools/css-tokenizer 1,622 ops/sec ±0.76% (96 runs sampled)


    Visit original content creator repository
    https://github.com/keithamus/csslex

  • dhcphelper

    dhcphelper Trivy Workflow Status Docker pulls Docker Image Size GitHub Actions Docker Alpine Linux contributions welcome FOSSA Status

    DHCP Relay in docker

    Table of Contents
    1. About The Project
    2. Getting Started
    3. Usage
    4. License
    5. Contact
    6. Acknowledgements

    About The Project

    This is a small docker image with a DHCP Helper useful in case when you have a DHCP server in the docker environment and you need a relay for broadcast.

    The DHCP server in the container does get only unicast the DHCPOFFER messages when it will have to get broadcast DHCPOFFER messages on the network.

    It will not work the DHCP server in docker even in networking host mode unless you are using any DHCP relay.

    👨‍🎓 If you need to know more about how it works DHCP protocol, I highly recommend this link.

    ☕️ Support HomeAll

    Enjoying my home lab and IT projects?
    Buy me a coffee to keep the ideas coming!

    Buy Me a Coffee

    Getting Started

    🔰 It will work on any Linux box amd64 or Raspberry Pi with arm64 or arm32.

    Prerequisites

    Made with Docker !

    You will need to have:

    This step is optional

    Usage

    You only need to pass as variable the IP address of DHCP server: "-e IP=X.X.X.X"

    You can run as:

    docker run --privileged -d --name dhcp --net host -e "IP=172.31.0.100" homeall/dhcphelper:latest

    Potentials issues

    ⚠️ Please make sure your host has port 67 on UDP open on iptables/firewall of your OS and it is running on network host mode ONLY.

    ‼️ You can run the following command to see that is working:

    $ nc -uzvw3 127.0.0.1 67
    Connection to 127.0.0.1 port 67 [udp/bootps] succeeded!
    

    ♥️ On the status column of the docker, you will notice the healthy word. This is telling you that docker is running healtcheck itself in order to make sure it is working properly. Please test yourself using the following command:

    $ docker inspect --format "{{json .State.Health }}" dhcp | jq
    {
      "Status": "healthy",
      "FailingStreak": 0,
      "Log": [
        {
          "Start": "2021-01-04T10:28:11.8070681Z",
          "End": "2021-01-04T10:28:14.8695872Z",
          "ExitCode": 0,
          "Output": "127.0.0.1 (127.0.0.1:67) open\n"
        }
      ]
    }
    

    ⬆️ Go on TOP ☝️

    Testing

    ➡️ You can run a command from Linux/Mac:

    $ sudo nmap --script broadcast-dhcp-discover -e $Your_Interface

    ⬇️ Output result:

    Starting Nmap 7.91 ( https://nmap.org ) at 2021-01-01 19:40 GMT
    Pre-scan script results:
    | broadcast-dhcp-discover:
    |   Response 1 of 1:
    |     Interface: en0
    |     IP Offered: 192.168.1.30
    |     DHCP Message Type: DHCPOFFER
    |     Server Identifier: 172.31.0.100
    |     IP Address Lease Time: 2m00s
    |     Renewal Time Value: 1m00s
    |     Rebinding Time Value: 1m45s
    |     Subnet Mask: 255.255.255.0
    |     Broadcast Address: 192.168.1.255
    |     Domain Name Server: 172.31.0.100
    |     Domain Name: lan
    |     Router: 192.168.1.1
    Nmap done: 0 IP addresses (0 hosts up) scanned in 10.26 seconds
    

    PiHole and DHCP Relay

    💰 It will work amazing both together dhcphelper and ©️ PiHole ☯️

    ❇️ A simple docker-compose.yml:

    version: "3.3"
    
    services:
      pihole:
        container_name: pihole
        image: pihole/pihole:latest
        hostname: pihole
        ports:
          - "53:53/tcp"
          - "53:53/udp"
          - "80:80/tcp"
        environment:
          TZ: 'Europe/London'
          WEBPASSWORD: 'admin'
          DNS1: '127.0.0.53'
          DNS2: 'no'
        volumes:
          - './etc-pihole/:/etc/pihole/'
        depends_on:
          - dhcphelper
        cap_add:
          - NET_ADMIN
        restart: unless-stopped
        networks:
          backend:
            ipv4_address: '172.31.0.100'
          proxy-tier: {}
    
      dhcphelper:
        restart: unless-stopped
        container_name: dhcphelper
        network_mode: "host"
        image: homeall/dhcphelper:latest
        environment:
          IP: '172.31.0.100'
          TZ: 'Europe/London'
        cap_add:
          - NET_ADMIN
    

    ⬆️ Go on TOP ☝️

    License

    🗞️ Check the LICENSE for more information.

    Contact

    🔴 Please free to open a ticket on Github. Or Buy Me A Coffee 😊

    Acknowledgements

    ⬆️ Go on TOP ☝️

    Visit original content creator repository https://github.com/homeall/dhcphelper
  • IJCV 2024: Transformer-based ReID Survey

    IJCV 2024: Transformer-based ReID Survey

    Transformer for Object Re-Identification: A Survey. arXiv

    • An implementation of UntransReID for unsupervised Re-ID is HERE.

    • An implementation of UntransReID for cross-modality visible-infrared unsupervised Re-ID is HERE.

    • An implementation of the unified experimental standard for animal Re-ID is HERE.

    Highlights

    • An in-depth analysis of Transformer’s strengths, highlighting its impact across four key Re-ID directions: image/video-based, limited data/annotations, cross-modal, and special scenarios.

    • A new Transformer-based unsupervised baseline, UntransReID, achieving state-of-the-art performance on both single/cross modal Re-ID.

    • A unified experimental standard for animal Re-ID, designed to address its unique challenges and evaluate the potential of Transformer-based approaches.

    Citation

    Please kindly cite this paper in your publications if it helps your research:

    @article{ye2024transformer,
      title={Transformer for Object Re-Identification: A Survey},
      author={Ye, Mang and Chen, Shuoyi and Li, Chenyue and Zheng, Wei-Shi and Crandall, David and Du, Bo},
      journal={arXiv preprint arXiv:2401.06960},
      year={2024}
    }
    

    TPAMI 2021 ReID-Survey with a Powerful AGW Baseline

    Deep Learning for Person Re-identification: A Survey and Outlook. PDF with supplementary materials. arXiv

    • An implementation of AGW for cross-modality visible-infrared Re-ID is HERE.

    • An implementation of AGW for video Re-ID is HERE

    • An implementation of AGW for partial Re-ID is HERE.

    A simplified introduction in Chinese on 知乎.

    Highlights

    • A comprehensive survey with in-depth analysis for closed- and open-world person Re-ID in recent years (2016-2020).

    • A new evaluation metric, namely mean Inverse Negative Penalty (mINP), which measures the ability to find the hardest correct match.

    • A new AGW baseline with non-local Attention block, Generalized mean pooling and Weighted regularization triplet. It acheieves competitive performance on FOUR challenging Re-ID tasks, including single-modality image-based Re-ID, video-based Re-ID, Partial Re-ID and cross-modality Re-ID.

    AGW on Single-Modality Image Re-ID with mINP

    DukeMTMC dataset

    Method Pretrained Rank@1 mAP mINP Model Paper
    BagTricks ImageNet 86.4% 76.4% 40.7% Code Bag of Tricks and A Strong Baseline for Deep Person Re-identification. In ArXiv 19. PDF
    ABD-Net ImageNet 89.0% 78.6% 42.1% Code ABD-Net: Attentive but Diverse Person Re-Identification. In ICCV 19. PDF
    AGW ImageNet 89.0% 79.6% 45.7% GoogleDrive Deep Learning for Person Re-identification: A Survey and Outlook

    Market-1501 dataset

    Method Pretrained Rank@1 mAP mINP Model Paper
    BagTricks ImageNet 94.5% 85.9% 59.4% Code Bag of Tricks and A Strong Baseline for Deep Person Re-identification. In ArXiv 19. arXiv
    ABD-Net ImageNet 95.6% 88.3% 66.2% Code ABD-Net: Attentive but Diverse Person Re-Identification. In ICCV 19. PDF
    AGW ImageNet 95.1% 87.8% 65.0% GoogleDrive Deep Learning for Person Re-identification: A Survey and Outlook. In ArXiv 20. arXiv

    CUHK03 dataset

    Method Pretrained Rank@1 mAP mINP Model Paper
    BagTricks ImageNet 58.0% 56.6% 43.8% Code Bag of Tricks and A Strong Baseline for Deep Person Re-identification. In ArXiv 19. PDF
    AGW ImageNet 63.6% 62.0% 50.3% GoogleDrive Deep Learning for Person Re-identification: A Survey and Outlook. In ArXiv 20. arXiv

    MSMT17 dataset

    Method Pretrained Rank@1 mAP mINP Model Paper
    BagTricks ImageNet 63.4% 45.1% 12.4% Code Bag of Tricks and A Strong Baseline for Deep Person Re-identification. In ArXiv 19. arXiv
    AGW ImageNet 68.3% 49.3% 14.7% GoogleDrive Deep Learning for Person Re-identification: A Survey and Outlook. In ArXiv 20. arXiv

    Quick Start

    1. Prepare dataset

    Create a directory to store reid datasets under this repo, taking Market1501 for example

    cd ReID-Survey
    mkdir toDataset
    

    toDataset
        market1501 
            bounding_box_test/
            bounding_box_train/
            ......
    

    Partial-REID and Partial-iLIDS datasets are provided by https://github.com/lingxiao-he/Partial-Person-ReID

    2. Install dependencies

    • pytorch=1.0.0
    • torchvision=0.2.1
    • pytorch-ignite=0.1.2
    • yacs
    • scipy=1.2.1
    • h5py

    3. Train

    To train a AGW model with on Market1501 with GPU device 0, run similarly:

    python3 tools/main.py --config_file='configs/AGW_baseline.yml' MODEL.DEVICE_ID "('0')" DATASETS.NAMES "('market1501')" OUTPUT_DIR "('./log/market1501/Experiment-AGW-baseline')"
    

    4. Test

    To test a AGW model with on Market1501 with weight file './pretrained/dukemtmc_AGW.pth', run similarly:

    python3 tools/main.py --config_file='configs/AGW_baseline.yml' MODEL.DEVICE_ID "('0')" DATASETS.NAMES "('market1501')"  MODEL.PRETRAIN_CHOICE "('self')" TEST.WEIGHT "('./pretrained/market1501_AGW.pth')" TEST.EVALUATE_ONLY "('on')" OUTPUT_DIR "('./log/Test')"
    

    Citation

    Please kindly cite this paper in your publications if it helps your research:

    @article{pami21reidsurvey,
      title={Deep Learning for Person Re-identification: A Survey and Outlook},
      author={Ye, Mang and Shen, Jianbing and Lin, Gaojie and Xiang, Tao and Shao, Ling and Hoi, Steven C. H.},
      journal={IEEE Transactions on Pattern Analysis and Machine Intelligence},
      year={2021},
    }
    

    Contact: mangye16@gmail.com

    Visit original content creator repository
    https://github.com/mangye16/ReID-Survey