This is an open Docker Swarm for AWS deployment based on Terraform and custom supporting images.
Why?
This is using mostly public code images (Working on a replacement for l4controller) instead of the “hidden” images docker use and the containers can run on non musl libc hosts.
Docker just released the Docker for AWS as a fire and forget thing, no docs, no anything and while I have no docs yet, the “how it works” is there in the open as the code for everything is on github.
There is still some cleanup to do and add it to travis, tests, etc. but it works as is.
For the VPC and ELB modules, you can BYO as long as it complies with the inputs and outputs. (I use something based on https://github.com/segmentio/stack that will publish soon)
Images:
guide-aws
This container guides the cluster instances through its lifecycle performing maintenance tasks.
meta-aws
Provides a simple Flask based metadata service, primarely gives Swarm tokens based on the EC2 instance SG.
init-aws
Initializes the EC2 instance, gets AWS info, inits or joins the Swarm, updates DynamoDB entry, etc.
status-aws
Provides a simple Flask based status endpoint based on the Docker Engine status.
elb-aws
Dynamically updates the cluster ELB based on the published services running on the cluster.
Documentation for each image is found under the image README.md
Development
Initialize
After cloning the repo, please run:
pip install pre-commit # If not installed
pre-commit install
Add your modules to the modules directory and then run terraform normally
go test -timeout 0 -covermode=count -coverprofile=coverage.out  -run="^Test" -coverpkg=package1,package2

go tool cover -html=coverage.out -o coverage.html
Fresh wordlists for all your passphrase-creation needs. Use these wordlists to create strong, secure passphrases, either with dice or a password generator, which are built-in to some password managers.
Made up of common words found in (English) Wikipedia and Google Books
Uniquely decodable, and thus safe to combine words in passphrases without a delimiter
Free of profane words, abbreviations, and British spellings
Available in a variety of lengths for different use-cases
NOTE: These lists are occasionally edited. If you want a static, unchanging copy of any of the word lists, feel free to download the lists as they are currently, download the latest tag/release, or fork this repository at any time. See licensing information below.
Orchard Street Long List
The Orchard Street Long List is a 17,576-word list. It provides a hefty 14.1 bits of entropy per word, meaning a 7-word passphrase gives almost 99 bits of entropy.
List length               : 17576 words
Mean word length          : 7.98 characters
Length of shortest word   : 3 characters (add)
Length of longest word    : 15 characters (troubleshooting)
Free of prefix words?     : false
Uniquely decodable?       : true
Entropy per word          : 14.101 bits
Efficiency per character  : 1.767 bits
Above brute force line?   : true
Mean edit distance        : 7.915

Word samples
------------
plank billionaire evaluated punched proficiency positioned
symptom commensurate spit connector misguided royalties
brokerage losers policy diagram graceful publishing
successors redesigned companions intrusion alternatives cleaned
rationalism coupons cosmos clarification translation blaming
Orchard Street Medium List
The Orchard Street Medium List has 8,192 (213) words. This length is optimized for binary computers and their random number generators. It gives a nice round 13.00 bits of entropy per word, which makes entropy calculations a bit easier for us humans.
List length               : 8192 words
Mean word length          : 7.07 characters
Length of shortest word   : 3 characters (add)
Length of longest word    : 10 characters (worthwhile)
Free of prefix words?     : false
Uniquely decodable?       : true
Entropy per word          : 13.000 bits
Efficiency per character  : 1.839 bits
Above brute force line?   : true
Mean edit distance        : 6.966

Word samples
------------
adding pilots maximal website opponent attraction
dispatched confirms chapter eagle brains arising
brethren nations palms vaccine relocation basis
motorway tidal jewelry warn alleged courtesy
impacts nature gauge quartz provisions exam
List length               : 7776 words
Mean word length          : 7.05 characters
Length of shortest word   : 3 characters (add)
Length of longest word    : 10 characters (worthwhile)
Free of prefix words?     : false
Uniquely decodable?       : true
Entropy per word          : 12.925 bits
Efficiency per character  : 1.832 bits
Above brute force line?   : true
Mean edit distance        : 6.954

Word samples
------------
believing drawing advocate mechanism slaves panel
lecturer institutes encourages assists rovers injected
checked liberals thirteen posting frigate mayo
monitored ruler mean renewal liquid requiring
polished cardiac injuries challenge coherence legs
Orchard Street Alpha and Orchard Street QWERTY lists both have 1,296 words and are optimized for inputting resulting passphrases into devices like smart TVs or video game consoles. Each word gives a passphrase an additional 10.34 bits of entropy.
The difference between these two lists are which keyboard layout they are optimized for. Use the Alpha list if your device’s keyboard is laid out alphabetically; use the QWERTY list if it is closer to the QWERTY layout.
Orchard Street Alpha list
List length               : 1296 words
Mean word length          : 4.12 characters
Length of shortest word   : 3 characters (add)
Length of longest word    : 7 characters (stopped)
Free of prefix words?     : false
Uniquely decodable?       : true
Entropy per word          : 10.340 bits
Efficiency per character  : 2.509 bits
Above brute force line?   : true
Mean edit distance        : 4.043

Word samples
------------
deity jazz cad bay beg lest
fees kind fell sell toys shoots
hints new stops food tell ideas
toad died must road net feet
die sold leg done peer tour
Orchard Street QWERTY List
List length               : 1296 words
Mean word length          : 4.24 characters
Length of shortest word   : 3 characters (add)
Length of longest word    : 8 characters (referred)
Free of prefix words?     : false
Uniquely decodable?       : true
Entropy per word          : 10.340 bits
Efficiency per character  : 2.441 bits
Above brute force line?   : true
Mean edit distance        : 4.170

Word samples
------------
pine mod polo egg three whip
zen ties cadet wars sweat tier
unity jam tire egg idea hull
sent kiss open fife reader will
mute mecca drugs rent turn den
This project has no association with Google, Wikipedia, or the creators of the Wikipedia frequency project cited above. To my knowledge, Google, Wikipedia, nor the creators of the Wikipedia word frequency project cited above endorses this project.
A repository documenting my daily problem solving to prepare for Google interviews 😅
Many of the problems solved are just done as a daily practice. But for UVa problems, they are listed in a book called Competitive Programming 3 by Steven & Felix Halim and i’m solving them while reading the book.
I’m also writing a documentation for the different algorithms and datastructures used: Documentation link.
api: Query of GraphQL API
apollo: Configuration of Apollo Client and connect to Apollo Server
components: Components used in the project
config: Urls and Ports used in the project
constants: Constants value and action types
contexts: Providers for Context API
css: Styles and fonts
helpers: Helper functions
options: All of options used for dropdown and selecbox component
pages: pages of sites
public: Images and gifs and static files
reducers: Reducers for Context API
Structures
Main file address: app/index.tsx
How to Use:
yarn install && yarn start
Runs the app in the development mode.
Open http://localhost:3000 to view it in the browser.
The page will reload if you make edits.
You will also see any lint errors in the console.
yarn build
Builds the app for production to the build folder.
It correctly bundles React in production mode and optimizes the build for the best performance.
The build is minified and the filenames include the hashes.
Your app is ready to be deployed!
See the section about deployment for more information.
Testing
yarn test
Launches the test runner in the interactive watch mode.
See the section about running tests for more information.
SwiftSummarize is the easiest way to create a summary from a String. Internally it’s a simple wrapper around CoreServices SKSummary
Before
Here’s to the crazy ones. The misfits. The rebels. The troublemakers. The round pegs in the square holes. The ones who see things differently. They’re not fond of rules. And they have no respect for the status quo. You can quote them, disagree with them, glorify or vilify them. About the only thing you can’t do is ignore them. Because they change things. They push the human race forward. And while some may see them as the crazy ones, we see genius. Because the people who are crazy enough to think they can change the world, are the ones who do.
After
Because the people who are crazy enough to think they can change the world, are the ones who do
Install
Add this url to your dependencies:
https://github.com/StefKors/SwiftSummarize
Example
letinput="""Here's to the crazy ones. The misfits. The rebels. The troublemakers. Theround pegs in the square holes. The ones who see things differently. They're notfond of rules. And they have no respect for the status quo. You can quote them,disagree with them, glorify or vilify them. About the only thing you can't do is ignorethem. Because they change things. They push the human race forward. And while somemay see them as the crazy ones, we see genius. Because the people who are crazyenough to think they can change the world, are the ones who do. """letsummary=Summary(text, numberOfSentences:1)print(summary.output)
// Because the people who are crazy enough to think they can change the world, are the ones who do
Or use it directly on Strings with the extension
letinput="""Here's to the crazy ones. The misfits. The rebels. The troublemakers. Theround pegs in the square holes. The ones who see things differently. They're notfond of rules. And they have no respect for the status quo. You can quote them,disagree with them, glorify or vilify them. About the only thing you can't do is ignorethem. Because they change things. They push the human race forward. And while somemay see them as the crazy ones, we see genius. Because the people who are crazyenough to think they can change the world, are the ones who do. """letoutput= input.summarize(numberOfSentences:1)print(output)
// Because the people who are crazy enough to think they can change the world, are the ones who do
The pado app provides a Hazelcast Portable class generator and CSV file import tools for Hazelcast. This bundle includes step-by-step instructions for ingesting mock data and UCI Machine Learning datasets into Hazelcast. It also includes a Pado scheduler demo that automates scheduled job executions for exporting and importing data from databases.
❗️ The Pado scheduler currently does not support Cygwin.
Use Case
This use case introduces Pado for ingesting CSV file contents in the form of VersionedPortable objects into a Hazelcast cluster.
Bundle Contents
apps└── padodocker└── mysql
Building Pado
cd_app pado/bin_sh
./build_app
The build_app script builds and deploys Pado in the pado app directory. You can check the directory contents as follows, where <version> is the Pado version.
ls ../pado_<version>
Pado CSV data Directory
The Pado CSV data directory structure includes the import directory where you place the CSV files to import and the schema directory in which you provide schema files that define how to parse the CSV files. Pado automatically moves the successfully imported files from the import directory to the processed directory. It moves the unsuccessful ones in the error directory.
data├── error├── import├── processed└── schema
Running Pado CSV Importer
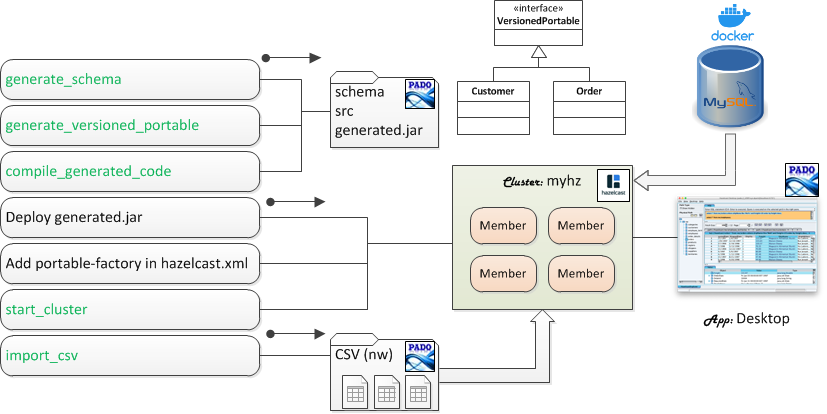
The Pado CSV importer facility automatically generates schema files, generates and compiles VersionedPortable classes, and imports CSV file contents into Hazelcast in the form of VersionedPortable objects. The imported data can then be viewed using the desktop app. These steps are shown in sequence below.
Place CSV files in the data/import/ directory.
Generate schema files using the CSV files in data/import/.
Generate VersionedPortable source code.
Compile and create a VersionedPortable jar file.
Deploy the generated jar file to a Hazelcast cluster and add the Portable factory class in hazelcast.xml.
Start a Hazelcast cluster.
Import CSV files.
View imported data using the desktop app.
NW Demo
For our demo, let’s import the NW sample data included in the Pado distribution into Hazelcast. To import data in CSV files, you need to first generate schema files. Pado provides the generate_schema command which auto-generates schema files based on CSV file contents. Once you have schema files ready, then you can generate Hazelcast VersionedPortable classes by executing the generate_versioned_portable command.
Create a Hazelcast cluster.
For our demo, we will use the default cluster, myhz, which can be created as follows.
create_cluster -product hazelcast -cluster myhz
Change directory to the pado directory and copy the NW CSV files to the import directory.
cd_app pado
cd pado_<version># Copy CSV files into data/import
cp -r data/nw/import data/
Generate schema files.
Generate schema files for the nw data
# Generate schema files. The following command generates schema files in the# data/schema/generated directory.
cd_app pado
cd pado_<version>cd bin_sh/hazelcast
./generate_schema
# Move the generated schema files to data/schema.
mv ../../data/schema/generated/* ../../data/schema/
❗️ If generate_schema fails due to a Java path issue, then you can set JAVA_HOME in the setenv.sh file as shown below.
# pado_<version>/bin_sh/setenv.sh
vi ../setenv.sh
Generate VersionedPortable source code. The following command reads schema files located in data/schema/ and generates the corresponding `VersionedPortable Java source code.
# Generate VersionedPortable classes with the factory ID of 30000 and the# start class ID of 30000.
./generate_versioned_portable -fid 30000 -cid 30000
Compile and create jar file.
./compile_generated_code
Deploy the generated jar file to a Hazelcast cluster and add the Portable factory class ID in hazelcast.xml.
# Copy the jar file to the padogrid workspace plugins directory
cp ../../dropins/generated.jar $PADOGRID_WORKSPACE/plugins/
# Add the Portable factory class ID in hazelcast.xml
switch_cluster myhz
# In hazelcast.xml, add the serialization configuration outputted by# the generate_versioned_portable command in step 3.
vi etc/hazelcast.xml
Find the <serialization> element in ect/hazelast.xml and add the <portable-factory> element shown below.
If you are using WSL without the X Server then set the correct Windows JAVA_HOME path run ‘desktop.bat’ as follows.
# Change directory where the Windows scripts are located.cd bin_win
# Set Windows JAVA_HOME path. If it's already set gobally then you do not need to# set it again in setenv.bat
vi setenv.bat
# Run desktop from WSL
cmd.exe /c desktop.bat
Dataset Examples
The following links provide Pado instructions for ingesting downloadable datasets.
Pado includes an ETL scheduler that automates exporting data from databases and importing them into Hazelcast clusters. You create and schedule jobs in JSON to periodically export data from any databases via JDBC. Each job defines the required JDBC connectivity and driver information and one or more grid paths (map names) with their query strings and scheduled time information.
Once you have created jobs, you can run them immediately without having the scheduler enabled. This allows you to quickly test your configurations but more importantly, generate the required schema files. You would generate the schema files in the same way as you did in the NW Demo section. The default scheduler directory is data/scheduler and has the same hierarchy as the CSV data directory described previously in the Pado CSV data Directory section.
To use the Pado scheduler, you need to encrypt the password as follows. Copy the encrypted password, which we will insert in the job file in step 6.
cd_app pado
cd pado_<version>/bin_sh/tools
./encryptor
Copy the scheduler template directory and create jobs that dump database tables to CSV files.
# Copy the entire template scheduler directory
cd_app pado
cd pado_<version>
cp -r data/template/scheduler data/

# IMPORTANT: Remove the files that came with the template. We don't need them.
rm data/scheduler/etc/*
rm data/scheduler/schema/*
Create the mysql.json file.
cd data/scheduler/etc
vi mysql.json
Enter query information in the mysql.json file as shown below. Copy/paste the encrypted database password in the file. Set the GridId attribute to the Hazelcast cluster name. Set the Path attributes to the map names.
Note that serverTimezone is set to America/New_York for the JDBC URL. Without it, you may see the following exception if your MySQL uses the system timezone and unable to calculate the dates due to the leap year.
We have configured two (2) jobs in the mysql.json file. The first job downloads the customers table every midnight and the second job downloads the orders table every hour. We could have configured with more practical queries like downloading just the last hour’s worth of orders, for example. For the demo purpose, let’s keep it simple and fluid. Our main goal is to ingest the database data into Hazelcast.
We need to create the schema files for properly reading and transforming CSV file contents to Hazelcast objects. We can manually create the schema files or simply generate them. To generate the schema files, we need CSV files. This is done by executing the import_scheduler -now command which generates CSV files without scheduling the jobs in the default directory, data/scheduler/import.
cd_app pado
cd pado_<version>/bin_sh/hazelcast
./import_scheduler -now
Generate schema files using the downloaded data files.
# Exit Hazelcast Desktop# Stop Hazelcast cluster
stop_cluster
# Stop MySQL container
cd_docker mysql
docker compose down
About Pado
Pado is authored by Dae Song Park (email:dspark@netcrest.com) to bring linear scalability to IMDG for storing Big Data. His architecture achieves this by logically federating data grids and providing an abstract API layer that not only hides the complexity of the underlying IMDG API but introduces new Big Data capabilities that IMDG products lack today. He coined the terms grids within grid and grid of grids to illustrate his architecture which spans in-memory data across a massive number of clusters with a universal namespace similar to URL for easy data access.
Pado for Geode 1.x and GemFire 9.x is part of PadoGrid and installed by running install_padogrid -product pado.
The pado app provides a Hazelcast Portable class generator and CSV file import tools for Hazelcast. This bundle includes step-by-step instructions for ingesting mock data and UCI Machine Learning datasets into Hazelcast. It also includes a Pado scheduler demo that automates scheduled job executions for exporting and importing data from databases.
❗️ The Pado scheduler currently does not support Cygwin.
Use Case
This use case introduces Pado for ingesting CSV file contents in the form of VersionedPortable objects into a Hazelcast cluster.
Bundle Contents
apps└── padodocker└── mysql
Building Pado
cd_app pado/bin_sh
./build_app
The build_app script builds and deploys Pado in the pado app directory. You can check the directory contents as follows, where <version> is the Pado version.
ls ../pado_<version>
Pado CSV data Directory
The Pado CSV data directory structure includes the import directory where you place the CSV files to import and the schema directory in which you provide schema files that define how to parse the CSV files. Pado automatically moves the successfully imported files from the import directory to the processed directory. It moves the unsuccessful ones in the error directory.
data├── error├── import├── processed└── schema
Running Pado CSV Importer
The Pado CSV importer facility automatically generates schema files, generates and compiles VersionedPortable classes, and imports CSV file contents into Hazelcast in the form of VersionedPortable objects. The imported data can then be viewed using the desktop app. These steps are shown in sequence below.
Place CSV files in the data/import/ directory.
Generate schema files using the CSV files in data/import/.
Generate VersionedPortable source code.
Compile and create a VersionedPortable jar file.
Deploy the generated jar file to a Hazelcast cluster and add the Portable factory class in hazelcast.xml.
Start a Hazelcast cluster.
Import CSV files.
View imported data using the desktop app.
NW Demo
For our demo, let’s import the NW sample data included in the Pado distribution into Hazelcast. To import data in CSV files, you need to first generate schema files. Pado provides the generate_schema command which auto-generates schema files based on CSV file contents. Once you have schema files ready, then you can generate Hazelcast VersionedPortable classes by executing the generate_versioned_portable command.
Create a Hazelcast cluster.
For our demo, we will use the default cluster, myhz, which can be created as follows.
create_cluster -product hazelcast -cluster myhz
Change directory to the pado directory and copy the NW CSV files to the import directory.
cd_app pado
cd pado_<version># Copy CSV files into data/import
cp -r data/nw/import data/
Generate schema files.
Generate schema files for the nw data
# Generate schema files. The following command generates schema files in the# data/schema/generated directory.
cd_app pado
cd pado_<version>cd bin_sh/hazelcast
./generate_schema
# Move the generated schema files to data/schema.
mv ../../data/schema/generated/* ../../data/schema/
❗️ If generate_schema fails due to a Java path issue, then you can set JAVA_HOME in the setenv.sh file as shown below.
# pado_<version>/bin_sh/setenv.sh
vi ../setenv.sh
Generate VersionedPortable source code. The following command reads schema files located in data/schema/ and generates the corresponding `VersionedPortable Java source code.
# Generate VersionedPortable classes with the factory ID of 30000 and the# start class ID of 30000.
./generate_versioned_portable -fid 30000 -cid 30000
Compile and create jar file.
./compile_generated_code
Deploy the generated jar file to a Hazelcast cluster and add the Portable factory class ID in hazelcast.xml.
# Copy the jar file to the padogrid workspace plugins directory
cp ../../dropins/generated.jar $PADOGRID_WORKSPACE/plugins/
# Add the Portable factory class ID in hazelcast.xml
switch_cluster myhz
# In hazelcast.xml, add the serialization configuration outputted by# the generate_versioned_portable command in step 3.
vi etc/hazelcast.xml
Find the <serialization> element in ect/hazelast.xml and add the <portable-factory> element shown below.
If you are using WSL without the X Server then set the correct Windows JAVA_HOME path run ‘desktop.bat’ as follows.
# Change directory where the Windows scripts are located.cd bin_win
# Set Windows JAVA_HOME path. If it's already set gobally then you do not need to# set it again in setenv.bat
vi setenv.bat
# Run desktop from WSL
cmd.exe /c desktop.bat
Dataset Examples
The following links provide Pado instructions for ingesting downloadable datasets.
Pado includes an ETL scheduler that automates exporting data from databases and importing them into Hazelcast clusters. You create and schedule jobs in JSON to periodically export data from any databases via JDBC. Each job defines the required JDBC connectivity and driver information and one or more grid paths (map names) with their query strings and scheduled time information.
Once you have created jobs, you can run them immediately without having the scheduler enabled. This allows you to quickly test your configurations but more importantly, generate the required schema files. You would generate the schema files in the same way as you did in the NW Demo section. The default scheduler directory is data/scheduler and has the same hierarchy as the CSV data directory described previously in the Pado CSV data Directory section.
To use the Pado scheduler, you need to encrypt the password as follows. Copy the encrypted password, which we will insert in the job file in step 6.
cd_app pado
cd pado_<version>/bin_sh/tools
./encryptor
Copy the scheduler template directory and create jobs that dump database tables to CSV files.
# Copy the entire template scheduler directory
cd_app pado
cd pado_<version>
cp -r data/template/scheduler data/

# IMPORTANT: Remove the files that came with the template. We don't need them.
rm data/scheduler/etc/*
rm data/scheduler/schema/*
Create the mysql.json file.
cd data/scheduler/etc
vi mysql.json
Enter query information in the mysql.json file as shown below. Copy/paste the encrypted database password in the file. Set the GridId attribute to the Hazelcast cluster name. Set the Path attributes to the map names.
Note that serverTimezone is set to America/New_York for the JDBC URL. Without it, you may see the following exception if your MySQL uses the system timezone and unable to calculate the dates due to the leap year.
We have configured two (2) jobs in the mysql.json file. The first job downloads the customers table every midnight and the second job downloads the orders table every hour. We could have configured with more practical queries like downloading just the last hour’s worth of orders, for example. For the demo purpose, let’s keep it simple and fluid. Our main goal is to ingest the database data into Hazelcast.
We need to create the schema files for properly reading and transforming CSV file contents to Hazelcast objects. We can manually create the schema files or simply generate them. To generate the schema files, we need CSV files. This is done by executing the import_scheduler -now command which generates CSV files without scheduling the jobs in the default directory, data/scheduler/import.
cd_app pado
cd pado_<version>/bin_sh/hazelcast
./import_scheduler -now
Generate schema files using the downloaded data files.
# Exit Hazelcast Desktop# Stop Hazelcast cluster
stop_cluster
# Stop MySQL container
cd_docker mysql
docker compose down
About Pado
Pado is authored by Dae Song Park (email:dspark@netcrest.com) to bring linear scalability to IMDG for storing Big Data. His architecture achieves this by logically federating data grids and providing an abstract API layer that not only hides the complexity of the underlying IMDG API but introduces new Big Data capabilities that IMDG products lack today. He coined the terms grids within grid and grid of grids to illustrate his architecture which spans in-memory data across a massive number of clusters with a universal namespace similar to URL for easy data access.
Pado for Geode 1.x and GemFire 9.x is part of PadoGrid and installed by running install_padogrid -product pado.
This C program calculates Swatch Internet Time, a revolutionary concept that could have changed how people measure time. <insert sarcasm flag here> In this alternate reality where Internet Time became the global standard, this tool would be essential for daily time management!
Internet Time divides the day into 1000 ‘beats’, abolishing time zones and providing a universal time for everyone.
Features
Real-time Beat Calculation: Current beat (@) based on Internet Time
Advanced Time Conversion: Convert beats back to standard time
Perfect Integration: Works seamlessly with tmux, status bars, and scripts
Installation
Prerequisites
C compiler (GCC, Clang, or similar)
Make (optional, for easier building)
Quick Build
git clone <repository-url>cd internet_time
make
Development Build (with debug symbols)
make debug
System Installation
make install # Install to /usr/local/bin (requires sudo)# or
PREFIX=$HOME/.local make install # Install to user directory
Usage
Basic Usage
# Current Internet Time
./internet_time
# Output: @347.22# With timezone offset (+3 hours)
./internet_time -t 3
# Output: @472.45# Using local time
./internet_time -l
# Output: @123.78
Advanced Features
# Convert beats to standard time
./internet_time -b 500
# Output: @500.00 = 12:00:00 BMT (Biel Mean Time)# Verbose output with details
./internet_time -v
# Output: Detailed time breakdown with context# Show Internet date
./internet_time -d
# Output: Internet Date: 2024.215 (Year 2024, Day 215)# Watch mode (updates every second)
./internet_time -w
# Output: Continuous real-time updates# Custom format (zero-padded integer)
./internet_time -f '@%04.0f'# Output: @0347
Practical Examples
# Status bar integration
./internet_time -f '%04.0f'# Clean format for bars# Time zone conversion
./internet_time -t -5 # Eastern Standard Time
./internet_time -t 9 # Japan Standard Time# Business meeting scheduler
./internet_time -v # Get full context for scheduling
A simple Go package for converting HTML content to PDF using the chromedp package under the hood. The package supports concurrent PDF generation through a worker pool system.
Features
Concurrent HTML to PDF conversion using Chrome/Chromium
Configurable worker pool size
Customizable PDF output settings (page size, margins, etc.)
Support for waiting for page load and animations
Automatic retry mechanism for failed conversions
Debug logging option
Resource cleanup with graceful shutdown
Installation
go get github.com/xarunoba/html2pdf-go
Ensure you have Chrome or Chromium installed on your system.
Usage
Basic Usage
package main
import (
"context""log""os""github.com/xarunoba/html2pdf-go"
)
funcmain() {
// Create a new converter with default optionsconverter, err:=html2pdf.New()
iferr!=nil {
log.Fatal(err)
}
deferconverter.Close()
// HTML content to converthtml:=` <!DOCTYPE html> <html> <body> <h1>Hello, World!</h1> </body> </html> `// Convert HTML to PDFctx:=context.Background()
pdf, err:=converter.Convert(ctx, html)
iferr!=nil {
log.Fatal(err)
}
// Save the PDFiferr:=os.WriteFile("output.pdf", pdf, 0644); err!=nil {
log.Fatal(err)
}
}
For more usage examples, please check the examples directory.
Configuration Options
Converter Options
Option
Description
Default
WithWorkers
Number of concurrent Chrome tabs
1
WithTimeout
Maximum time for conversion
60 seconds
WithRetryAttempts
Number of retry attempts
3
WithRetryDelay
Delay between retries
1 second
WithDebug
Enable debug logging
false
PDF Options
Option
Description
Default
WithPaperSize
Page width and height (inches)
8.5 x 11
WithMargins
Page margins (inches)
0.5 all sides
WithWaitForLoad
Wait for page to load
true
WithWaitForAnimations
Animation completion wait time
500ms
WithWaitTimeout
Maximum wait time
60s
Considerations
This package uses Chrome/Chromium for PDF generation, which provides excellent CSS support and rendering accuracy but may not be the fastest solution for high-volume processing.
Memory usage scales with the number of workers, as each worker maintains a Chrome tab.
Performance can vary based on system resources, document complexity, and whether the HTML contains external resources.
For production environments, consider running benchmarks to determine optimal worker pool size for your use case.
Requirements
Go 1.23 or later
Chrome or Chromium browser installed on the system