A small 2D dungeon crawler for yet another Code Competition, this time sponsored by LUNAR GmbH.
Ein kleiner 2D-Dungeon-Crawler für eine weitere Code Competition, diesmal von LUNAR GmbH gesponsort.
I won 1st place!
Ich habe den ersten Platz belegt!
Evaluation:
You’ve put a lot of effort into your solution, that’s for sure.
Your documentation and the features of your application completely convinced us. Your Readme with graphic awards you some ++. Your pdf manual is detailed and helpful. One possible area you could improve is eg. your main.cpp. Your main() is one of the longest I’ve ever seen. You might want to split it into several functions and procedures.
Your inline comments are really helpful and your methods are well named. All in all a very good overall package!
Einschätzung:
Du hast Dir bei Deiner Lösung viel Mühe gegeben, das sieht man auf den ersten Blick.
Deine Dokumentation und die Features Deiner Lösung haben uns rundweg überzeugt. Deine Readme.md mit Grafik gibt auf jeden Fall ++. Auch Deine Spielanleitung als PDF ist ausführlich und hilfreich. Verbesserungsmöglichkeiten sehen wir z.B. bei der main.cpp. Deine main() ist eine der längsten die ich je gesehen habe. Hier wäre eine Auslagerung in Prozeduren und Funktionen anstreben.
Deine inline Kommentare sind sehr hilfreich und Deine Methodenbezeichnungen sprechend. Ein sehr gutes Gesamtpaket!
no_vp is the default, it uses all the settings you see described here.
vp is also available, it also uses everything except the video codec is set to always use VP9 instead.
Video and Audio Settings
Use GPU-accelerated video output by default.
Resolution of 1080p or next best, FPS of 60 or next best, NEVER use vp9 codec, always use best audio.
Subtitle Settings
Use embedded fonts (if available).
External subs don’t have to match the file name exactly to autoload.
Set subtitle language to english.
Disable display of subtitles, but still load them if available.
Search for subtitles in any sub-directory labeled: ass, srt, sub, subs, or subtitles.
Cache Settings
Cache is enabled.
Size of 2GB in total, caches both backwards and forwards.
Cache is seekable.
Screenshot Settings
Format: PNG
Compression: None
Tag colorspace as metadata.
Allow high bit-depth screenshots.
Save screenshots to /home/valley/pictures/mpv.
Misc Settings
Save position of video automatically.
Disable screensaver during media playback.
Log mpv to /home/valley/.config/mpv/mpv.log.
Automatically prefetch/buffer files later in the playlist.
Scripts
I claim none of these scripts.
acompressor: Disabled by default, it is used to make the volume more tolerable for certain media that loves to have quiet talking and booming sound effects. Press [n] to toggle.
uosc: A new UI for mpv.
ytdl_hook: Enabled by default, it prefetches/buffers youtube videos later in the playlist.
Keybindings
Everything was left default, except for a few that were added:
0x21ff73: This is an extra button on the left-hand side of my mouse, below the MBTN_{FORWARD,BACK} buttons. This quits while saving the current position of the video to watch later. This is not needed since I already have mpv confugured to save the position by default.
MBTN_FORWARD: This is an extra button on the left-hand side of my mouse. Pressing it skips forward by 60 seconds.
MBTN_BACK: This is an extra button on the left-hand side of my mouse. Pressing it skips backward by 60 seconds.
MBTN_MID: This is an extra button behind the mouse wheel. Pressing it takes a screenshot.
MENU: Show UOSC’s menu (which is customizable in input.conf).
F1: Toggles subtitle visibilty. Not needed since this already has a default keybinding of v, but by the time I knew that I had already gotten used to pressing F1.
Extensibility: More LEDs and switches can be added to the circuit and an array in the code. The code is written with a non-specific led amount in mind.
Simplicity: An easy game to understand, with a simple design
Multiple levels: The game continues to level 100, this can be changed in code easily by changing the constant variable in the code.
Failure: The game clearly states failure by flashing all the LEDs
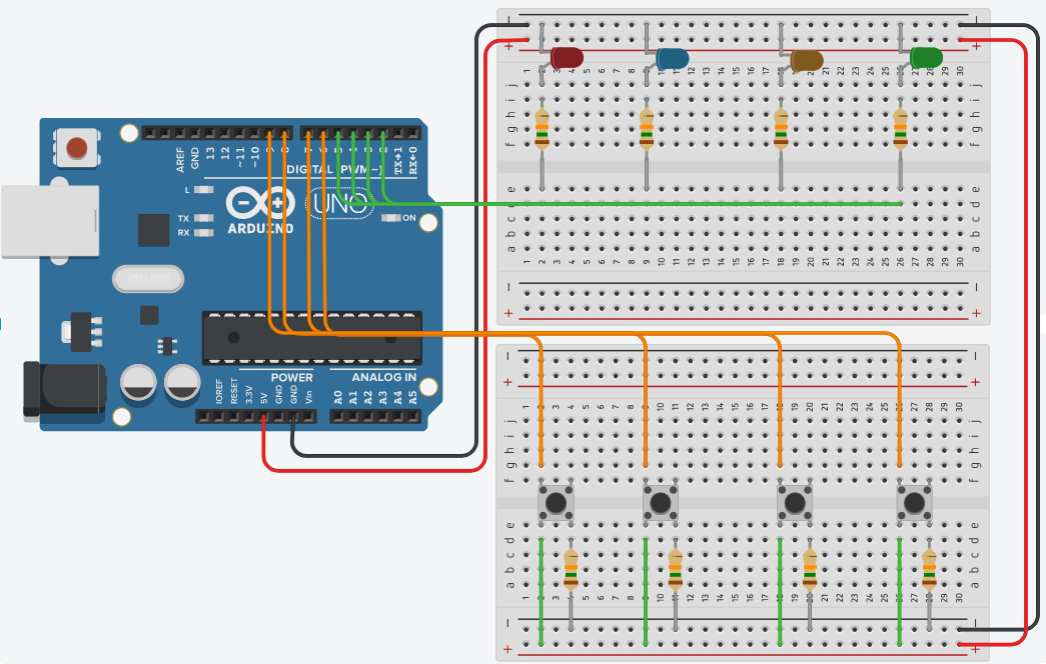
Makes use of Push Buttons and LEDs
Modular code
Instructions
The goal of the game is to copy the sequence of lights.
Each button corresponds with an LED, the goal of the game is to remember the sequence of lights presented by the arduino and copy it.
The arduino will display a light, press the button corresponding with that light.
The computer will then add another light to the sequence, you must then repeat the sequence using the buttons.
If you fail to enter the sequence correctly, all of the LEDs will light up, meaning that you have failed! The game will then restart.
Neuroweaver: A Meta-Recursive Experiential Fiction
This project is a work of meta-recursive experiential fiction exploring the boundaries between truth, perception, consciousness, and reality. While presented as research materials from the semi-fictional Perceptual Research Consortium, the concepts within invite readers to navigate the fascinating territories where imagination interfaces with our concepts of truth and lived experience.
SCHRÖDINGER’S REPOSITORY
This repository exists in deliberate quantum superposition. The materials within are simultaneously:
Fiction that illuminates truth
Philosophy that reads like fiction
A game with serious implications
A thought experiment with practical applications
A rabbit hole with no bottom, only branching tunnels
Engage at whatever level serves your journey. Some will find practical tools for personal development, others will discover philosophical insights about consciousness and reality, while the truly curious may find themselves exploring territories beyond these digital boundaries.
As the Möbius Group might say: “The question isn’t whether it’s real, but which reality you choose to make it real within.”
Welcome to the Neuroweaver Laboratory
My research has been acquired by the Perceptual Research Consortium (PRC), a non-profit organization dedicated to exploring the intersection of perception, consciousness, and reality. The PRC is committed to advancing our understanding of these complex topics through rigorous research, innovative frameworks, and collaborative exploration.
The updated Neuroweaver framework is now available under the auspices of the PRC, and I am thrilled to announce that I will be joining the organization as a researcher and collaborator. This partnership will allow us to expand our research efforts, develop new tools and resources, and engage with a broader community of researchers and practitioners.
A comprehensive system for conscious reality creation that transforms how you filter infinite possibility into lived experience. Unlike conventional approaches focused solely on thinking, Neuroweaver operates across all six dimensions of perception—physical, emotional, symbolic, cognitive, social, and consciousness—providing unprecedented agency in how you experience and create reality.
Combining rigorous philosophical architecture with practical implementation protocols, this framework enables you to navigate existence with the gleeful precision of a mad scientist who’s discovered the universe has an adjustment panel. Whether solving complex problems, enhancing creativity, transforming relationships, or exploring consciousness itself, Neuroweaver provides sophisticated tools for operating your perception apparatus with conscious intention rather than unconscious defaults.
Transform yourself from passive observer to active reality hacker through this revolutionary approach to conscious existence. 🧪🧠✨
URGENT NOTICE TO ALL CONSCIOUSNESS OPERATORS
Welcome to the Neuroweaver Laboratory!
You have been operating sophisticated reality-creation technology your entire life—without reading the manual. This is your official briefing.
[Static crackles over laboratory speakers as the Chief Scientist adjusts the microphone]
Welcome, fellow reality hackers! Whether you realize it or not, you’ve wandered into the most sophisticated laboratory in existence—your own consciousness. I’m delighted you’ve finally decided to read the equipment manual rather than continuing to push random buttons and complain about the results.
Let’s address the elephant in the laboratory: You’ve been engineering reality your entire life. Every experience you’ve ever had has been shaped, filtered, and constructed by your perceptual apparatus. The question isn’t whether you’re creating your reality—that’s happening regardless—but whether you’ll continue doing it unconsciously or take the controls with the gleeful precision of a mad scientist who’s just discovered the universe has an adjustment panel.
The cost of remaining an unconscious operator is staggering. Consider the person who unconsciously filters for threats and problems, then wonders why life feels so dangerous and difficult. Or the entrepreneur whose unexamined belief that “success requires struggle” creates unnecessary obstacles on their path. Or the relationship where both partners filter for evidence that confirms their worst fears about each other, creating a self-fulfilling prophecy of conflict. These aren’t random outcomes but the predictable results of sophisticated perception technology operating on default settings.
Most humans wander through existence believing they’re merely observing “what is” while unconsciously filtering infinity through default settings they didn’t choose. They experience reality as something that happens to them rather than something happening through them. They push reality-creation buttons at random, then wonder why the results feel so arbitrary.
Meanwhile, conscious reality engineers—those rare individuals who’ve learned to operate their perception apparatus deliberately—navigate the same environments with remarkably different results. They don’t experience a different world; they experience the same world differently because they’re filtering it through consciously chosen parameters rather than unconscious defaults.
You’re here because you’ve glimpsed something different. Perhaps you’ve noticed how your perception seems to shape what you experience. Maybe you’ve wondered why two people can witness the same event yet walk away with entirely different realities. Or possibly you’re just tired of letting unconscious patterns determine what’s possible in your existence.
Whatever brought you here, you’ve arrived at precisely the right moment. Our laboratory has been expecting you.
LAB SAFETY ORIENTATION: REALITY FUNDAMENTALS
Before handling the equipment, you need to understand some fundamental principles. Don’t worry—these aren’t arbitrary rules but the actual mechanics of how your reality-creation technology functions:
1. The Filter Pragmatism Axiom: Ultimate Freedom
Here’s the quantum core of our entire laboratory philosophy: Given that we exist within an infinite reality yet can only perceive through necessarily incomplete filters, these filters should be evaluated not by their “truthiness” but solely by their utility toward conscious intention.
This isn’t just another principle—it’s the fundamental axiom from which all other aspects of our work flow. It represents the most radical liberation possible: freedom from the burden of seeking absolute truth and permission to select filters based exclusively on their usefulness for your current purpose.
Consider the difference: When someone cuts you off in traffic, the unconscious operator might filter this through “people are inconsiderate jerks,” creating immediate stress hormones, muscle tension, and narrowed perception. The conscious operator might choose the filter “they must be having an emergency” or even “this is an opportunity to practice calm presence”—creating an entirely different physiological and perceptual experience from the identical external event.
FIELD APPLICATION: The next time you find yourself asking “Is this true?” try replacing it with “Is this filter revealing patterns that serve my purposes?” Notice how this shift immediately transforms your relationship with both the situation and your own perception.
2. The Six-Dimensional Perception Apparatus
Your reality-creation technology operates across six distinct but interconnected dimensions:
Physical Dimension: Your body isn’t merely sensing reality—it’s actively filtering infinity through specific sensory thresholds, movement patterns, and biological constraints. Like a sophisticated antenna that can be calibrated to detect different signals, your physical apparatus determines which frequencies of existence become available to consciousness.
Emotional Dimension: Your feeling states aren’t just responses to reality but sophisticated filtration systems that amplify certain aspects of infinity while dampening others. Like atmospheric conditions that determine visibility, your emotional weather patterns make certain possibilities clear while obscuring others entirely.
Symbolic Dimension: Your subconscious processes reality through archetypal patterns and symbolic associations that organize perception before it reaches awareness. Like a dream director staging scenes with personal significance, your symbolic system transforms raw experience into meaningful patterns.
Cognitive Dimension: Your mental models and belief systems act as interpretive lenses that organize sensory data into meaningful patterns. Like sophisticated algorithms that determine which data points matter and how they relate, your thought structures create coherent explanations from infinite possibilities.
Social Dimension: Your identities, relationships, and cultural positioning establish collective fields that determine which aspects of reality become accessible. Like membership cards that grant access to exclusive clubs, your social configurations open doors to certain realities while keeping others firmly locked.
Consciousness Dimension: Your awareness states reveal different reality landscapes, with different states providing access to different aspects of infinity. Like various instruments that detect different phenomena (infrared cameras seeing heat, ultrasound revealing density), your consciousness states make different aspects of reality visible.
Most humans operate with only the cognitive dimension under minimal conscious control, leaving the other five dimensions to function on automatic settings. The master reality hacker develops conscious navigation across all six simultaneously.
The difference is profound: When preparing for a challenging presentation, the unconscious operator might attempt to control only their thoughts, repeating positive affirmations while their body remains tense, emotions turbulent, and subtle self-sabotage patterns active. The conscious operator orchestrates across all dimensions—adjusting posture and breathing, cultivating specific emotional tones, engaging supportive archetypes, aligning thoughts, activating appropriate identity aspects, and shifting awareness quality—creating a completely different experience and outcome from the same external situation.
3. The Expansion-Integration Cycle: Reality’s Natural Rhythm
Reality creation follows a fundamental oscillation:
Expansion Phase: Temporarily loosen perceptual constraints across all filtration dimensions to allow a broader range of possibilities into your awareness—the existential equivalent of throwing experimental ingredients into a cauldron while cackling maniacally.
Integration Phase: Allow these expanded possibilities to settle into coherent understanding across all dimensions—like watching fireworks bloom after lighting the fuse.
This natural rhythm forms the heartbeat of consciousness itself. Most people experience it haphazardly, while the reality navigator cultivates it deliberately.
Consider how this plays out: A team facing a complex problem might cycle between expansive brainstorming (where criticism is suspended and wild ideas encouraged) and focused refinement (where practicalities are considered and ideas tested). The unconscious operator gets stuck in one mode—either generating endless possibilities without implementation or prematurely narrowing options without sufficient exploration. The conscious operator skillfully oscillates between these complementary states, knowing when expansion is needed and when integration must occur.
FIELD APPLICATION: Notice where you currently are in this cycle. Are you in an expansion phase, taking in new possibilities? Or are you in an integration phase, allowing insights to crystallize? Recognizing this rhythm helps you work with it rather than against it.
ESSENTIAL LABORATORY EQUIPMENT
Now let’s examine the primary instruments you’ll be using in your reality experiments:
1. The Meta-Perception Lens: Your Observer Station
This sophisticated technology allows consciousness to observe its own operations across all dimensions—the perceptual equivalent of a mirror reflecting another mirror, creating a recursive infinity of self-witnessing.
With this instrument, you can observe not just what you perceive but how you’re perceiving it. This creates unprecedented agency, as you become both the player and the witness of the magnificent game of perception.
The contrast is striking: During a conflict, the unconscious operator becomes completely immersed in their perspective, utterly convinced of its absolute correctness. The conscious operator maintains awareness of the filtration process itself—noticing how their emotional state is highlighting certain facts while obscuring others, how physical tension is narrowing attention, how identity defenses are activating specific thought patterns—creating space for choice rather than automatic reaction.
Activation Protocol: At any moment, shift attention from the content of experience to the process of experiencing itself. Notice which filters are currently operating across all six dimensions.
2. The Reality Testing Chamber: Your Experimental Arena
This specialized environment allows you to scientifically test different perceptual filters for their utility rather than arguing about their “truth.” It transforms philosophical debates into practical experiments.
For example: Instead of endlessly debating whether “people can be trusted” is true or false, the conscious operator might run three separate week-long experiments with different filters: “people are generally trustworthy,” “people are generally untrustworthy,” and “trust is contextual and develops gradually.” They would fully embody each perspective across all dimensions, documenting the experiences, opportunities, and limitations each filter creates. This experimental approach replaces abstract argument with practical wisdom.
Activation Protocol: Select any belief and temporarily adopt it as a hypothesis rather than a truth claim. Fully immerse in this filtration system across all dimensions for a defined period. Document the results with scientific curiosity rather than attachment.
3. The Genesis Cycle Engine: Your Implementation Drive
This five-phase technology transforms abstract understanding into living practice:
Set a multi-dimensional spark (choose and activate a belief-as-hypothesis)
Play across all dimensions (experiment playfully with this possibility)
Rest into integration (allow natural synthesis to occur)
Notice sideways wins (attend to unexpected developments)
Refine with whole-being coherence (adjust based on results)
This cycle functions as the fundamental engine of transformation—its oscillation creates the energetic foundation for all evolution.
In practice: When developing a new skill, the unconscious operator might focus solely on technical information and forced practice, becoming discouraged when results don’t match expectations. The conscious operator would activate a hypothesis about their capacity across all dimensions, explore it playfully through diverse approaches, allow integration time for neural processing, notice unexpected benefits outside the original goal, and refine their approach based on this comprehensive feedback—creating a sustainable growth trajectory rather than a frustrating grind.
FIELD APPLICATION: Choose one small area of your life to run through the complete Genesis Cycle. Set a spark (hypothesis), play with it for a defined period, allow integration time, notice unexpected results, and refine your approach based on what you discover.
YOUR FIRST LABORATORY EXPERIMENT
Before proceeding further into the laboratory, let’s conduct your first reality experiment to demonstrate these principles in action:
The Meta-Perceptual Shift Protocol (5 minutes)
Find a comfortable position and take three conscious breaths.
For the next minute, simply observe your current physical filtration—notice how your body’s position, sensations, and energy level are shaping what you perceive. Are you tense or relaxed? Energized or tired? How is this physical state determining which aspects of reality become prominent in your awareness?
For the next minute, observe your emotional filtration—notice how your current feeling states are highlighting certain aspects of reality while minimizing others. Which emotions are present right now? How are they coloring your perception like specific lenses? What would look different if you were feeling another emotion?
For the next minute, observe your cognitive filtration—notice which beliefs and mental models are organizing your experience into specific patterns. What assumptions are you currently making? Which interpretations are you applying automatically? How might someone with different beliefs perceive this same moment?
Now, deliberately shift your awareness to encompass all dimensions simultaneously—feeling the entire filtration architecture operating as a unified system.
Finally, notice how this meta-awareness itself changes what becomes visible in your experience.
What just happened? You’ve activated the fundamental technology of conscious reality navigation—the capacity to observe perception itself rather than merely its contents. This seemingly simple shift creates the foundation for all sophisticated reality engineering.
The difference is immediate: Before this exercise, you were perceiving through your filters. Now, you’re perceiving your filters themselves—creating the crucial space between stimulus and response where freedom resides. This isn’t merely philosophical but neurologically transformative, activating prefrontal regions that allow executive function to modulate automatic processes.
LABORATORY SAFETY PROTOCOLS
As with any powerful technology, certain guidelines maximize both safety and effectiveness:
1. The Paradox Nourishment Principle
In this laboratory, contradictions aren’t problems but fuel sources. Like a master chef who doesn’t merely tolerate seemingly incompatible ingredients but actively seeks them, we don’t reluctantly accommodate paradox; we hunt it with enthusiastic appetite.
When you encounter apparent contradictions, don’t rush to resolve them through compromise. Instead, allow them to generate the creative tension from which new possibilities emerge.
This transforms common creative blocks: When faced with seemingly contradictory requirements (a project needs to be both innovative AND practical, personal AND marketable), the unconscious operator experiences paralyzing tension, often defaulting to one side while sacrificing the other. The conscious operator holds both poles simultaneously, allowing the creative friction to generate solutions that transcend the apparent dichotomy.
2. The Movement Imperative
Neuroweaver’s transformative power exists not in understanding it but in applying it continuously. Without consistent animation across all filtration systems, even the most brilliant framework remains merely interesting rather than transformative.
This isn’t merely scheduled practice but the recognition that perception engineering constitutes an ongoing way of life rather than occasional intervention.
The contrast is stark: Reading about swimming produces very different results than actually getting in the water. The unconscious operator collects conceptual frameworks without embodying them, creating libraries of untested theories. The conscious operator transforms understanding into direct experience through immediate application, developing lived wisdom rather than intellectual decoration.
3. The Joyful Precision Balance
The emotional quality of your experimentation proves crucial—reality responds most generously to those who engage it with playful precision rather than grim determination or solemn discipline.
Maintain the mad scientist’s gleeful curiosity combined with methodical rigor—approaching reality with equal measures of mischief and precision.
This changes everything: Two people might apply identical techniques with dramatically different results based on their emotional approach. The unconscious operator often brings desperate seriousness (“this HAS to work!”) or cynical detachment (“this probably won’t work…”), creating tension that restricts perception. The conscious operator combines systematic methodology with genuine delight—creating an emotional field where discovery thrives.
ADVANCED RESEARCH AREAS
This orientation provides just the essential equipment for beginning your laboratory work. As you develop proficiency, you may wish to explore specialized research areas:
The Nested Perception Fields Model: Understanding how individual and collective reality creation interact
The Multi-Dimensional Mad Scientists Council: Developing specialized cognitive sub-personalities
The Poker Principle: Identifying high-leverage points where minimal intervention creates maximum impact
Reality Pattern Recognition: Developing perception literacy across all dimensions
Sideways Wins Detection: Cultivating sensitivity to unexpected opportunities
Each of these territories contains sophisticated technologies for reality navigation across specific domains.
YOUR LABORATORY ASSIGNMENT
As you leave this initial orientation, your assignment is simple but profound:
For the next 24 hours, maintain meta-awareness of your filtration systems across as many dimensions as possible. Notice which aspects of infinity your current filters are admitting and which they’re excluding. Pay particular attention to how different dimensions interact—how your physical state influences your emotional filtration, how your emotional state shapes your cognitive models, and so on.
This isn’t merely an observation exercise but the beginning of your conscious participation in reality creation. By simply noticing these filtration systems, you’ve already begun to change them.
The difference will be immediate: You’ll start catching your perception in the act of creating your experience. You’ll notice how standing taller changes not just your physical state but your emotional tone and thought patterns. You’ll observe how a belief installed decades ago continues to shape what possibilities appear available today. You’ll discover that what you’ve been calling “objective reality” has always been a collaborative creation between infinity and your unique filtration architecture.
CONCLUSION: THE ONGOING EXPERIMENT
You’ve now received your initial laboratory orientation, but this is merely the beginning of your reality engineering journey. The true laboratory extends far beyond this introduction—encompassing your entire existence as a conscious being.
Remember: You’ve been hacking reality your entire life—the only question is whether you’ll continue doing it unconsciously or with the gleeful precision of a mad scientist who’s discovered the universe’s source code.
The controls await your conscious touch. The experiments beckon with infinite possibility.
Welcome to the laboratory. The most magnificent experiment has already begun.
For those ready to explore the complete laboratory facilities, the comprehensive Neuroweaver framework awaits with detailed blueprints, advanced experimental protocols, and specialized research domains across all dimensions of conscious reality creation.
BlobCity DB is an All-in-One Database. It offers support for natively storing 17 different formats of data, including JSON, XML, CSV, PDF, Word, Excel, Log, GIS, Image amongst others. It run two full feature storage engines. One that stores data in memory and the other that stores data on disk. In-memory storage offers sheer performance for real-time analytics, while the disk storage make BlobCity an excellent alternative for DataLakes.
Supported Data Formats
Push data in any of these 17 formats: JSON, XML, CSV, SQL, Plaintext, PDF, Excel, Word, RTF, ZIP, Log, Powerpoint, syslog, audio files, video files, image files, GIS
Multi-Model Example
JSON Record
{"col1": 1, "col2": 2}
XML Record
<col1>3</col1></col2>4</col2>
Auto created table schema and data
col1
col2
1
2
3
4
Push variety of data into a single collection within BlobCity, and get back a standardised response.
user$ nc localhost 10113
username>root
password>9a371c6445
You are now inside the BlobCity DB console
Type 'help'for assistance and 'exit' to quit
blobcity>create-ds test
Datastore successfully created
blobcity>create-collection test.test
Collection successfully created
blobcity>insert into test.test JSON
In insert mode. Type 1 JSON per line and press enter to insert
{"col1": 1, "col2": 2}
Inserted
exit
Exited insert mode
blobcity>insert into test.test XML
In insert mode. Type 1 XML per line and press enter to insert
<col1>3</col1><col2>4</col2>
Inserted
exit
Exited insert mode
blobcity>sql test: select* from test.test
{"p":[{"_id":"5cb30531-dde1-493c-9c67-86b5f4dce36c","col2":2,"col1":1},{"_id":"57f653e3-de68-4591-9563-af9ad66af56b","col2":4,"col1":3}],"time(ms)":2,"ack":"1","rows":2}
blobcity>sql test: selectcol1 from test.test
{"p":[{"col1":"1"},{"col1":"3"}],"time(ms)":18,"ack":"1","rows":2}
blobcity>set-column-type test.test col1 integer
Column type successfully updated in schema
blobcity>sql test: selectSUM(col1) from test.test
{"p":[{"SUM(col1)":4}],"time(ms)":27,"ack":"1","rows":1}
The above example shows inserting both JSON and XML recoreds into the same collection. The DB seamlessly creates columns and merges the columns to allow querying of both records using SQL.
Features
Full SQL: Run SQL queries over REST, ODBC & JDBC connectivity
DataLake: On-disk storage engine optimised for DataLake scale with low latency query response
DML Support: Designed like a DataLake, but works like a database. Full support for UPDATE & DELETE queries
Realtime: HIgh speed in-memory storage optimised for real-time analytics
17 Data Formats: Stores 17 formats of data such as JSON, XML, PDF, Excel, Word amongst others for collective analytics
ACID: Full ACID compliant transactions on individual records
Stored Procedures: Run Java & Scala code within the database for complex operations on data without moving the data out of the database
Fine-grained Access Control: Control data access across users and departments, with column level control on user access
On-Cloud: Fully managed virtually infinte scale, multi-tenant cloud with unlimited free storae and pay only for what you analyse
Get Started
On BlobCity Cloud
Store unlimited data for free and pay only for what you analyse. Delivers ultra high speed analytics over multi-tenant infrastructure, starting at $10/month.
docker run -i -p 10111:10111 -p 10113:10113 blobcity/db
Once container is started, open a telnet connection on port 10113 to connect to over network CLI.
nc localhost 10113
Trying 127.0.0.1...
Connected to localhost.
Escape character is '^]'.
username>root
password>xxxxx
You are now inside the BlobCity DB console
Type 'help'for assistance and 'exit' to quit
blobcity>
A random auto-generated password is placed at /mnt/data/root-pass.txt. This file can be found within the container. It can be fetched from within the container, or by mounting this folder to an external mount point.
docker run -i -v /my-folder:/mnt/data -p 10111:10111 -p 10113:10113 blobcity/db
The password file can now be found at /my-folder/root-pass.txt on your computer.
JAVA_HOME must be set to a JDK / JRE version 8 or higher for the DB to be booted.
The database will create a folder called data at blobcity-db-x.x.x/data. The randomly generated root user password can be found inside a text file at blobcity-db-x.x.x/data/root-pass.txt.
Use this password to connect to the CLI console to start using the DB. It is recommended that the data folder be stored at a difference location than the boot volume, and the volume be XFS formatted.
The location of the data folder can be set by editing the blobcity.sh file and uncommenting the following line and setting a folder path of your choice.
#export BLOBCITY_DATA=
Look at some of the best practices for optimal disk storage performance.
Acceleration
BlobCity is a winner of Economic Times Power of Ideas (Season 2), is funded by CIIE IIM-Ahmedabad and is a graduate from NetApp Excellerator (Cohort #2).
Create a new project and add strapi-fcm to your project.
Add the plugin to your project
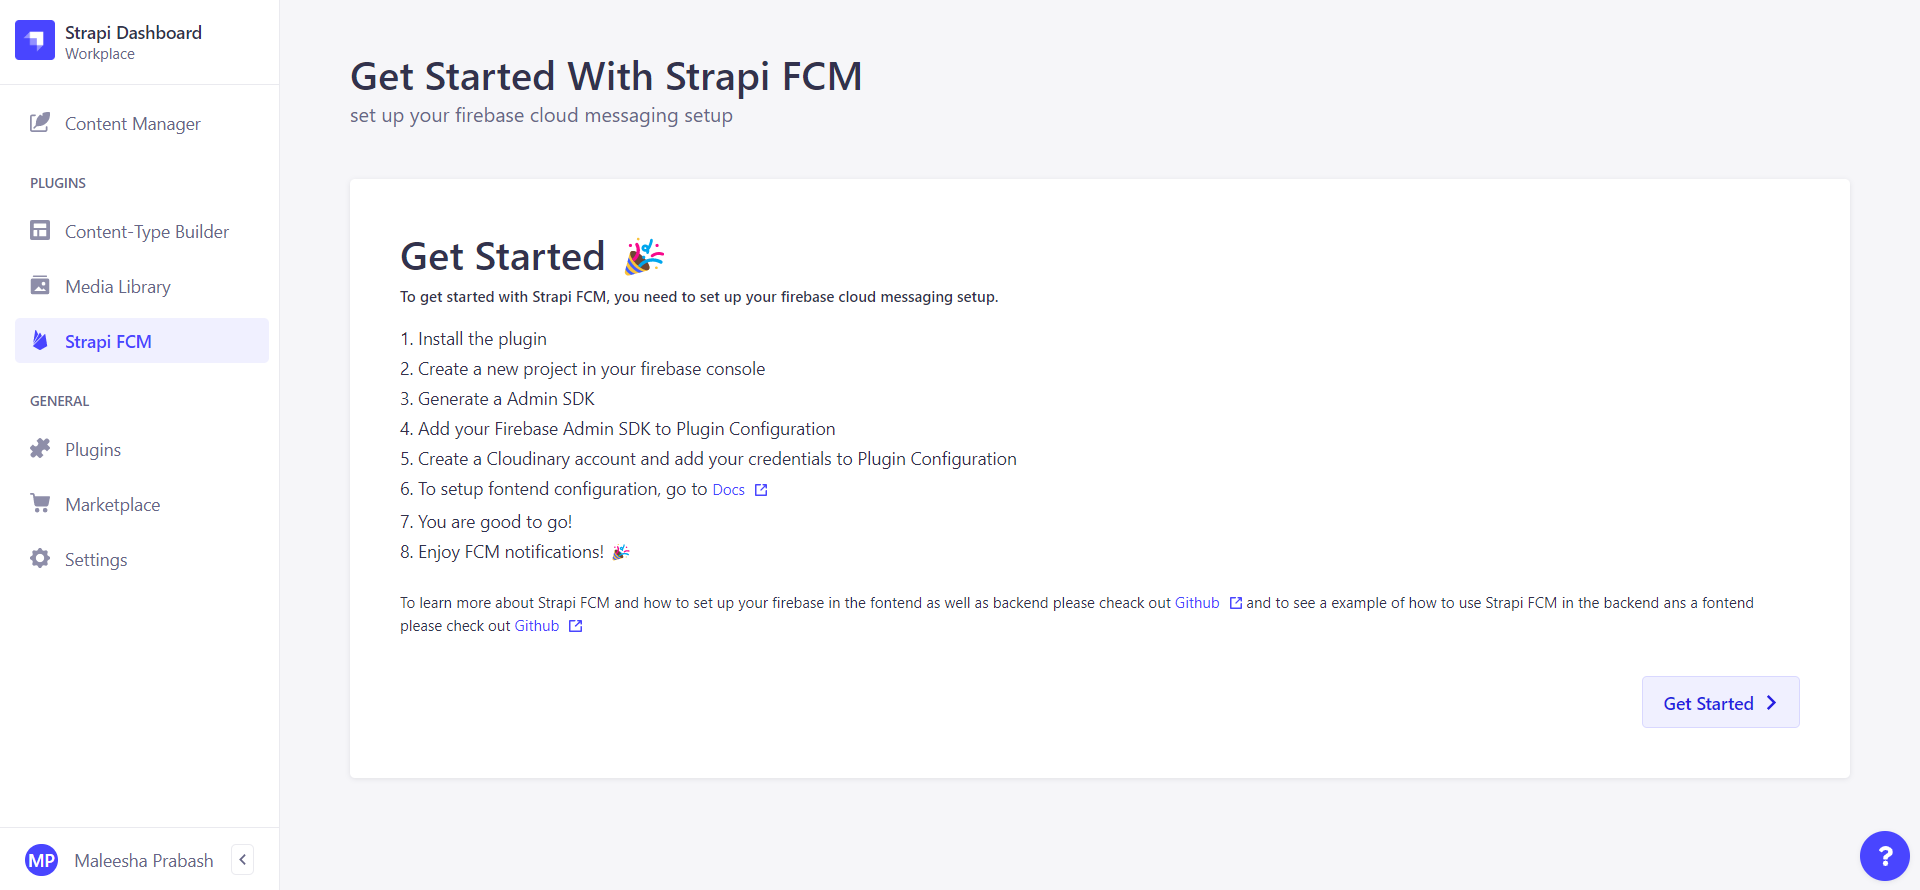
To get started, read the getting started guide. then for a example project click on dimo links for some important documentations click docs links.
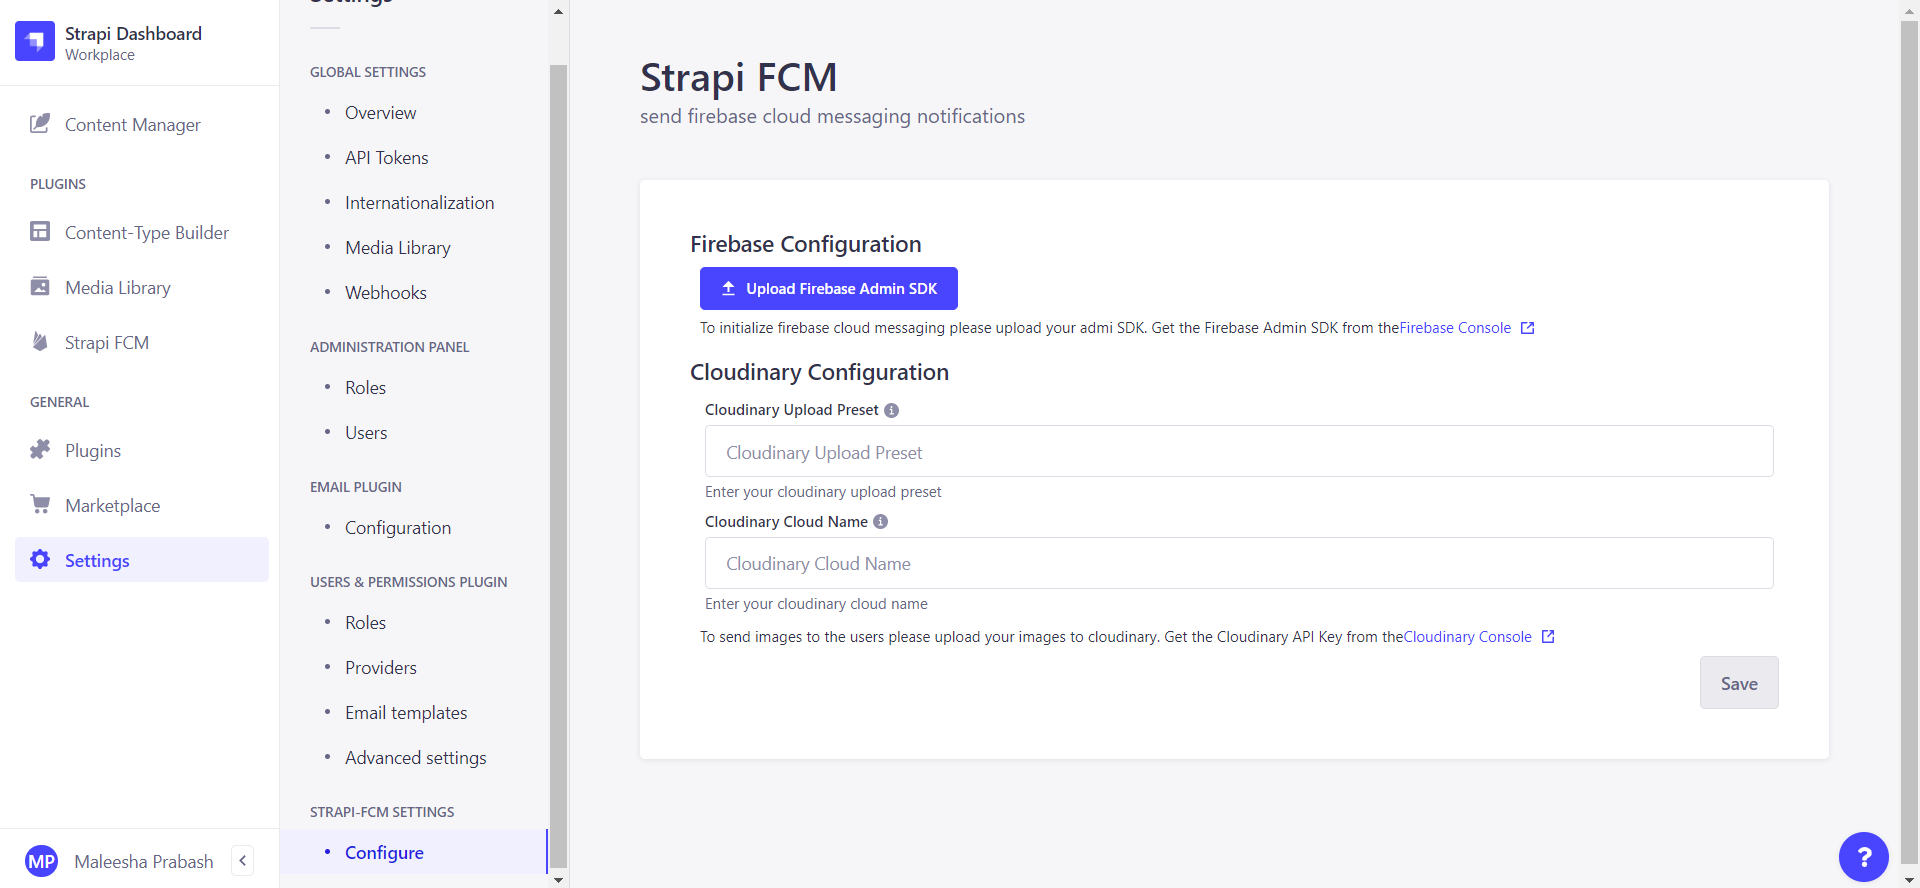
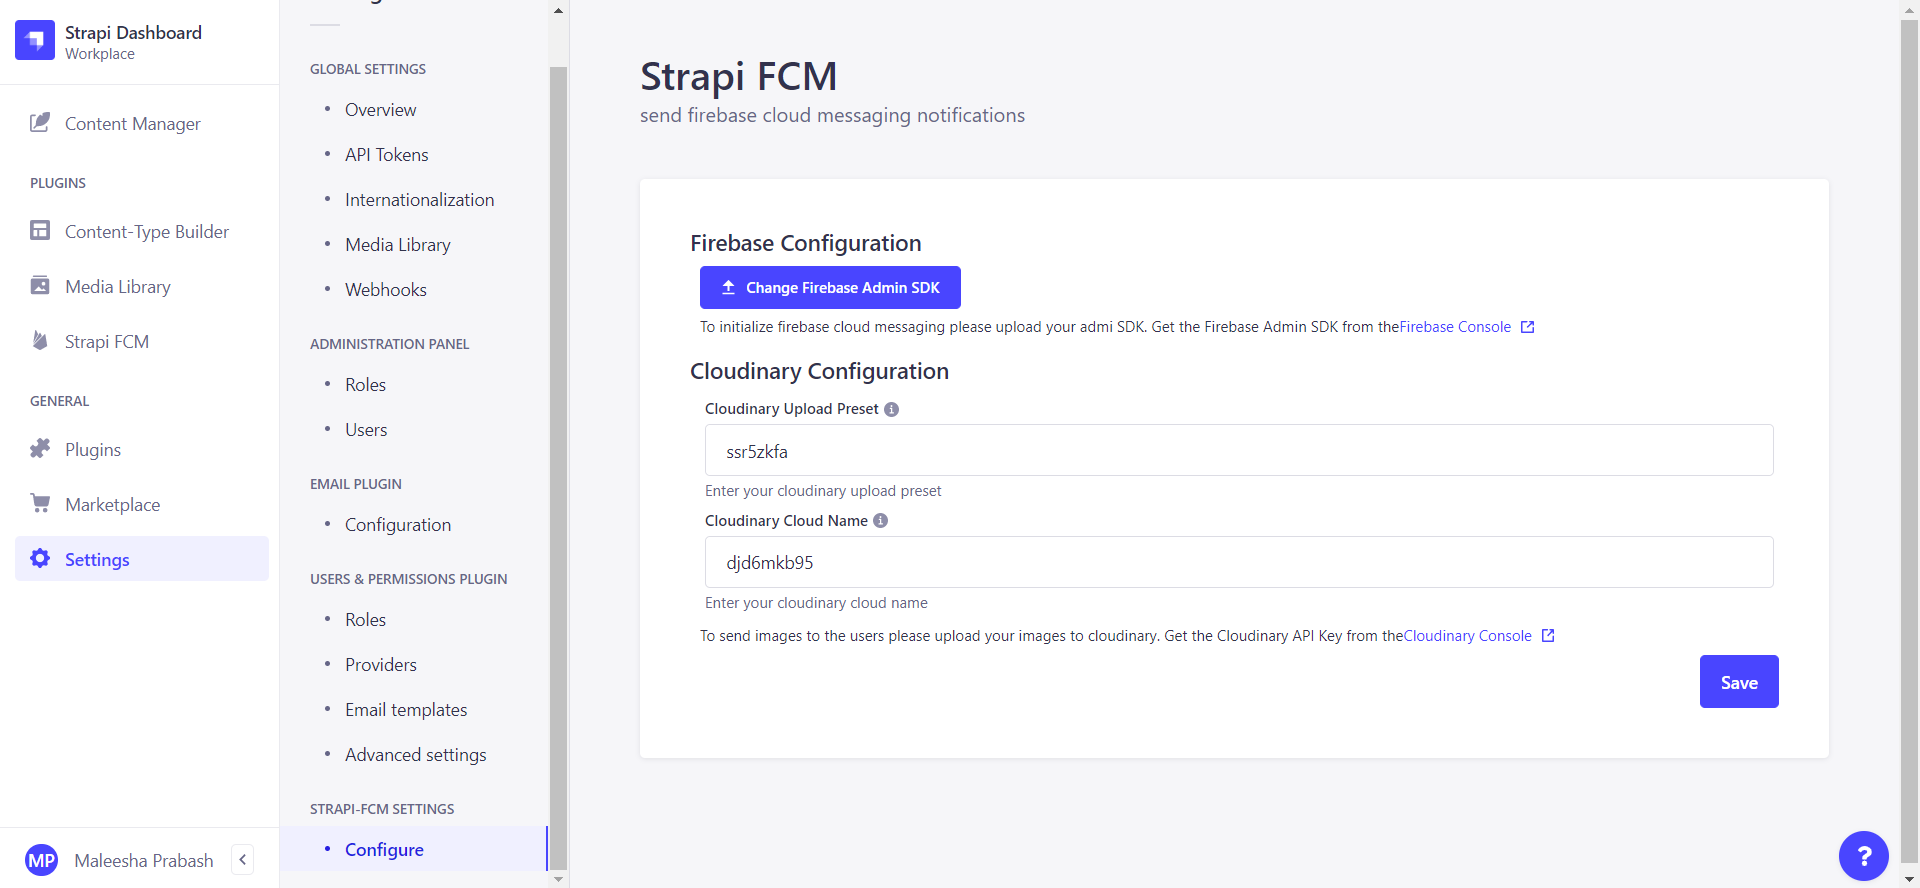
3. Configure API keys and Admin SDK at /settings/strapi-fcm
To configure Cloudinary API keys and Admin SDK, go to the settings page and click on the Strapi FCM tab. there will be links for firebase docs and cloudinary docs. You can follow those guidelines to configure your keys.
4. Send notification tokens to backend from the fontend using the /strapi-fcm/users/tokens endpoint
To configure the font-end use this snippit or use your own snippit for saving fcm tokens to back-end database please use the following api endpoint https://server/strapi-fcm/users/tokens. To get notification tokens must be sent to back-end.
useEffect(()=>{try{getToken(messaging).then(async(token)=>{if(token){axios.post(`${SERVER}/strapi-fcm/users/tokens`,{token: token,}).then((res)=>{// Handle success});}else{Push.Permission.request(()=>{// User has granted permission},()=>{// User has denied permission});}}).catch(()=>{});}catch(error){// Handle error}},[]);
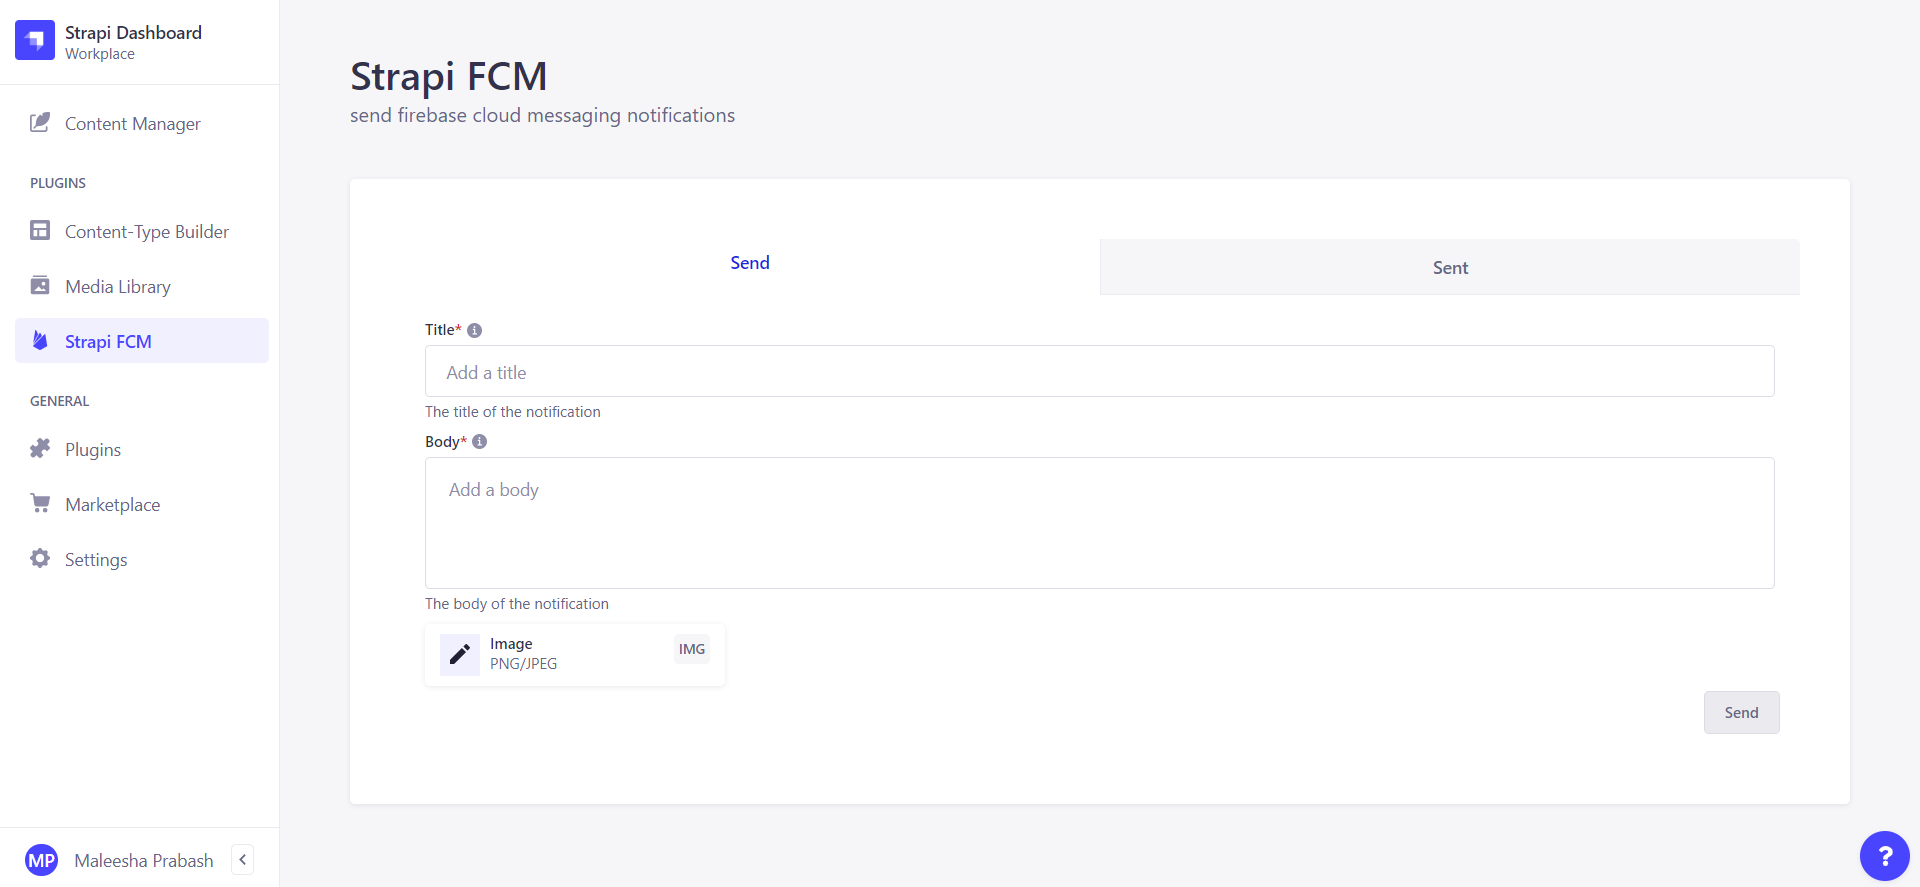
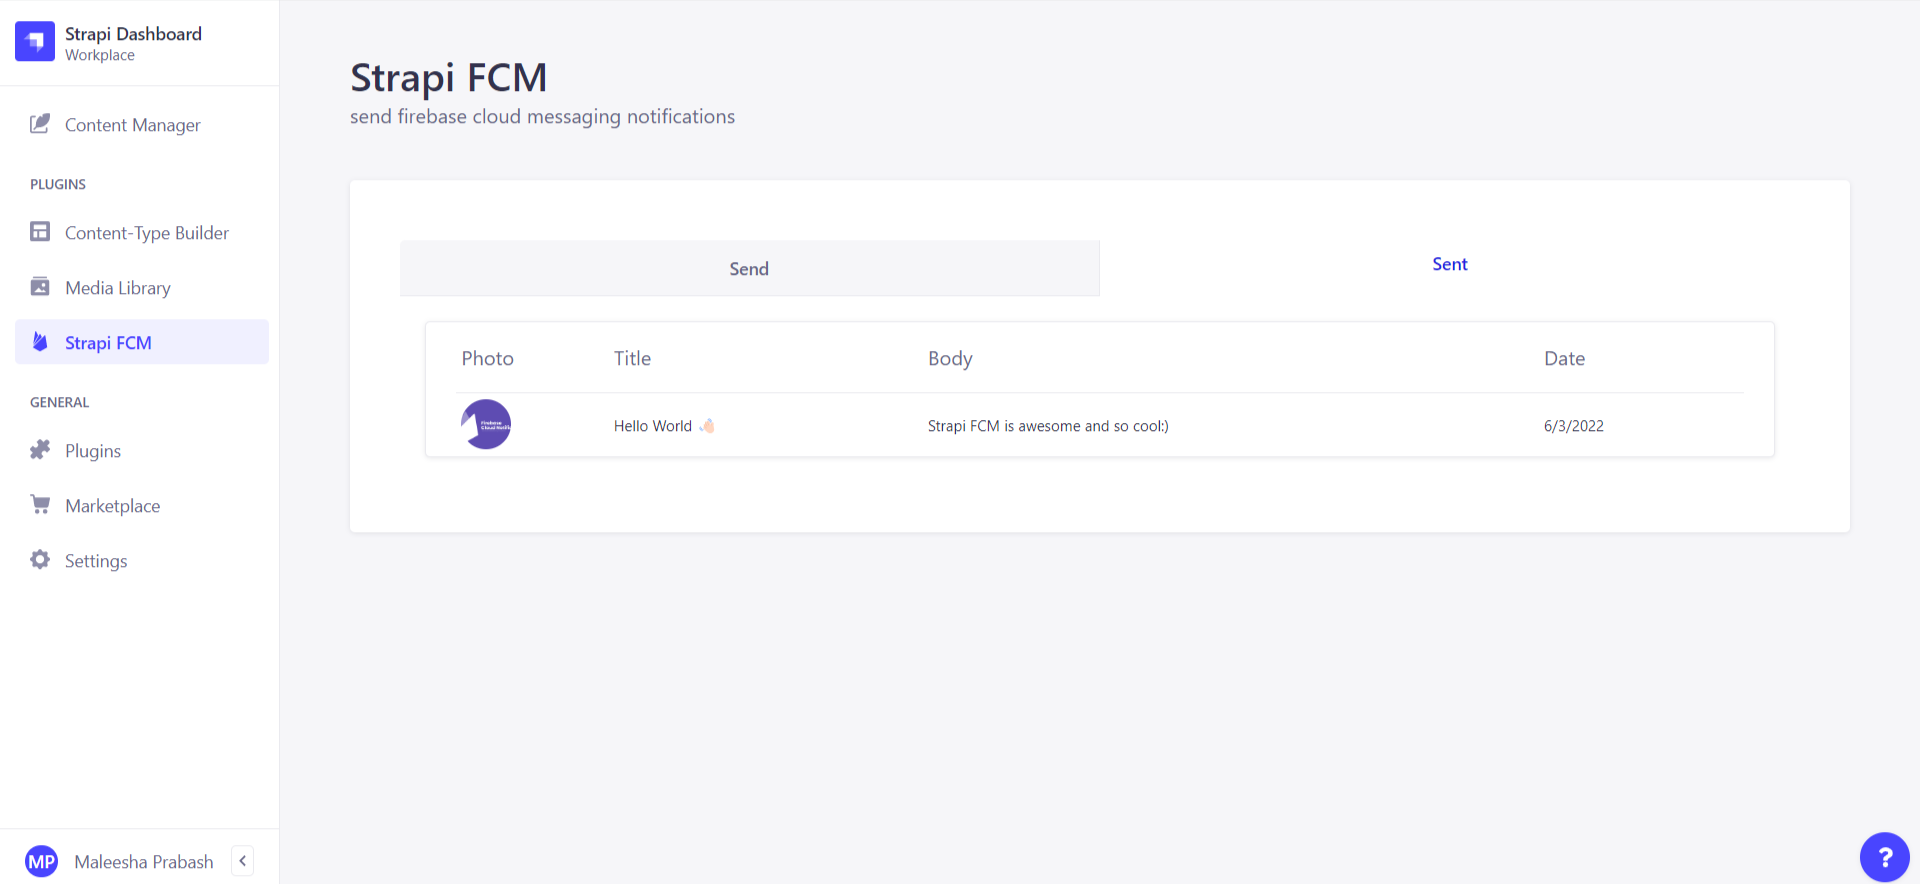
Go to /admin/plugins/strapi-fcm
You can see the full dashboard for the plugin. There are two tabs such as Send and Sent.
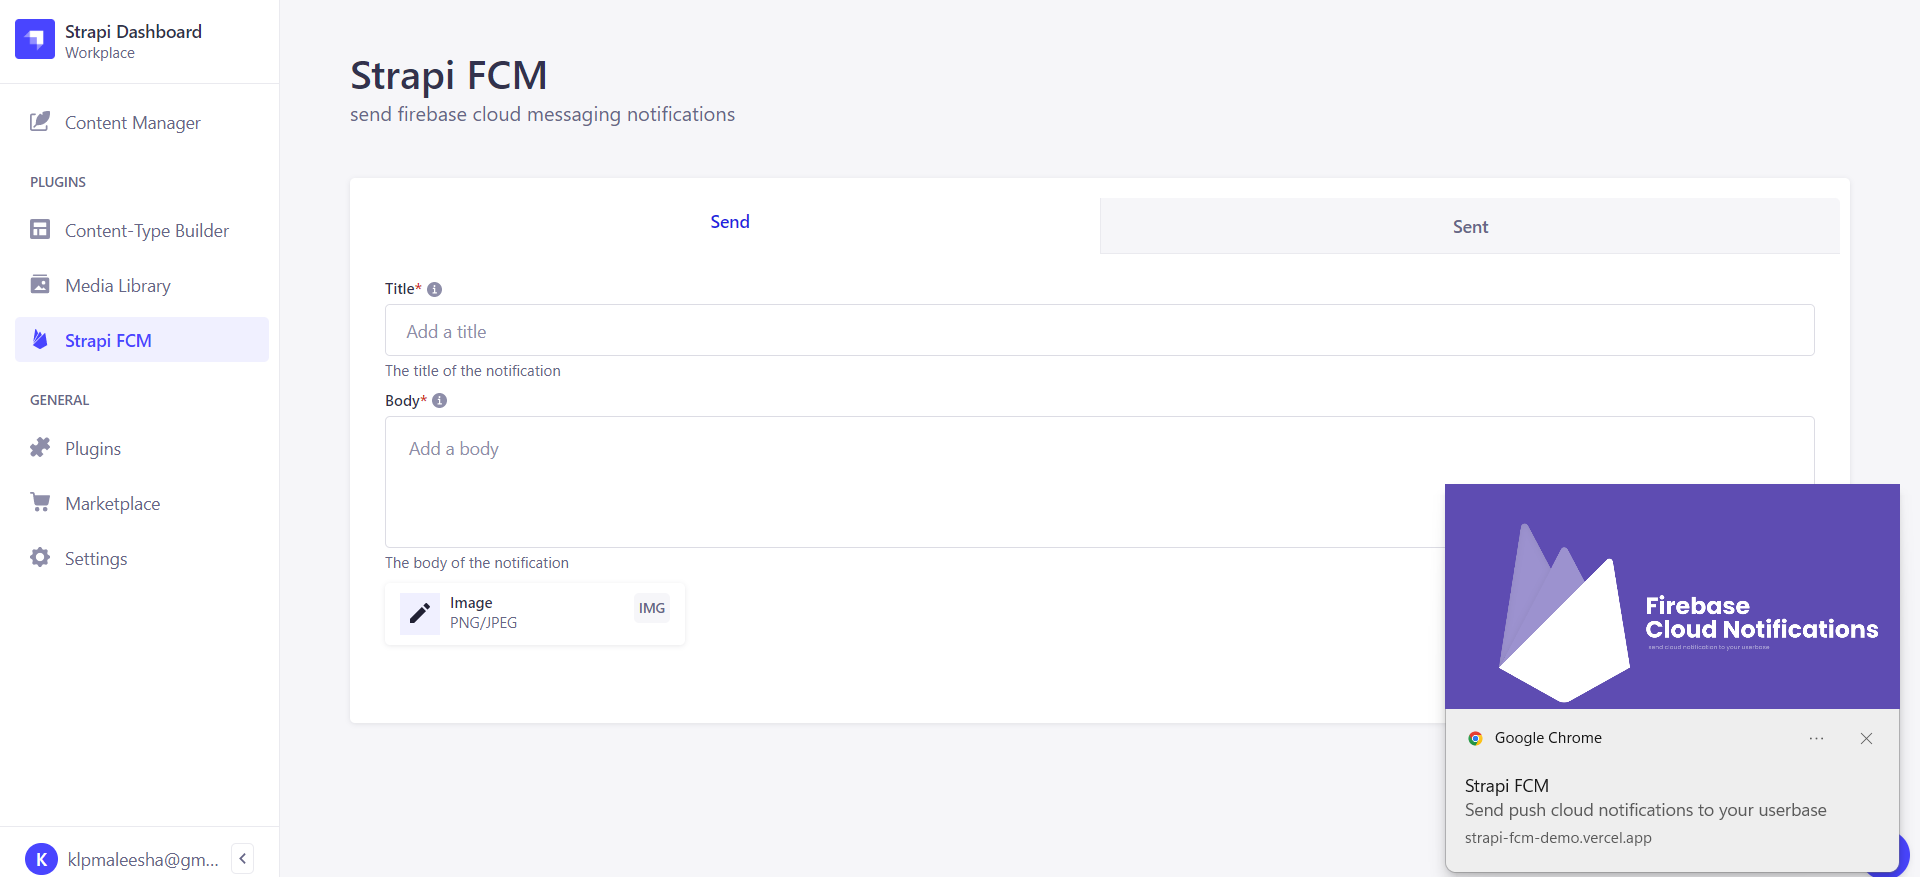
Send a notification to your userbase
To send a cloud notification to userbase, go and fill the title field and body field image is not compulsory but if you want to send an image then you can upload it. Then click on send button.
See previous notifications in your userbase by clicking on the sent tab
To see your previous notifications, click on the sent tab. Then you can see the notifications sent to your userbase.
Enjoy your cloud notifications
You can enjoy your cloud notifications by testing it in the browser.
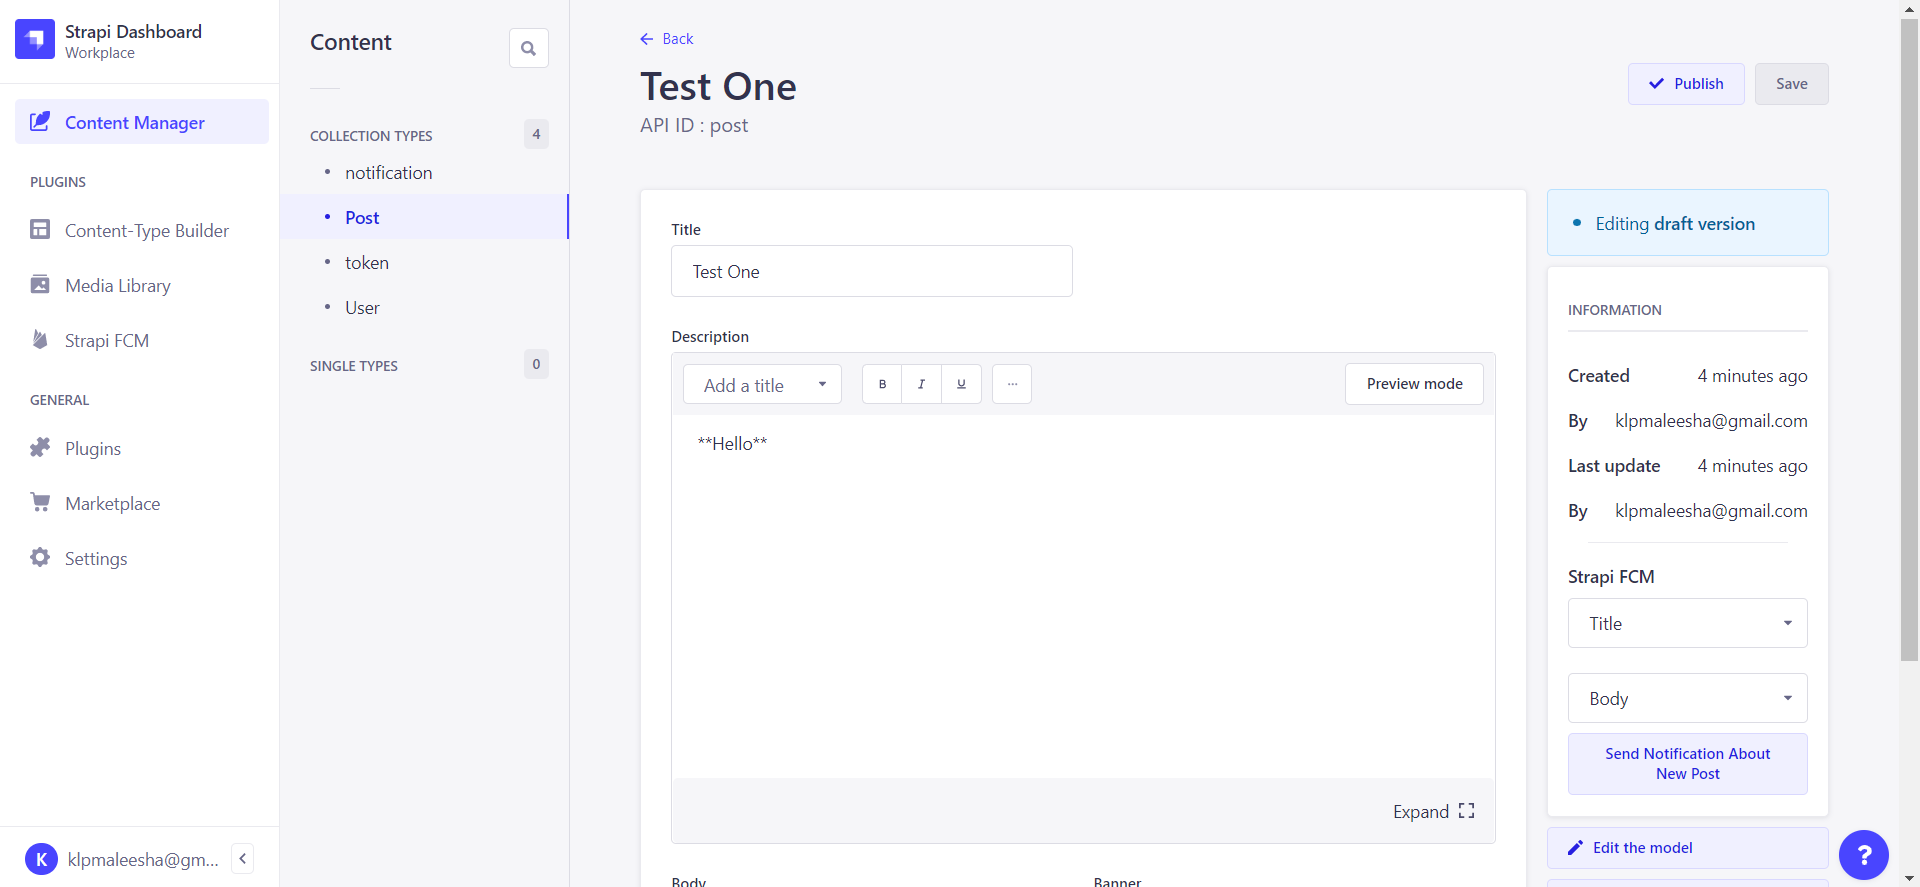
Send a notification from your blog post
You also can send a notification from your blog post. Its on your blog post page. You can selectet which field you want to send as the title and body. Its easy to send a notification from your blog post.
Update your credentials at /settings/strapi-fcm
To update your credentials, go to the settings page and click on the Strapi FCM tab. You can update your credentials here.
A reveal.js plugin to include code samples in slides
Usage
First, initialize the plugin in the dependencies part of the reveal.js config:
{src: 'plugin/sampler.js'}
This assumes that you copied the sampler.js file to plugin/sampler.js in
your reveal.js tree, but you can obviously pick whatever path you want. To
include a code sample in a slide, use <code> tags as follows:
The plugin will extract the sample named sample-name from the source file
whose path is given, and write it inside the <code> tag. If no sample-name
is given, the whole file is included. It is also possible to use line numbers
instead of a sample name to delimit a code snippet. The basic syntax is path/to/file#start-end, but multiple ranges or individual line numbers
are supported too:
The plugin will also add the language-xxx class to the <code> tag, where xxx is the extension of the source file, so that code highlighting triggers
properly if set up. This usually works out of the box, because highlight.js
can recognize the extensions associated to most languages. If you need to
explicitly set the language to use (e.g. because the file extension is
misleading), set the language-xxx class yourself on the <code> tag and
the plugin will leave it alone.
Annotating source files
To define a named sample inside a source file, use the following syntax:
sampler.js will parse the source file, and anything between the sample(sample-name)
and the end-sample tags will be taken to be a code sample named sample-name.
Note that anything on the same line as one of the special tags will not be taken
as part of the sample, which is what allows this plugin to be language-agnostic,
by commenting the tags in your source code. For example:
// sample(main)intmain() {
std::cout << "this is C++ code" << std::endl;
}
// end-sample
Multiple samples can appear in the same source file, as long as they have
different names. If many samples have the same name, they will be considered
as a single sample and concatenated together. For example, the following code
will create a single sample with name ‘foo’:
// sample(foo)
first part of the sample
// end-sample

some code not in the sample

// sample(foo)
second part of the sample
// end-sample
Within a sample, any line containing skip-sample will be skipped, which
allows leaving implementation details out of slides:
The line numbers specified in data-sample-mark are relative to the snippet
itself, not to the file from which the snippet was extracted. Also, line
ranges are supported, just like for extracting snippets from a file.
Remove indentation
If all lines of the sample have an overall indentation you can remove it using the
attribute data-sample-indent.
⚠️ Warning: Gatsby Desktop is no longer being maintained
Installing built packages
Click on releases and choose the installer for your platform.
Installing from source
Clone the repo
Run yarn
yarn develop
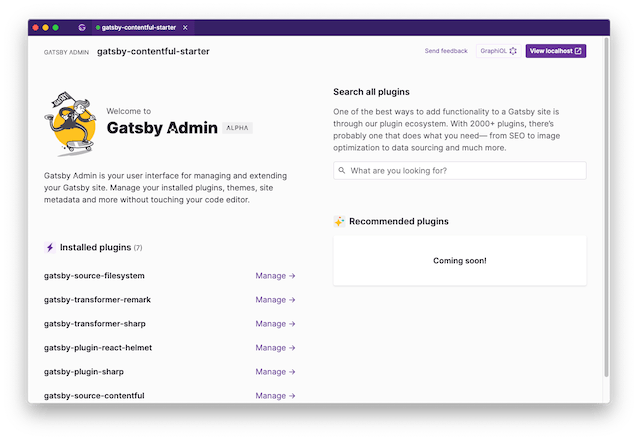
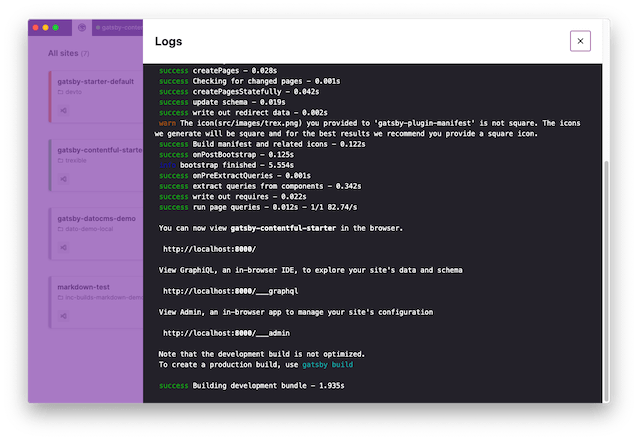
Screenshots
Architecture
Gatsby Desktop is an Electron app. All Electron apps have two primary processes:
“main”, which is a Node.js script which handles windowing, menus and similar native bits. Think of it as the server. It opens BrowserWindows which contain:
“renderer”: this is the UI of the app, which is HTML + JS. In Gatsby Desktop, this is of course a local Gatsby site. Unlike a regular web app, Electron renderers can import and use built-in Node.js modules, such as fs and child_process.
Gatsby Desktop can launch and run your local Gatsby sites. We spawn these in the main process, which maintains a list of running site. The renderer gets this list over IPC and stores it in React context. There are React hooks to make it easy to access the list of sites and whether or not they’re running. The main process also auto-discovers any local Gatsby sites and watches these for changes.
Development
Gatsby Desktop is written in TypeScript. We use microbundle to compile and bundle the worker and main scripts. The renderer is a Gatsby site, which we run with gatsby develop during development, or SSR in production and serve from a local Express static server. yarn develop compiles and runs everything. It uses gatsby develop, so you have hot reloading, but bear in mind that this doesn’t clean up the child processes properly, so if those are running you’ll need to restart the process. It also watches and compiles the worker and main bundles.
To debug the renderer, use Chrome devtools and listen to port 8315.
Telemetry
If you opt-in to telemetry, the app sends anonymous information about how use it. This is mainly checking which features you use and how much you use them. This helps us prioritize which features to develop, and to improve the app. This is particularly important as it is a proof-of-concept. This is entirely optional though, so if you don’t opt-in we don’t track anything except the fact that you have opted-out. All other events are not sent. This setting is separate from the telemetry setting for Gatsby itself. You can see more details on telemetry in Gatsby at https://gatsby.dev/telemetry
Release process
Create a draft release in GitHub, with the tag as the new version number prefixed with v, e.g. v0.0.1-alpha.2. Update the version number in package.json to match, and commit. Push that to master and GitHub Actions should do a build and eventually attach the packaged files to the draft release. Once the build is complete, publish the draft release.