Blog

  • topictool

    Topictool

    CLI Tool to manage topic labels on Github repositories

    Installation

    go get github.com/cbrgm/topictool
    

    or

    git clone git@github.com:cbrgm/topictool.git && cd topictool
    go mod vendor && make
    

    Usage

    You’ll need a Github Personal Access Token to use this tool. Create one for your user (Settings -> Developer Settings -> Personal Access Token) and grant read/write access for repositories to it. In case you want to modify private repositories of an organization please authorize SSO.

    export GH_ACCESS_TOKEN=<your-token>

    then run the topictool.

    Usage: topictool <subcommand> <search pattern> <topic labels...>
    
    Replace, add or remove topic labels from multiple Github repositories
    
    Subcommands:
        - replace   - replaces all existing topic labels with new ones
        - add       - adds topic labels to existing ones
        - rm        - removes topic labels from existing ones
        
    Search Pattern:
        Searches repositories via various criteria.
        See Github docs: https://docs.github.com/en/free-pro-team@latest/rest/reference/search/#search-repositories
    
    Topic Labels:
        A list of strings representing topic labels


    Examples

    Add a labels foo and bar to the repository cbrgm/topictool

    topictool add "cbrgm/topictool" "foo" "bar"
    Repository Name	Topics	
     ---		---	
     cbrgm/topictool	
    
     Add labels [foo,bar] to 1 repositories? [y/n/q]:
     
     > y
     
     Done!

    Add a labels foo and bar to all repositories of user cbrgm

    topictool add "user:cbrgm" "foo" "bar"
    Repository Name			Topics								
     ---				---								
     cbrgm/telegram-robot-rss		bot,messenger,python,rss,rss-feed,rss-reader,telegram-bot			
     cbrgm/go-t			        cli,command-line,go,golang,twitter,twitter-api,twitter-client		
     cbrgm/clickbaiter			advertising,clickbait,generation,generator,go,golang,useless		
     cbrgm/terraform-k8s-hetzner		bash,hetzner,hetzner-cloud,kubernetes,terraform				
     cbrgm/authproxy			api,authentication,client,kubernetes,middleware,token,webhook		
     cbrgm/kubernetes-rbac-groups		authorization,cluster,kubernetes,rbac	
     
    Add labels [foo,bar] to 6 repositories? [y/n/q]:
    
    > y
    
    Done!

    Replace all labels with foo and bar for all repositories of user cbrgm already having a topic foo

    topictool replace "user:cbrgm topic:foo" "foo" "bar"
    Repository Name			Topics								
     ---				---								
     cbrgm/telegram-robot-rss		bot,messenger,python,rss,rss-feed,rss-reader,telegram-bot,foo			
     cbrgm/go-t			        cli,command-line,go,golang,twitter,twitter-api,twitter-client,foo		
     cbrgm/clickbaiter			advertising,clickbait,generation,generator,go,golang,useless,foo		
     cbrgm/terraform-k8s-hetzner		bash,hetzner,hetzner-cloud,kubernetes,terraform,foo				
     cbrgm/authproxy			api,authentication,client,kubernetes,middleware,token,webhook,foo		
     cbrgm/kubernetes-rbac-groups		authorization,cluster,kubernetes,rbac,foo	
     
    Replace all existing topic labels with [foo,bar] in 6 repositories? [y/n/q]:
    
    > y
    
    Done!

    Contributing & License

    Feel free to submit changes! See the Contributing Guide. This project is open-source and is developed under the terms of the Apache 2.0 License.

    Visit original content creator repository https://github.com/cbrgm/topictool
  • gapseq

    gapseq

    Informed prediction and analysis of bacterial metabolic pathways and genome-scale networks
    Documentation Status DOI:10.1186/s13059-021-02295-1 conda build

    gapseq is designed to combine metabolic pathway analysis with metabolic network reconstruction and curation. Based on genomic information and databases for pathways and reactions, gapseq can be used for:

    • prediction of metabolic pathways from various databases
    • transporter inference
    • metabolic model construction
    • multi-step gap filling

    alt text

    Publication

    Zimmermann, J., Kaleta, C. & Waschina, S. gapseq: informed prediction of bacterial metabolic pathways and reconstruction of accurate metabolic models. Genome Biology 22, 81 (2021)

    Installation

    The latest release can be downloaded here. Besides this, the current development version can be accessed via:

    git clone https://github.com/jotech/gapseq
    

    Detailed information on installation and troubleshooting.

    Using Bioconda

    Gapseq has a bioconda package. You must have conda/miniconda/miniforge installed already.

    conda create -c conda-forge -c bioconda -n gapseq gapseq

    Hint: When installing with bioconda, the gapseq binary will reside in your PATH, so you will not have to prepend “./” in front of gapseq. (Use “gapseq” instead of “./gapseq”).

    Quickstart

    For detailed use cases and full tutorials, see the documentation.

    Prediction of network candidate reactions, building of a draft model and gap filling:

    ./gapseq doall toy/myb71.fna
    

    Do the same but with a defined medium for gap filling:

    ./gapseq doall toy/ecoli.fna.gz dat/media/MM_glu.csv
    

    LICENSE

    Copyright 2020 Johannes Zimmermann, Christoph Kaleta, & Silvio Waschina; University of Kiel, Germany

    GNU General Public License version 3.0 (GPLv3) is applied to all copyrightable parts of gapseq. gapseq uses information on biochemical reactions, compounds, compartments, enzymes, and biological sequences from different external sources. The copyright and licensing terms for each of the resources are listed and cross-linked below. Identifiers for reactions, enzymes, compounds, and compartments may be identical to the external sources but can also differ to those. In both cases, the data from gapseq may be considered to be subject to the original copyright and licensing restrictions of the external resource.

    Citation

    • Zimmermann, J., Kaleta, C. & Waschina, S. gapseq: informed prediction of bacterial metabolic pathways and reconstruction of accurate metabolic models. Genome Biol 22, 81 (2021). https://doi.org/10.1186/s13059-021-02295-1
    • De Bernardini, N., Zampieri, G., Campanaro, S., Zimmermann, J., Waschina, S. & Treu, L. pan-Draft: automated reconstruction of species-representative metabolic models from multiple genomes. Genome Biol 25, 280 (2024). https://doi.org/10.1186/s13059-024-03425-1
    Visit original content creator repository https://github.com/jotech/gapseq
  • compodium

    Compodium

    npm version npm downloads License Nuxt

    A plug and play component playground for Vue and Nuxt.

    Documentation

    Warning

    This project is in its early stages and will evolve. Expect frequent updates and potential changes. Feedback is welcome!

    Features

    • Effortless Setup: Simple setup process and minimal maintenance, allowing you to focus on building components.
    • No Stories Required: Analyzes your component code directly, eliminating the need to write stories.
    • Fast: Built on top of Vite for rapid development and instant feedback, enhancing productivity.
    • DevTools Integration: Integrates with Vue and Nuxt devtools for a cohesive development experience.
    • UI Library Integrations: Integrates with popular UI libraries, showcasing examples for locally installed components.
    • Code generation: Generates up-to-date template code based on component props, ready to copy and use instantly.

    Installation

    Nuxt

    npx nuxi@latest module add --dev compodium

    Vue

    1. Install @compodium/vue
    pnpm add -D @compodium/vue
    yarn add --dev @compodium/vue
    npm install --save-dev @compodium/vue
    bun add -D @compodium/vue
    1. Add the Compodium plugin in your vite.config.ts:
    import { defineConfig } from 'vite'
    import vue from '@vitejs/plugin-vue'
    import vueDevTools from 'vite-plugin-vue-devtools'
    import { compodium } from '@compodium/vue'
    
    export default defineConfig({
      plugins: [
        vue(),
        vueDevTools(),
        compodium()
      ]
    })
    1. Include compodium types in your tsconfig.app.json
    {
      "include": [
        "src/**/*.ts",
        "src/**/*.tsx",
        "src/**/*.vue",
        "node_modules/@compodium/vue/dist/index.d.ts"
      ],
    }

    Contribution

    Contributions are welcome! ♥️

    Currently, one way you can contribute is by adding examples for your favorite component library. You can find the Nuxt UI collection and examples here.

    Local development

    # Install dependencies
    pnpm install
    
    # Generate type stubs
    pnpm dev:prepare
    
    # Develop with the playground
    pnpm dev
    
    # Run ESLint
    pnpm lint
    
    # Run typechecks 
    pnpm typechecks 
    
    # Run Vitest
    pnpm test
    Visit original content creator repository https://github.com/romhml/compodium
  • Anti-Cracking-for-.Net

    Net Protector 🛡️

    🚀 Net Protector – Protect Your Code in Style!

    Net Protector is a robust and innovative solution for safeguarding your Windows Forms application against tampering and unwanted injections. Developed with advanced obfuscation and protection techniques, Net Protector ensures the integrity of your code and the security of your software.


    📞 Contact

    If you have any questions or need support, please reach out to us:

    • Discord: lukz11n

    🛠 Features

    • Dynamic Code Obfuscation: Protects critical methods and prevents reverse engineering.
    • Code Injection Detection: Identifies injection attempts and secures your application in real-time.
    • Advanced Protection: Implements multiple layers of security to ensure code integrity.

    📦 Installation

    1. Clone the Repository:

      git clone https://github.com/YOUR_USERNAME/Net-Protector.git
    2. Open the Project:

      • Open the project in Visual Studio.
    3. Build and Run:

      • Build the project and run the application to start protecting your code!

    🎯 How to Use

    Add the following code to your main form to activate the protection:

    using NetProtector;
    
    public partial class Form1 : Form
    {
        public Form1()
        {
            AdvancedProtection.Protect();
            CodeInjectionDetection.DetectCodeInjection();
            CodeInjectionDetection.DetectCodeInjection();
            AdvancedAntiDebugging.CheckForAdvancedDebuggers();
            Protection.Protect();
            DynamicCodeObfuscation.RunProtectedCode();
            DynamicCodeObfuscation.RunProtectedCode();
            InitializeComponent();
        }
    }
    Visit original content creator repository https://github.com/Lukz1n/Anti-Cracking-for-.Net
  • tcbuild

    Toolchain build scripts Codacy Badge

    There are times where a tip of tree LLVM build will have some issue fixed and it isn’t available to you, maybe because it isn’t in a release or it isn’t available through your distribution’s package management system. At that point, to get that fix, LLVM needs to be compiled, which sounds scary but is rather simple. The build-llvm.py script takes it a step farther by trying to optimize both LLVM’s build time by:

    • Trimming down a lot of things that kernel developers don’t care about:
      • Documentation
      • LLVM tests
      • Ocaml bindings
      • libfuzzer
    • Building with the faster tools available (in order of fastest to slowest):
      • clang + lld
      • clang/gcc + ld.gold
      • clang/gcc + ld.bfd

    Getting started

    These scripts have been tested in a Docker image of the following distributions with the following packages installed. LLVM has minimum host tool version requirements so the latest stable version of the chosen distribution should be used whenever possible to ensure recent versions of the tools are used. Build errors from within LLVM are expected if the tool version is not recent enough, in which case it will need to be built from source or installed through other means.

    • Debian/Ubuntu

      apt install bc \
                  binutils-dev \
                  bison \
                  build-essential \
                  ca-certificates \
                  ccache \
                  clang \
                  cmake \
                  curl \
                  file \
                  flex \
                  git \
                  libelf-dev \
                  libssl-dev \
                  lld \
                  make \
                  ninja-build \
                  python3-dev \
                  texinfo \
                  u-boot-tools \
                  xz-utils \
                  zlib1g-dev
      
    • Fedora

      dnf install bc \
                  binutils-devel \
                  bison \
                  ccache \
                  clang \
                  cmake \
                  elfutils-libelf-devel \
                  flex \
                  gcc \
                  gcc-c++ \
                  git \
                  lld \
                  make \
                  ninja-build \
                  openssl-devel \
                  python3 \
                  texinfo-tex \
                  uboot-tools \
                  xz \
                  zlib-devel
      
    • Arch Linux / Manjaro

      pacman -S base-devel \
                bc \
                bison \
                ccache \
                clang \
                cpio \
                cmake \
                flex \
                git \
                libelf \
                lld \
                llvm \
                ninja \
                openssl \
                python3 \
                uboot-tools
      
    • Clear Linux

      swupd bundle-add c-basic \
                       ccache \
                       curl \
                       dev-utils \
                       devpkg-elfutils \
                       devpkg-openssl \
                       git \
                       python3-basic \
                       which
      

      Additionally, to build PowerPC kernels, you will need to build the U-Boot tools because there is no distribution package. The U-Boot tarballs can be found here and they can be built and used like so:

      $ curl -LSs https://ftp.denx.de/pub/u-boot/u-boot-2021.01.tar.bz2 | tar -xjf -
      $ cd u-boot-2021.01
      $ make -j"$(nproc)" defconfig tools-all
      ...
      $ sudo install -Dm755 tools/mkimage /usr/local/bin/mkimage
      $ mkimage -V
      mkimage version 2021.01
      

      Lastly, Clear Linux has ${CC}, ${CXX}, ${CFLAGS}, and ${CXXFLAGS} in the environment, which messes with the heuristics of the script for selecting a compiler. By default, the script will attempt to use clang and ld.lld but the environment’s value of ${CC} and ${CXX} is respected first so gcc and g++ will be used. Clear Linux has optimized their gcc and g++ so this is fine but if you would like to use clang and clang++ instead, invoke the script like so:

      $ CC=clang CFLAGS= CXX=clang++ CXXFLAGS= ./build-llvm.py ...
      

    Python 3.5.3+ is recommended, as that is what the script has been tested against. These scripts should be distribution agnostic. Please feel free to add different distribution install commands here through a pull request.

    build-llvm.py

    By default, ./build-llvm.py will clone LLVM, grab the latest binutils tarball (for the LLVMgold.so plugin), and build LLVM, clang, and lld, and install them into install.

    The script automatically clones and manages the llvm-project. If you would like to do this management yourself, such as downloading a release tarball from releases.llvm.org, doing a more aggressive shallow clone (versus what is done in the script via --shallow-clone), or doing a bisection of LLVM, you just need to make sure that your source is in an llvm-project folder within the root of this repository and pass --no-update into the script. See this comment for an example.

    Run ./build-llvm.py -h for more options and information.

    build-binutils.py

    This script builds a standalone copy of binutils. By default, ./build-binutils.py will download the latest stable version of binutils, build for all architectures we currently care about (see the help text or script for the full list), and install them into install. Run ./build-binutils.py -h for more options.

    Building a standalone copy of binutils might be needed because certain distributions like Arch Linux (whose options the script uses) might symlink /usr/lib/LLVMgold.so to /usr/lib/bfd-plugins (source), which can cause issues when using the system’s linker for LTO (even with LD_LIBRARY_PATH):

    bfd plugin: LLVM gold plugin has failed to create LTO module: Unknown attribute kind (60) (Producer: 'LLVM9.0.0svn' Reader: 'LLVM 7.0.1')
    

    Having a standalone copy of binutils (ideally in the same folder at the LLVM toolchain so that only one PATH modification is needed) works around this without any adverse side effects. Another workaround is bind mounting the new LLVMgold.so to /usr/lib/LLVMgold.so.

    Contributing

    This repository openly welcomes pull requests! There are a few presubmit checks that run to make sure the code stays consistently formatted and free of bugs.

    1. All Python files must be passed through yapf. See the installation section for how to get it (it may also be available through your package manager).

    2. All shell files must be passed through shfmt (specifically shfmt -ci -i 4 -w) and emit no shellcheck warnings.

    The presubmit checks will do these things for you and fail if the code is not formatted properly or has a shellcheck warning. Running these tools on the command line before submitting will make it easier to get your code merged.

    Additionally, please write a detailed commit message about why you are submitting your change.

    Getting help

    Please open an issue on this repo and include your distribution, shell, the command you ran, and the error output.

    Visit original content creator repository https://github.com/cbendot/tcbuild
  • Delphi-SEPA-XML-ES

    Delphi: Creación de ficheros normas 19.14 y 34.14 SEPA formato XML

    Actualización 2024: Compilado sin problemas en Delphi Alexandria. Corregido un bug en la conversión de importes a texto. No se estaba aplicando el formato formatSettings (ver el commit) lo cual resultaba que en proyectos que tuvieran decimalseparator = ‘,’; los importes quedasen con ‘,’ y fallaban.

    Actualización 2019: Mucha gente me pregunta si este proyecto sigue siendo válido, tras ver que lleva años sin actualizarse. Sí, yo sigo utilizandolo en proyectos que generan ficheros SEPA a diario. Simplemente es que la normativa no ha cambiado, y no ha sido necesario actualizarlos. Con respecto a utilizarlo en las versiones más nuevas de Delphi, no debes tener problema, no se utilizan features del lenguaje novedosas.

    Estas unidades contienen dos objetos para la creación de los siguientes ficheros:

    • Norma 19.14 SEPA XML. Es un fichero de órdenes de cobro. El ordenante cobra al deudor. Internamente tenemos un array de ordenantes, cada uno con sus órdenes de cobro. Basta utilizar AddOrdenante, AddCobro. Como cada ordenante tiene una cuenta de abono para todos los cobros, internamente el objeto se encarga de colocar cada cobro en su ordenante. Ver el test está ahí explicado el uso de los objetos.

    • Norma 34.14 SEPA XML. Es un fichero de órdenes de pago. El ordenante paga al beneficiario.

    Cosas a tener en cuenta:

    • Leer la normativa de los dos ficheros. Son complejos. Hay campos opcionales que no se han añadido aquí y puede que su banco se lo pida. Los identificadores únicos de cada elemento son importantes, hay que leer su significado y tomar la decisión de cómo formarlos. Por si fuera poco, cada banco tiene su interpretación y puede que le pida alguna variación en algún elemento del fichero (esto ya lo he comprobado con la versión anterior los 19.14 y 34.14 en formato plano). Esto no es un componente “listo para usar” sin más. Hay que entender de qué estamos hablando. Lo que si facilita es la estructuración y la escritura de las etiquetas.

    • Como guardamos la info en arrays, hay unos límites de órdenes y ordenantes. Supongo que serán suficientes pero es fácilmente modificable.

    • En la normativa hay muchos campos opcionales, no se ha añadido ninguno.

    • Se trata de los esquemas básicos, no los b2b.

    • Solamente se contemplan transferencias en euros, nada de cheques.

    • No se contemplan órdenes de devoluciones, etc.

    • No se hace ningún chequeo de contenidos (IBAN, BIC, etc)

    • Vea el proyecto test de ejemplo.

    • Basado en este otro componente: https://github.com/aspettl/delphi-sepa-xml las diferencias son amplias, pero es justo mencionar ese git.

    La normativa:

    Actualización (febrero 2016): Ya está testeado en 3 bancos españoles. Tanto la norma 19.14 como la 34.14 y los ficheros han sido aceptados.

    Actualización (abril 2016): Hacemos público (en Norma 19.14) el array de ordenantes. Para poder recorrerlo y mostrarle al usuario el resumen de importes, algo así:

     for iOrdenantes:=1 to oNorma1914XML.iOrdenantes do begin
         mmFicheros.Lines.add(oNorma1914XML.listOrdenantes[iOrdenantes].sNombreOrdenante+' '+
              oNorma1914XML.listOrdenantes[iOrdenantes].sIBANOrdenante+' '+
                              uFmt_Numero2Str2(oNorma1914XML.listOrdenantes[iOrdenantes].mSumaImportes)+'€');
     end;
    

    Espero que sea de utilidad.
    Diego J. Muñoz.
    Freelance.
    Cocosistemas.com

    Visit original content creator repository
    https://github.com/cocosistemas/Delphi-SEPA-XML-ES

  • dapr-nblocks

    Contributors Forks Stargazers Issues MIT License LinkedIn
    Technical Debt Quality Gate Status Security Rating Code Smells Coverage


    Dapr NBlocks

    Dapr NBlocks is a Dapr Building Blocks implementations for common use projects. It offers an abstraction and somes pattern with Dapr Components like PubSub, StateStore, and others.
    Explore the docs »
    · Report Bug · Request Feature

    Table of Contents
    1. About The Project
    2. Getting Started
    3. Usage
    4. License
    5. Contact

    About The Project

    Dapr NBlocks uses Dapr Client SDK from Dapr official. Dapr is an awesome runtime for distributed applications. It helps in solving problems in microservices architecture with an Event approch. For more information about Dapr : https://dapr.io/

    Dapr NBlocks :

    • Dapr Core : abstraction for Dapr Client SDK
    • Dapr Events : Building blocks for Dapr Pub/Sub with an event driven paradigm.

    (back to top)

    Benchmarks

    Coming soon …

    Built With

    (back to top)

    Getting Started

    Coming soon …

    Prerequisites

    You might have a .NET 6 SDK or .NET 7 SDK.

    Installation

    1. Get latest release
    2. Configure “appsettings.json” file

    (back to top)

    Usage

    Coming soon …

    (back to top)

    Contributing

    Contributions are what make the open source community such an amazing place to learn, inspire, and create. Any contributions you make are greatly appreciated.

    If you have a suggestion that would make this better, please fork the repo and create a pull request. You can also simply open an issue with the tag “enhancement”. Don’t forget to give the project a star! Thanks again!

    1. Fork the Project
    2. Create your Feature Branch (git checkout -b feature/AmazingFeature)
    3. Commit your Changes (git commit -m 'Add some AmazingFeature')
    4. Push to the Branch (git push origin feature/AmazingFeature)
    5. Open a Pull Request

    (back to top)

    License

    Distributed under the MIT License. See LICENSE.txt for more information.

    (back to top)

    Contact

    Alexandre Julien – @alexandrejulien

    Project Link: https://github.com/alexandrejulien/dapr-nblocks

    (back to top)

    Visit original content creator repository https://github.com/alexandrejulien/dapr-nblocks
  • prelude-jxa

    prelude-jxa

    Generic functions for:

    • macOS scripting with JavaScript for Automation
    • iOS scripting in JavaScript, with apps like the excellent 1Writer, and @agiletortoise’s Drafts.

    Details:

    • Function names are as in Hoogle.
    • The 400+ functions in jsPrelude.js are generic and cross-platform (macOS, iOS etc),
    • The 20+ functions in jxaSystemIO.js are specific to macOS.

    For the purposes of sketching and testing a script,
    the JavaScriptCore interpreter used on macOS and iOS is fast enough to allow for import of the whole of the jsPrelude.js file and, in the case of macOS, the jxaSystemIO.js file as well.

    (c. 500 generic and file-system functions in total)

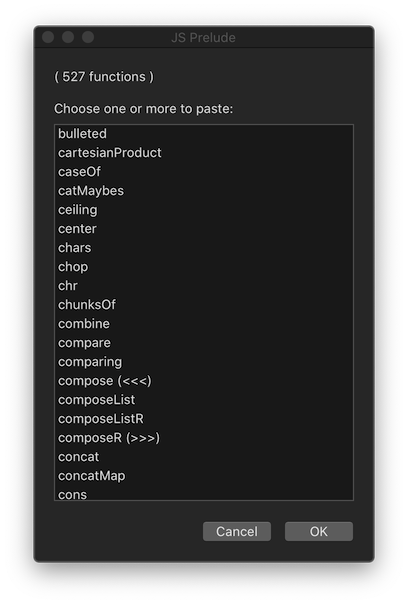
    Display a menu of functions to copy to the clipboard

    Menu of functions

    (() => {
        'use strict';
        
        // Display a menu of functions to select and copy.
        // Rob Trew @2020
    
        ObjC.import('AppKit')
    
        // ---------------------- MAIN ----------------------
        const main = () => {
            const inner = () => {
                const
                    fpFolder = '~/prelude-jxa',
                    menuJSONFile = 'jsPreludeMenu.json';
                return either(
                    alert('JavaScript functions')
                )(
                    // Copied to clipboard and returned.
                    x => (
                        copyText(x),
                        x
                    )
                )(
                    bindLR(
                        readFileLR(
                            combine(fpFolder)(menuJSONFile)
                        )
                    )(
                        json => bindLR(
                            jsonParseLR(json)
                        )(
                            dict => bindLR(
                                showMenuLR(true)(
                                    'Functions'
                                )(Object.keys(dict))
                            )(
                                ks => Right(
                                    ks.map(k => dict[k])
                                    .join('\n\n\n')
                                )
                            )
                        )
                    )
                )
            };
    
            // alert :: String => String -> IO String
            const alert = title =>
                s => {
                    const sa = Object.assign(
                        Application('System Events'), {
                            includeStandardAdditions: true
                        });
                    return (
                        sa.activate(),
                        sa.displayDialog(s, {
                            withTitle: title,
                            buttons: ['OK'],
                            defaultButton: 'OK'
                        }),
                        s
                    );
                };
    
            // copyText :: String -> IO String
            const copyText = s => {
                const pb = $.NSPasteboard.generalPasteboard;
                return (
                    pb.clearContents,
                    pb.setStringForType(
                        $(s),
                        $.NSPasteboardTypeString
                    ),
                    s
                );
            };
    
            return inner();
        };
    
        // ---------------- JS PRELUDE - JXA ----------------
    
        // readFileLR :: FilePath -> Either String IO String
        const readFileLR = fp => {
            const
                e = $(),
                ns = $.NSString
                .stringWithContentsOfFileEncodingError(
                    $(fp).stringByStandardizingPath,
                    $.NSUTF8StringEncoding,
                    e
                );
            return ns.isNil() ? (
                Left(ObjC.unwrap(e.localizedDescription))
            ) : Right(ObjC.unwrap(ns));
        };
    
    
        // ------------------- JS PRELUDE -------------------
    
        // Left :: a -> Either a b
        const Left = x => ({
            type: 'Either',
            Left: x
        });
    
        // Right :: b -> Either a b
        const Right = x => ({
            type: 'Either',
            Right: x
        });
    
        // bindLR (>>=) :: Either a -> 
        // (a -> Either b) -> Either b
        const bindLR = m =>
            mf => undefined !== m.Left ? (
                m
            ) : mf(m.Right);
    
        // combine (</>) :: FilePath -> FilePath -> FilePath
        const combine = fp =>
            // Two paths combined with a path separator. 
            // Just the second path if that starts 
            // with a path separator.
            fp1 => Boolean(fp) && Boolean(fp1) ? (
                "https://github.com/" === fp1.slice(0, 1) ? (
                    fp1
                ) : "https://github.com/" === fp.slice(-1) ? (
                    fp + fp1
                ) : fp + "https://github.com/" + fp1
            ) : fp + fp1;
    
        // either :: (a -> c) -> (b -> c) -> Either a b -> c
        const either = fl =>
            // Application of the function fl to the
            // contents of any Left value in e, or
            // the application of fr to its Right value.
            fr => e => 'Either' === e.type ? (
                undefined !== e.Left ? (
                    fl(e.Left)
                ) : fr(e.Right)
            ) : undefined;
    
        // jsonParseLR :: String -> Either String a
        const jsonParseLR = s => {
            try {
                return Right(JSON.parse(s));
            } catch (e) {
                return Left(
                    `${e.message} (line:${e.line} col:${e.column})`
                );
            }
        };
    
        // showMenuLR :: Bool -> String -> [String] -> 
        // Either String [String]
        const showMenuLR = blnMult =>
            title => xs => 0 < xs.length ? (() => {
                const sa = Object.assign(
                    Application('System Events'), {
                        includeStandardAdditions: true
                    });
                sa.activate();
                const v = sa.chooseFromList(xs, {
                    withTitle: title,
                    withPrompt: 'Select' + (
                        blnMult ? (
                            ' one or more of ' +
                            xs.length.toString()
                        ) : ':'
                    ),
                    defaultItems: xs[0],
                    okButtonName: 'OK',
                    cancelButtonName: 'Cancel',
                    multipleSelectionsAllowed: blnMult,
                    emptySelectionAllowed: false
                });
                return Array.isArray(v) ? (
                    Right(v)
                ) : Left('User cancelled ' + title + ' menu.');
            })() : Left(title + ': No items to choose from.');
    
        return main();
    })();
    Visit original content creator repository https://github.com/RobTrew/prelude-jxa
  • the_meal_DB

    Getting Started with Create React App

    This project was bootstrapped with Create React App.

    Available Scripts

    In the project directory, you can run:

    npm start

    Runs the app in the development mode.
    Open http://localhost:3000 to view it in your browser.

    The page will reload when you make changes.
    You may also see any lint errors in the console.

    npm test

    Launches the test runner in the interactive watch mode.
    See the section about running tests for more information.

    npm run build

    Builds the app for production to the build folder.
    It correctly bundles React in production mode and optimizes the build for the best performance.

    The build is minified and the filenames include the hashes.
    Your app is ready to be deployed!

    See the section about deployment for more information.

    npm run eject

    Note: this is a one-way operation. Once you eject, you can’t go back!

    If you aren’t satisfied with the build tool and configuration choices, you can eject at any time. This command will remove the single build dependency from your project.

    Instead, it will copy all the configuration files and the transitive dependencies (webpack, Babel, ESLint, etc) right into your project so you have full control over them. All of the commands except eject will still work, but they will point to the copied scripts so you can tweak them. At this point you’re on your own.

    You don’t have to ever use eject. The curated feature set is suitable for small and middle deployments, and you shouldn’t feel obligated to use this feature. However we understand that this tool wouldn’t be useful if you couldn’t customize it when you are ready for it.

    Learn More

    You can learn more in the Create React App documentation.

    To learn React, check out the React documentation.

    Code Splitting

    This section has moved here: https://facebook.github.io/create-react-app/docs/code-splitting

    Analyzing the Bundle Size

    This section has moved here: https://facebook.github.io/create-react-app/docs/analyzing-the-bundle-size

    Making a Progressive Web App

    This section has moved here: https://facebook.github.io/create-react-app/docs/making-a-progressive-web-app

    Advanced Configuration

    This section has moved here: https://facebook.github.io/create-react-app/docs/advanced-configuration

    Deployment

    This section has moved here: https://facebook.github.io/create-react-app/docs/deployment

    npm run build fails to minify

    This section has moved here: https://facebook.github.io/create-react-app/docs/troubleshooting#npm-run-build-fails-to-minify

    Visit original content creator repository
    https://github.com/gloriag-dev/the_meal_DB

  • react-taggable-search

    npm version Build Status

    NPM

    React Taggable Search

    A React/Redux taggable search input that can accept tags with dynamic options. Based off of the excellent react-select by Jed Watson.

    Demo & Examples

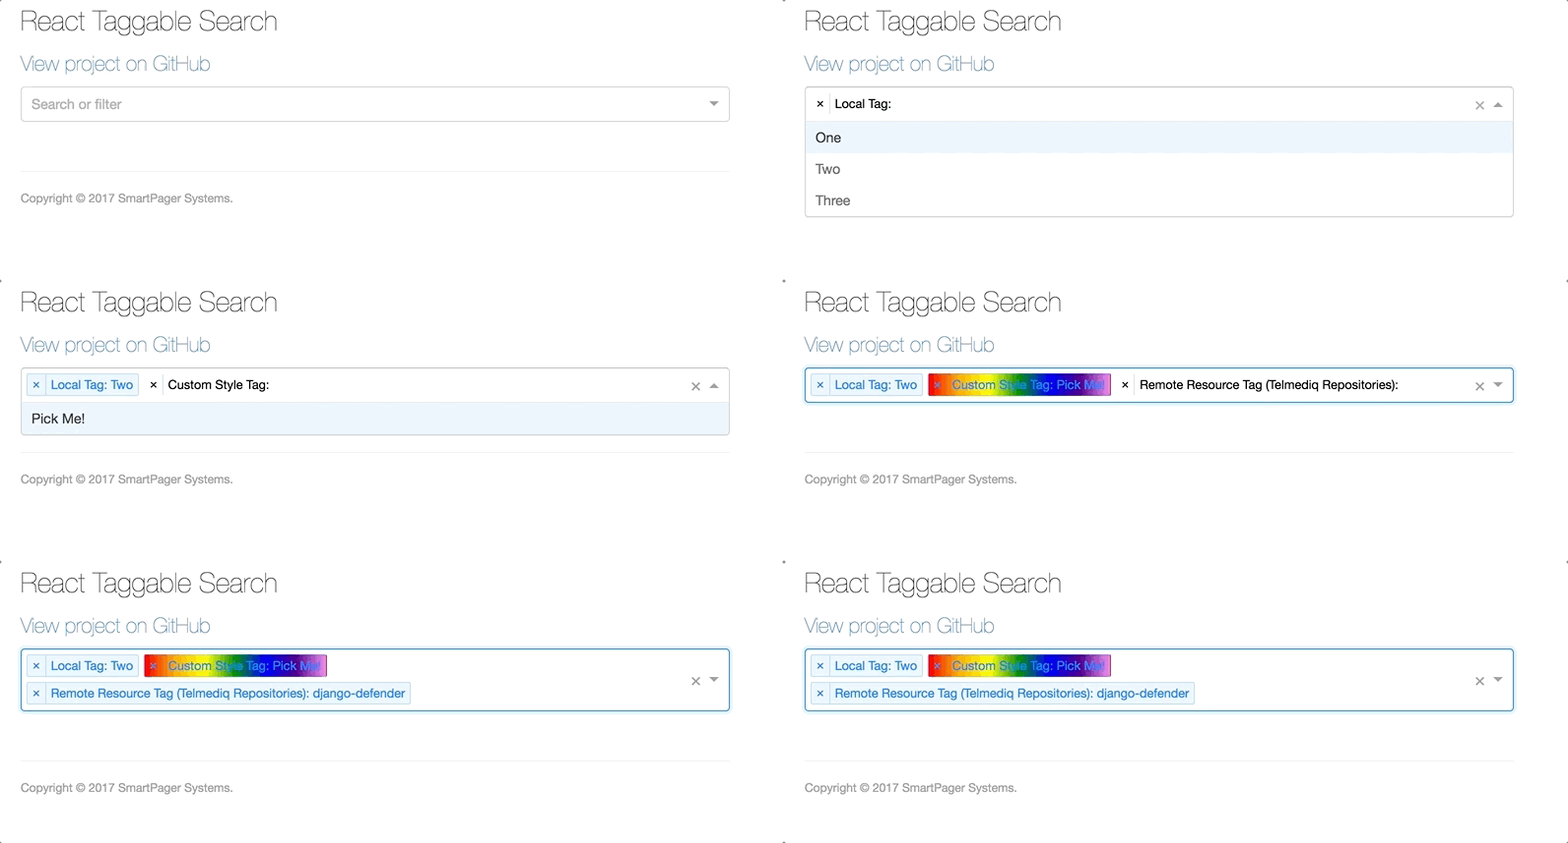
    example.gif

    To build the examples locally, run:

    npm install
    npm start
    

    Then open localhost:8000 in a browser.

    Installation

    The easiest way to use react-taggable-search is to install it from NPM and include it in your own React build process (using Browserify, Webpack, etc).

    npm install react-taggable-search --save
    

    Usage

    First, connect the taggableReducer to your Redux store:

    import {taggableReducer} from 'react-taggable-search';
    import {createStore, combineReducers, applyMiddleware} from 'redux';
    import thunk from 'redux-thunk';
     
    const reducers = combineReducers({taggableSearch: taggableReducer, ..rest});
    const store = createStore(
       reducers,
       applyMiddleware(
           thunk,
           // Other middleware
       )
    );
    

    The ReactTaggableSearch accepts the following props:

    Prop Description
    searchKey A unique key for this search component
    searchFn A callback function for searching. Parameters will be passed as an object of key/value pairs specified by tags
    tags An array of tag objects (see below)

    A tag object can be one of two objects:

    // A local tag
    {
    	tagKey: "somekey", // The query parameter key
    	tagLabel: "Some Label", // The label to show in the search bar
    	tagStyle: {background: 'red'}, // (Optional) A custom CSS style to apply to the tag once it is selected
    	options: [{key: "some option key", label: "Some Option Label"}] // The options available for the tag
    }
    
    // A fetched tag
    {
    	tagKey: "somekey", // The query parameter key,
    	tagLabel: "Some Label", // The label to show in the search bar
    	tagStyle: {background: 'red'}, // (Optional) A custom CSS style to apply to the tag once it is selected
    	optionResourceUri: "https://api.github.com/orgs/telmediq/repos/", // The resource URI to fetch the options from
    	optionResourceUriHeaders: {}, // An object with any request headers required
    	optionResourceCreationFactory: (resp)=>{}, // A function that takes a response from the optionResourceUri and returns a list of option objects with key and value properties 	
    }
    
    var ReactTaggableSearch = require('react-taggable-search');
    
    <ReactTaggableSearch {...props}/>
    

    Development (src, lib and the build process)

    NOTE: The source code for the component is in src. A transpiled CommonJS version (generated with Babel) is available in lib for use with node.js, browserify and webpack. A UMD bundle is also built to dist, which can be included without the need for any build system.

    To build, watch and serve the examples (which will also watch the component source), run npm start. If you just want to watch changes to src and rebuild lib, run npm run watch (this is useful if you are working with npm link).

    License

    Copyright (c) 2017 SmartPager Systems.

    Visit original content creator repository https://github.com/Telmediq/react-taggable-search