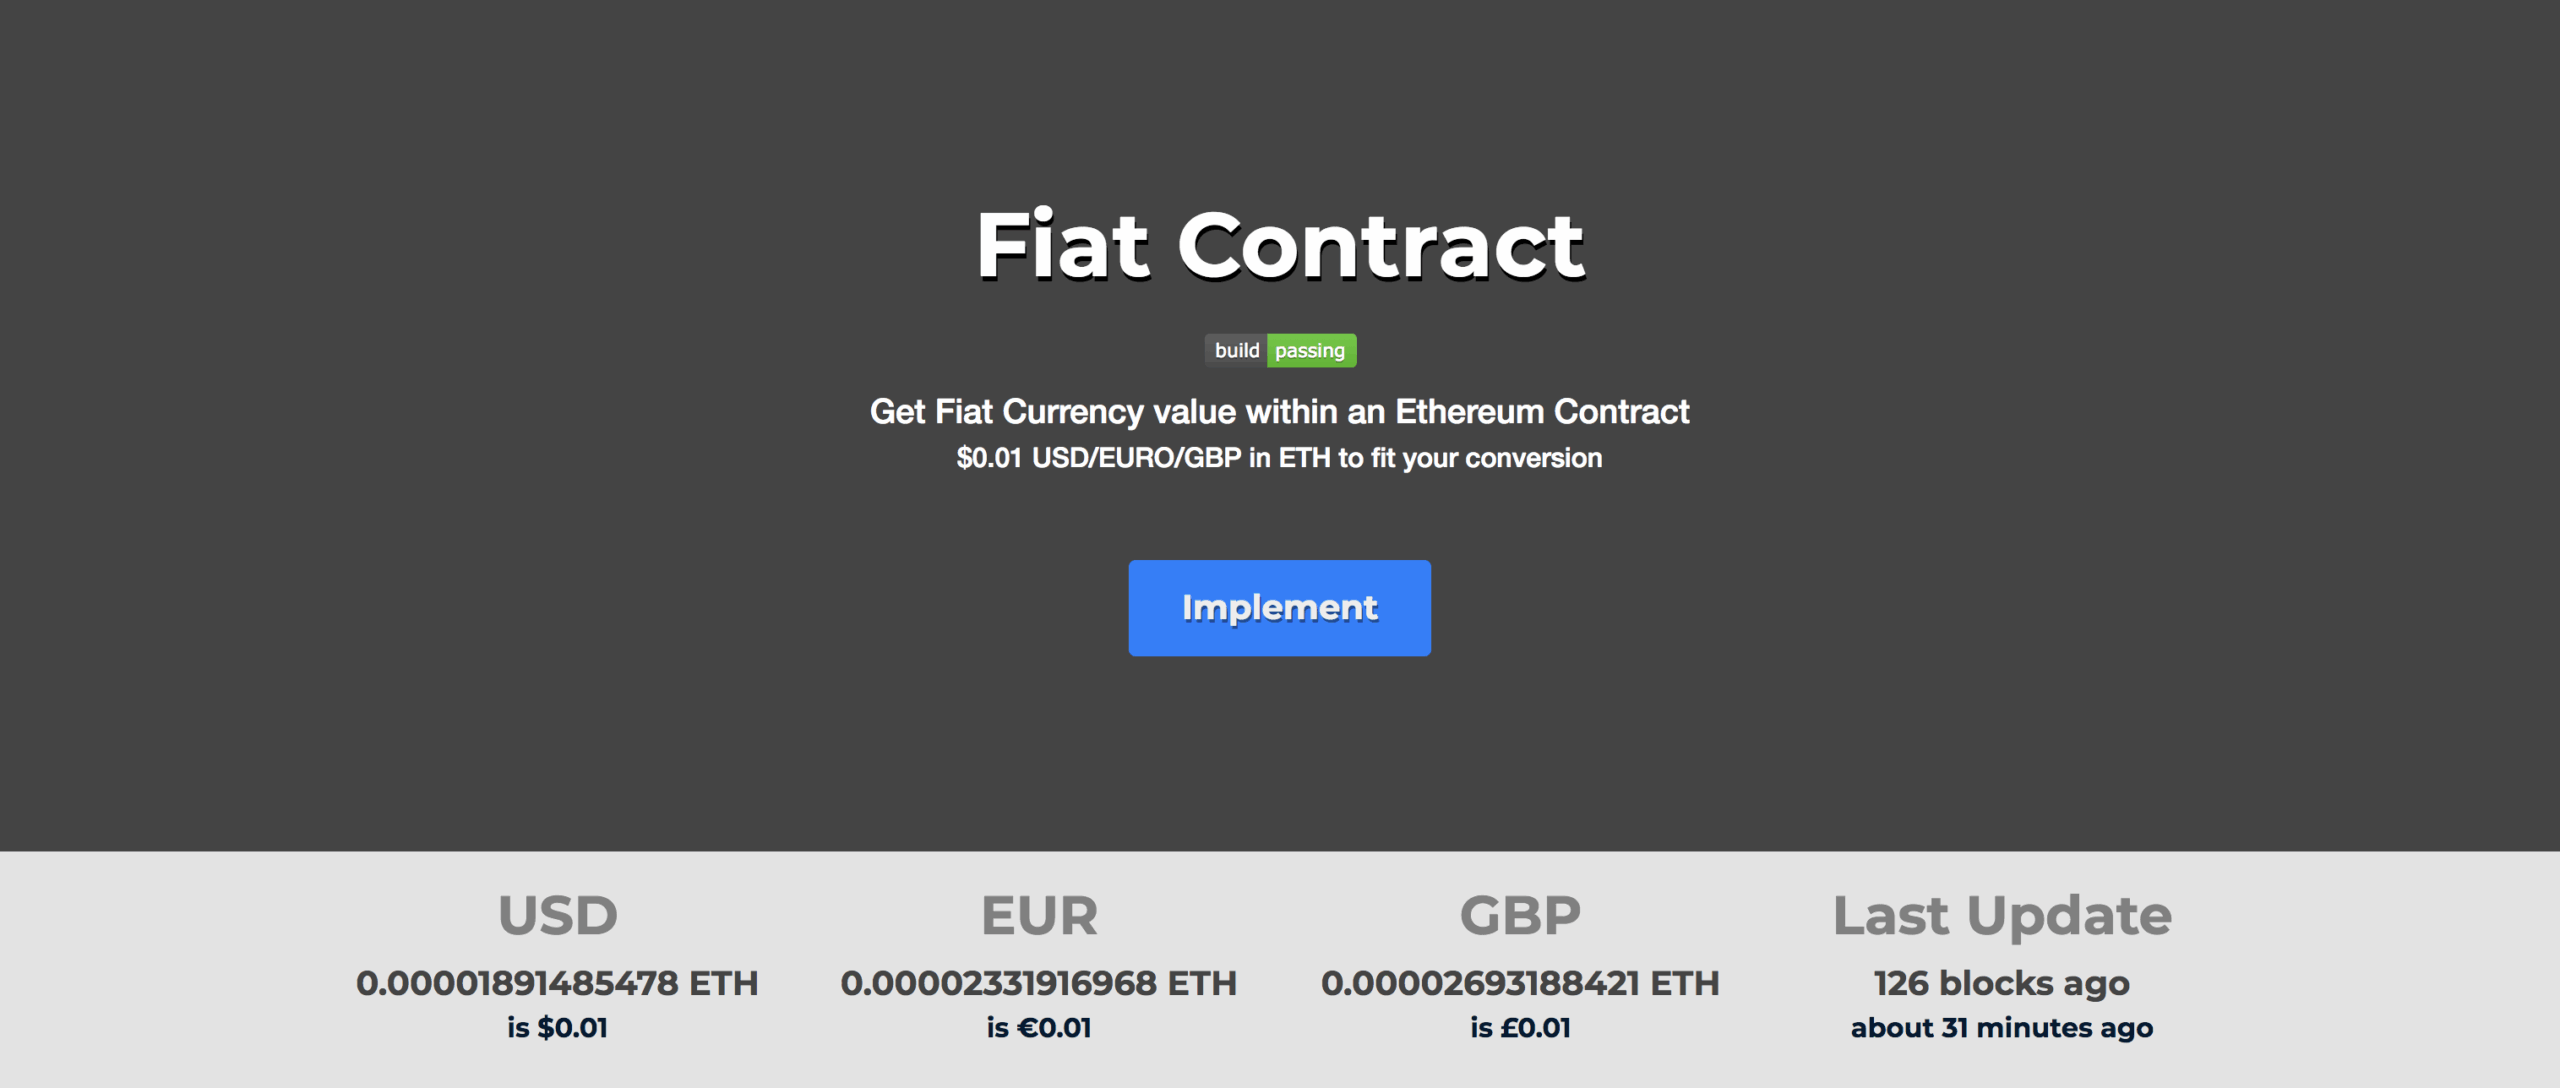
Category: Blog

  • fiatcontract

    Fiat Contract
    Testnet | Mainnet | Implement
    FiatContract(0x8055d0504666e2B6942BeB8D6014c964658Ca591)

    Fiat Contract Build Status

    Retrieve Ethereum market price by referencing this smart contract! Finally a way for smart contracts to get how much $1.00 is in ETH. By referencing this contracts you can even automatically convert other ERC20’s market prices and convert it back into ETH.

    This contract doesn’t need any calls, all you need to do is reference it and start converting ETH to multiple crypto’s. All return values are measure in Ethereum’s WEI amount, the lowest possible value. You can convert USD, EUR, and even GBP.

    price = FiatContract(0x8055d0504666e2B6942BeB8D6014c964658Ca591) // MAINNET ADDRESS
    price = FiatContract(0x2CDe56E5c8235D6360CCbb0c57Ce248Ca9C80909) // TESTNET ADDRESS (ROPSTEN)
    

    Market Price Update Rate

    • MAINNET – Every 1 hour (website has a counter for amount of days contract can run based on donations!)
    • TESTNET – Every 15 minutes

    Donating to the contract will help support the gas used for updating the exchange prices.

    Send ETH to address 0x2138FfE292fd0953f7fe2569111246E4DE9ff1DC with data: 0xed88c68e gas limit: 50000. You can also send ETH or any other ERC20 directly to the contract address. Thank you for donating!

    Market Rate inside Smart Contract

    This contract holds multiple market rates for multiple cryptocurrencies, the contract automatically converts back into ETH value.

    Simple to Use Methods

    uint256 coin = price.ETH(0);    // returns ETH value for 1 ETH. Always 1.
    uint256 cent = price.USD(0);    // returns $0.01 worth of ETH in USD.
    uint256 cent = price.EUR(0);    // returns $0.01 worth of ETH in Euro.
    uint256 cent = price.GBP(0);    // returns $0.01 worth of ETH in British Pound.
    

    Implement in your Contract

    First you must include the Pricing Contract on the top of your contract.

    contract MarketPrice {
        function ETH(uint _id) constant returns (uint256);
        function USD(uint _id) constant returns (uint256);
        function EUR(uint _id) constant returns (uint256);
        function GBP(uint _id) constant returns (uint256);
        function updatedAt(uint _id) constant returns (uint);
    }
    
    MarketPrice public price;
    
    function Example() {
      //price = MarketPrice(0x2138FfE292fd0953f7fe2569111246E4DE9ff1DC) // MAINNET ADDRESS
      price = MarketPrice(0x97d63Fe27cA359422C10b25206346B9e24A676Ca) // TESTNET ADDRESS
    }


    Here’s an example of getting $5.00 USD worth of ETH valued as USD.

    // $0.01 * 500 = $5.00
    function FiveUSDinETH() constant returns (uint256) {
        uint256 cents = price.USD(0);
        return cents * 500;
    }
    

    Get Market Price Changed Block

    uint updatedBlock = price.updatedAt(0); // 4,109,482
    
    if (block.number - updatedBlock > 100) {
      // the price hasn't been updated in 100 blocks.
    }
    

    Once you have the value of $5.00 worth of OMG in ETH, you can have a function to require the exact amount of ETH that is worth $5.00 of OMG.

    function TradeOMG() constant returns (uint256) {
        require(msg.value == FiveUSDtoOMG());
        // Awesome! The sender sent $5.00 worth of OMG based in ETH value (OMG/ETH)
    }
    

    Supported Cryptos

    • ETH – price.ETH(0);
    • more too come very very soon

    Market Price Update Rate

    Updating the contract requires the wallet to pay the Gas for the transaction.

    Donatation Based Update Timeline

    This contract can accept donatation, the updater address can update market rates at a higher frequency if there was more community support.

    Times a Day Supported Coins Supported Fiat Each Cost Daily Cost Monthly Total
    1 5 3 63,000 315,000 9,450,000
    24 5 3 63,000 1,512,000 45,300,000
    48 5 3 63,000 3,024,000 90,720,000

    More Examples

    Some examples are not yet implemented on the current version.

    uint256 weiAmount = (price.USD(0) * 450)       // $4.50 worth of ETH
    
    uint256 weiAmount = (price.USD(9) * 723)       // $7.23 worth of STORJ
    
    uint256 weiAmount = (price.USD(5) * 5793)      // $57.93 worth of LITECOIN
    
    uint256 weiAmount = (price.USD(1) * 100000)    // $1,000 worth of BTC
    
    uint256 weiAmount = (price.USD(0) * 10000)     // $1000 worth of ETH
    
    uint256 weiAmount = (price.EUR(12) * 10000)    // 1000 EURO's worth of OMG
    

    Testing

      Contract: MarketPrice
        ✓ should insert new ETH price (48ms)
        ✓ should insert new OMG price (38ms)
        ✓ should insert new STORJ price
        ✓ should get 0.01 USD worth of ETH
        ✓ should get 0.01 EURO worth of ETH
        ✓ should get 0.01 GBP worth of ETH
        ✓ should get 0.01 USD worth of OMG
        ✓ should get $105.75 USD worth of ETH
        ✓ should get 1.00 EURO worth of STORJ
        ✓ should get $100.00 USD worth of OMG
        ✓ should change Creator address (41ms)
        ✓ should change Sender address (47ms)
        ✓ should delete STORJ token from database (43ms)
        ✓ should donate to contract
        ✓ should request to update price
        ✓ should be MarketPrice contract address
        ✓ should test $5.00 worth of ETH
    
      17 passing (596ms)
    
    Visit original content creator repository https://github.com/hunterlong/fiatcontract
  • semantic

    CloudMitigator Semantic

    Test and Release Version PyPI version

    Allows you to manage versioning and releases using git tags as the source of truth. No more manual bumping of version files. CloudMitigator Semantic allows the user to control releases via commit messages. All the rest is handled for you. Just use trigger words listed below, and if a word is detected, a release will be automatically completed. Incrementing the specified number.

    • Major release: Major: major:
    • Minor release: Minor: minor:
    • Patch release: Patch: patch:

    Trigger words can also be modified through the inclusion of a semantic.yml.

    major:
      - "major:"
      - "breaking:"
    
    minor:
      - "minor:"
    
    patch:
      - "patch:"
    

    Installation:

    Run pip install cloudmitigator_semantic

    This will install a script called semantic

    Usage:

    Run semantic --help for a list of commands that can be run.

    semantic version will return the latest git tag version if it has been changed, or the current git tag version if unchanged.

    v0.0.1
    

    semantic changed will return a boolean on whether or not the version has been incremented.

    False
    

    Requirements:

    Must run command within a directory that has git initialized.

    If no version tag is specified then a default of v0.0.0 will be given. Make sure to tag your repo if you wish to start at a different seed number.

    This module is only compatible with ‘v’ tagging. This means ‘0.0.0’ will not be recognized where ‘v0.0.1’ will be.

    This is meant to be run as part of a github action. Please see the sample implementation for an example.

    Visit original content creator repository https://github.com/reflexivesecurity/semantic
  • nato_encoder

    Nato Encoder

    Encode hexadecimal string using the nato alphabet/numbers.

    python3 nato_encoder.py encode -M "deadbeef" -f "result.wav"
    
    zero zero one four uniform two whiskey four three six
    

    The file result.wav contain an audio version of the result phrase (created locally).

    You can decode the nato string in the same manner.

    python3 nato_encoder.py decode -M "zero zero one four uniform two whiskey four three six"
    
    deadbeef
    

    The -h argument can help you understanding how this program is working.

    usage: nato_encoder.py [-h] {encode,decode,map,version} ...
    
    NATO alphabet encoder/decoder.
    
    positional arguments:
      {encode,decode,map,version}
    
    optional arguments:
      -h, --help            show this help message and exit
    

    Protocol

    The protocol uses a starting code (2 chars of start type) followed by the message encoding.
    The encoding is realized char by char with a different conversion table for even and odd characters, this technique allows to recognize easily if a char is missing in the sequence.

    Even chars

    Fist nibble of the byte is encoded with a set of nato chars:

    • 0: alpha
    • 1: charlie
    • 2: echo
    • 3: golf
    • 4: india
    • 5: kilo
    • 6: mike
    • 7: oscar
    • 8: quebec
    • 9: sierra
    • a: uniform
    • b: whiskey
    • c: yankee
    • d: one
    • e: three
    • f: five

    Odd chars

    Second nibble of the byte is encoded with a different set of nato chars:

    • 0: bravo
    • 1: delta
    • 2: foxtrot
    • 3: hotel
    • 4: juliett
    • 5: lima
    • 6: november
    • 7: papa
    • 8: romeo
    • 9: tango
    • a: victor
    • b: xray
    • c: zulu
    • d: two
    • e: four
    • f: six

    Special chars

    • start: zero – used two time as starting sequence,
    • silence: char not printed but used as separator between words (in audio).

    Dependencies

    • pydub used for create an unique wav file,
    • speech_recognition used for STT conversion.

    License

               GNU GENERAL PUBLIC LICENSE, Version 3
    

    Based on pgp-words.py Copyright (C) 2015 Joe Ruether jrruethe@gmail.com

    Visit original content creator repository
    https://github.com/valerio-vaccaro/nato_encoder

  • Wyam

    Visit original content creator repository
    https://github.com/Smartrak/Wyam

  • Xamarin.HotSpotManager

    Xamarin.HotSpotManager

    Build status NuGet version

    Xamarin C# port of https://github.com/nickrussler/Android-Wifi-Hotspot-Manager-Class to allow creating and managing Hot Spots on Android devices

    Table of contents

    Hot Spot Manager

    An Xamarin Android library (and demo app) that provides a wrapper for the private android hotspot API.

    What it does

    The manager let’s you access and do the following with the private android hotspot API.

    • Check current status of hotspot
    • Enable/disable hotspot
    • Read or save the current hotspot configuration
    • Get list of clients connected to the hotspot

    Usage

    Install

    Nuget

    Install-Package Xamarin.HotSpotManager
    

    Basic Example

    The HotSpotManager.App is a quick app to see how the API works. Setting it up is very simple.

    //Other android usings
    
    using HotSpotManager;
    
    namespace MyApp
    {
        [Activity(Label = "MyApp", MainLauncher = true)]
        public class MainActivity : Activity
        {
            WifiApManager wifiApManager;
    
            protected override void OnCreate(Bundle savedInstanceState)
            {
                //Android view setup
    
                wifiApManager = new WifiApManager(this);
            }
    
            private void SetupHotspot()
            {
                WifiConfiguration config = new WifiConfiguration();
                config.Ssid = "MyAccessPoint";
    
                bool result = wifiApManager.SetWifiApEnabled(config, true);
            }
    
            private void SetupHotspotWithPassword()
            {
                //WPA Example
                WifiConfiguration config = new WifiConfiguration();
                config.Ssid = "MyAccessPoint";
                config.AllowKeyManagement.Set((int)KeyManagementType.WpaPsk);
                config.PreSharedKey = "Password";
    
                bool result = wifiApManager.SetWifiApEnabled(config, true);
            }
        }
    }

    Advanced

    /// <summary>
    /// Show write permission settings page to user if necessary or force
    /// </summary>
    /// <param name="force">Show settings page even when rights are already granted</param>
    public void ShowWritePermissionSettings(bool force);
    
    /// <summary>
    /// Start AccessPoint mode with the specified configuration.  If the radio is already running in AP mode, update
    /// the new configuration
    /// Note that starting in access point mode disables station mode operation
    /// </summary>
    /// <param name="wifiConfig">SSID, security and channel details as part of <see cref="WifiConfiguration"/></param>
    /// <param name="enabled">If enabled</param>
    /// <returns><code>true</code> if the operation succeeds, <code>false</code> otherwise</returns>
    public bool SetWifiApEnabled(WifiConfiguration wifiConfig, bool enabled);
    
    /// <summary>
    /// Gets the Wi-Fi enabled state.
    /// <see cref="IsWifiApEnabled()"/>
    /// </summary>
    /// <returns><see cref="Enums.WIFI_AP_STATE"/></returns>
    public Enums.WIFI_AP_STATE GetWifiApState();
    
    /// <summary>
    /// Returns whether Wi-Fi AP is enabled or disabled
    /// 
    /// <see cref="GetWifiApState()"/>
    /// </summary>
    /// <returns><code>true</code> if Wi-Fi AP is enabled</returns>
    public bool IsWifiApEnabled();
    
    /// <summary>
    /// Gets the Wi-Fi AP Configuration
    /// </summary>
    /// <returns>AP details in <see cref="WifiConfiguration"/></returns>
    public WifiConfiguration GetWifiApConfiguration();
    
    /// <summary>
    /// Sets the Wi-Fi AP Configuration
    /// </summary>
    /// <param name="wifiConfig">The <see cref="WifiConfiguration"/></param>
    /// <returns><code>true</code> if the operation succeeded, <code>false</code> otherwise</returns>
    public bool SetWifiApConfiguration(WifiConfiguration wifiConfig);
    
    /// <summary>
    /// Gets a list of the clients connected to the Hotspot
    /// </summary>
    /// <param name="onlyReachables"><code>false</code> if the list should contain unreachable (probably disconnected) clients, <code>true </code> otherwise</param>
    /// <param name="reachableTimeout">Reachable timeout in milliseconds</param>
    /// <returns>List of <see cref="ClientScanResult"/></returns>
    public Task<IList<ClientScanResult>> GetClientListAsync(bool onlyReachables, int reachableTimeout = 300);
    Visit original content creator repository https://github.com/nwestfall/Xamarin.HotSpotManager
  • tower-of-windsock

    The Tower of Windsock

    Binder

    What is this

    That is a space when I`ll make some ☣ – Experiences or create little articles, talking about things I love like λ – Functional programming.

    The Stack

    Development languages

    As development languages I’ll use basically C# and F#. C# or CSharp is a current Microsoft main language, easy to learn basic concepts c# is an elegant object oriented language, most used in corporative softwares but is so versatile can use in another many cases like game development with Unit Engine. Now F# or FSharp is a beauty Functional first language, in another words F# not only Functional like Haskell it can used as Object Oriented too that mean is possible have interoperability between C# and F#. Different than C#, F# not is use on big scale softwares yet, F# is versatile can be used in a big variance of softwares like Jet.com used in own Marketplace or in Data science with SciSharp.

    Environment

    Obviously I’ll use .NET framework but with a new feature Microsoft Interact. The Microsoft Interact is basically a bunch of tools to give for .NET Framework a interactive power with REPL or interactive notebooks, including F# and C# Jupyter kernels. So that way is possible combine .NET Framework with Jupyter Notebooks and share it without code compilation or local environment necessity.

    Other important environment is the Jupyter project. This is open source project to allows create and share interactive document, mixing live coding, charts and markdowns. Use Jupyter kernels to interpreting different languages and Jupyter lab as a incredible and customized, by extensions, web based UI.

    Now to support all those environments the Docker. Basically Docker is a open source platform to admin and create isolate environment using Linux Containers and a container is a isolated packing software with yours dependencies. With Docker is easy to create a isolated environment and share it, because you only need share the “configuration files” or use some cool cloud service like My Binder to host your notebooks with your environment, in another words you just share the cookbook not the food.

    Why use this stack?

    Once upon a time a magic software builder called Microsoft created a magic artifact called Microsoft interact VS Code. The artifact holder have a big power of… make same stuff than jupyter notebook with little advantages like the communication between different languages in same notebook and VS Code facilities, but I preferred use some magic artifacts already works, Jupyter lab, than use another is on preview version and not works so well. Ok.. That is not full truth, I’m yet using Microsoft Interact but without VS Code Insiders, but using F# and C# Kernel. But we has the environment problem yet, so to resolve that problem I used another magic artifact, the Docker. That way is easy to share the environment by a cookbook and build it locally or use a cool service like My Binder to host the notebooks.

    How to use

    To read the articles you have three possibilities, first you can click on Binder in this doc head, this button will redirect you one folder with all Jupyter Notebooks files, just chose one and have fun.
    The last way is using Docker, just fallow the instructions below:

    1. On project directory root run the command docker-compose up local-notebooks.

    And just that… Now a link you be generated after image build, click on link and enjoy it.

    Visit original content creator repository https://github.com/nathancaracho/tower-of-windsock
  • PicoBETH

    images1-1

    cht en

    Tip

    Translated by ChatGPT 3.5
    中文說明請點選上方image連結

    PicoBETH

    PicoBETH (Raspberry Pico Badminton Electronic Tension Head) is an open-source project that allows hobbyist stringers who enjoy stringing but only have mechanical stringing machines (drop-weight, manual crank) to create their own electronic tensioning head. If you have basic programming skills, this project can be easily completed.

    Design philosophy: Economical, Intuitive, Accurate

    Current Main Functions and Features

    The following is a demonstration of the features in version v2.7 (legacy version):

    DEMO VIDEO

    Functions

    • LB/KG display and setting
    • Pre-Stretch function
    • Constant-Pull system
    • Knot function
    • Tension adjustment manually during tensioning
      • Fine-tuned in 0.5 lb increments
    • Tension calibration
    • Stringing timer
    • Tension timer
    • Tension counter and boot counter
    • Pull speed with 9-speed selection
    • Supports a 15 ~ 90 lb tension range (suitable for tennis stringing)
      • Actual range depends on the specifications of the Ball Screw Slide Table and load cell
    • OTA firmware update support
      • Requires Raspberry Pi Pico W and firmware version v2.90 or later

    Features

    • 0.05LB High Precision
      • Lifetime calibration-free under stable conditions.
      • Achieved with the Sparkfun HX711 at 94Hz and software version V2.2 and later.
      • DEMO Vides
    • Low Power Consumption
      • Uses a DC19V4A power supply. *
    • Real-time UPS Redundancy (Uninterruptible Power Supply)
      • Uses 5 x 18650 batteries to ensure at least one complete racquet stringing.
    • Compact and Space-Saving
      • Dimensions: approximately 38(L) × 15(W) × 15(H) cm, Weight: 3.5 kg
    • Simple structure, low cost, and easy maintenance
      • All components are easy to source and inexpensive
    • High durability
      • Over 1 million tension reliability test cycles have been completed with no hardware failures detected. 1 Million Cycles Video

    Caution

    Starting from version v2.90B, it is required to manually upload the updated LCD library pico_i2c_lcd2.py to the src folder; otherwise, the program will not run properly (OTA updates alone will not complete the upgrade—manual file upload is necessary).
    This version also incorporates optimization experience from the ZeroBETH project, significantly enhancing PicoBETH’s constant-pull algorithm and tensioning start-up response, bringing overall performance to the same level as ZeroBETH and greatly improving the user experience.

    Development Project Plan

    Project Item Progress Remarks
    DM542 Series Stepper Motor Driver Testing Completed This test replaced the TB6600 with DM542, DM542C, and DM542S to evaluate noise reduction and assess their suitability for the project. See: Hardware Setup, Procurement, and Maintenance
    Porting to Raspberry Pi Zero Paused This task involved replacing the original Raspberry Pi Pico with a Raspberry Pi Zero and migrating the code accordingly. For details, see the project page: https://github.com/206cc/ZeroBETH/. Development has been paused due to significant performance improvements in PicoBETH.
    3D Printed Lightweight Tennis Version Completed Within the HW3D structure, a 50KG load cell and an SGX 1605 sliding platform will be used to perform a cyclic tension reliability test ranging from 55 to 65 LB. The test concluded after over 430,000 cycles due to a tension sensing error reported by the load cell.
    Pico 2 Compatibility Completed Due to the impact of the RP2350-E9 bug, it has been confirmed that direct usage is not possible. Please refer to branch/pico2-issue for more details.
    Reliability Testing Completed The HW1 tension test reached 1 million cycles with no hardware failures, marking the completion of the test.
    Tennis Racquet Compatibility Completed Within the HW2 structure, a 50KG load cell and a GX80 1605 sliding platform were used to conduct a cyclic tension reliability test at 75 to 85 LB. The test concluded after over 870,000 cycles when the load cell experienced metal fatigue fracture.
    3D-Printed Clip Head Completed Due to the poor durability of the clamping piece, development has been discontinued.

    Background

    A year ago, due to company club activities, I started playing badminton. Although my badminton skills weren’t great, I became fascinated with stringing. I purchased a drop-weight stringing machine and initially planned to buy an electronic tensioning head. However, I later thought about using my knowledge to create this project on the Raspberry Pico, incorporating a load sensor, several microswitches, and buttons.

    PicoBETH Family img_hw_family

    HW 1.5 machine (Old version, no longer updated) How to make step by step img_final_machine

    PicoBETH HW 1.5
    View 3D Model on Tinkercad

    HW 2.0 machine img_final_machine

    PicoBETH HW 2.0
    View 3D Model on Tinkercad

    HW 3D Print machine (Fully 3D-Printed) HW3DP

    PicoBETH HW 3D-Printed Version
    PicoBETH HW 3D-Printed Version branch branch/3d-printed

    Stringing demonstration video

    VIDEO

    Note

    If you don’t have a stringing machine, you can refer to this project to make one: Pico-Badminton-Stringer

    Note

    If you are choosing a manual badminton stringing machine. I recommend purchasing a drop-weight machine with a six-point fixed and base clamp. Drop-weight machines have a somewhat constant-pull effect, and the rackets strung with a drop-weight machine are not much different from those strung with an electronic machine. Before completing this project, you can use a drop-weight machine to become familiar with stringing. In the future, if the electronic stringing head malfunctions, you can quickly switch back to using the drop-weight machine head.

    Warning

    If the structure of your badminton stringing machine is not strong enough, I strongly advise against continuing with this project. A weak fixed platform can deform during tensioning, causing the racket frame to become round and the tension to decrease. Eventually, the machine will compensate for the tension, creating a vicious cycle that will ultimately lead to the racket breaking.

    Caution

    Extremely important: If your stringing machine is of a simple type, please make sure to reinforce the structure.

    Additional Documentation

    Improvement Branches

    Branch Name Description
    imp/beadclip-btn@jpliew Improved Bead Clip Activation Button
    branch/3d-printed HW 3D-Printed Version
    branch/tennis Compatible with Tennis Racquets
    branch/pico2-issue Pico2 issue

    Support

    If you encounter any issues during the production process, feel free to leave a comment on the YouTube tutorial video. If you complete the project, you’re also very welcome to share photos of your finished product in the GitHub discussions.

    Acknowledgements

    License

    • Source Code: Licensed under the Apache License 2.0
    • Hardware Design: Distributed under the CERN Open Hardware Licence v2 – Weakly Reciprocal
    Visit original content creator repository https://github.com/206cc/PicoBETH
  • basic-auth-service

    basic-auth-service

    Basic Auth as an External Authorization service for Envoy Proxy

    Configuration

    All configuration is done using env vars. Check .env file for a sample configuration.

    • PORT (optional, defaults to 10000): Listen port.
    • BASIC_AUTH_SERVICE_HTPASSWD: List of users in Apache Htpasswd format, remember to escape all $ characters. If defined, this has preference over username/password. See .env for an example.
    • BASIC_AUTH_SERVICE_USERNAME: Basic authentication username.
    • BASIC_AUTH_SERVICE_PASSWORD: Basic authentication password.
    • BASIC_AUTH_SERVICE_HOST_ALLOWLIST (optional, defaults to *): Comma separated list of hosts, on glob format, to which authentication will be applied. If the incoming host matches any it will be processed, if not the call will be allowed.
    • BASIC_AUTH_SERVICE_PATH_ALLOWLIST (optional, defaults to *): Comma separated list of paths, on glob format, to which authentication will be applied. If the incoming path matches any it will be processed, if not the call will be allowed.

    Sample Envoy config to use this service:

    • On http_filters:

      - name: envoy.filters.http.ext_authz
        typed_config:
          "@type": type.googleapis.com/envoy.extensions.filters.http.ext_authz.v3.ExtAuthz
          failure_mode_allow: false
          http_service:
            server_uri:
              uri: basic-auth-service:10000
              cluster: ext-authz
              timeout: 0.25s
            authorization_response:
              allowed_upstream_headers:
                patterns:
                  - exact: "x-auth-username"
          include_peer_certificate: true
          with_request_body:
            max_request_bytes: 1024
            allow_partial_message: true
            pack_as_bytes: true
          transport_api_version: V3
    • On clusters:

    - name: ext-authz
      connect_timeout: 0.25s
      type: logical_dns
      lb_policy: round_robin
      load_assignment:
        cluster_name: ext-authz
        endpoints:
        - lb_endpoints:
          - endpoint:
              address:
                socket_address:
                  address: basic-auth-service
                  port_value: 10000

    Docker

    This service is available as a docker image at pablote/basic-auth-service

    Visit original content creator repository
    https://github.com/pablote/basic-auth-service

  • laravel-nexmo

    Laravel Nexmo

    Currently a work in progress so nothing is even close to guaranteed to work and will periodically fail

    Package Status and Goals

    • Build NCCOs
    • Implement a very simple IVR builder
    • Handle answering voice calls
    • Route calls to correct IVR menu
    • Handle incoming SMS
    • Handle outgoing SMS
    • Very simple real time SMS chat (being partially redone)
    • Handle input from IVR steps properly

    Install

    Using composer

    $ composer require taylornetwork/laravel-nexmo

    Migrate Tables

    $ php artisan migrate

    Publish Assets

    $ php artisan vendor:publish --provider="TaylorNetwork\\LaravelNexmo\\NexmoServiceProvider"

    Will publish config, migrations and js (vue) components.

    config/
        + ncco.php
    database/
        migrations/
            + 2020_04_03_000000_create_calls_table.php
            + 2020_04_03_000001_create_ivrs_table.php
            + 2020_04_03_000002_create_ivr_steps_table.php
            + 2020_04_07_000003_create_sms_table.php
    resources/
        vendor/
            taylornetwork/
                laravel-nexmo/
                    components/
                        Ivr/
    		        + IvrBuilder.vue
    			+ IvrMenu.vue
    			+ IvrApp.vue
    		    Sms/ (not up to date)
    		        + Messenger.vue
    			+ ComposeSms.vue
                    + laravel-nexmo.js
    

    If you’re going to be using the included vue components, see Vue Components.

    Add your Vonage (Nexmo) information

    In your .env add the following lines

    NEXMO_KEY=(Your API Key)
    NEXMO_SECRET=(Your API Secret)
    NEXMO_NUMBER=(Your Number)
    

    Setup your Vonage (Nexmo) Application

    You will need to login to your linked application and set your webhooks.

    Run php artisan route:list should add the following routes:

    +---------------------------------+--------------------------------------------------------------------------------+
    | URI                             | Action                                                                         |
    +---------------------------------+--------------------------------------------------------------------------------+
    | api/nexmo/call/answer           | TaylorNetwork\LaravelNexmo\Controllers\API\CallController@answer               |
    | api/nexmo/call/ivr/{ivr}/answer | TaylorNetwork\LaravelNexmo\Controllers\API\CallController@answerWithIvr        |
    | api/nexmo/event/update          | TaylorNetwork\LaravelNexmo\Controllers\API\EventController@handleEventUpdate   |
    | api/nexmo/sms/inbound           | TaylorNetwork\LaravelNexmo\Controllers\API\SmsController@handleInboundMessage  |
    | api/nexmo/sms/outbound          | TaylorNetwork\LaravelNexmo\Controllers\API\SmsController@handleOutboundMessage |
    | api/nexmo/sms/{sms}/send        | TaylorNetwork\LaravelNexmo\Controllers\API\SmsController@send                  |


    Assign your webhooks to the corressponding URLs.

    Prepare for Incoming Calls

    You’ll need to either (A) create a new IVR menu or (B) override the answer method.

    Create a new IVR menu

    Currently no easy way to do this other than adding the entries manually.

    Override answer method

    By default the package will look for App\Http\Controllers\Api\CallController

    This is customizable by publishing config.

    namespace App\Http\Controllers\Api;
    
    use Illuminate\Routing\Controller;
    use Illuminate\Http\JsonResponse;
    use Illuminate\Http\Request;
    
    class CallController extends Controller
    {
    	public function answer(Request $request): JsonResponse
    	{
    		// Must respond with a JSON response.
    	}
    }

    Usage

    NccoBuilder Class

    Can be called using the NccoBuilder facade or by creating a new instance.

    Action Methods

    All the NCCO actions are their own method. See NCCO Reference
    Each action method will have a required parameter that will match the required parameter in the NCCO reference. All other options can be added in the second optional array parameter.

    Action methods always return the NccoBuilder instance, so you can chain any additional methods.

    For example:

    // Default talk action
    $builder->talk('Hello!');
    
    // Talk with different voice
    $builder->talk('Hi there!', [ 'voiceName' => 'Joey' ]);
    
    // Connect to another phone
    $builder->connect([ 'type' => 'phone', 'number' => '19998887777' ]);
    
    // Start recording
    $builder->record();

    Additonal Methods

    addAction(string $action, array $options = [])

    Will add the action provided with the given options.

    All the action methods call this method.

    $builder->addAction('talk', [ 'text' => 'Hello!' ]);

    append(array $data)

    Appends to the end of the NCCO stack.

    prepend(array $data)

    Prepends to the beginning of the NCCO stack.

    getNcco() and ncco()

    Returns the NCCO array.

    getJsonNcco() and json()

    Returns the NCCO as JSON.

    buildResponse(int $httpStatus = 200)

    Builds and returns an Illuminate\Http\JsonResponse with the NCCO and provided HTTP status code.

    respond(int $httpStatus = 200)

    Returns the built response from buildResponse()

    Call Model

    The TaylorNetwork\LaravelNexmo\Models\Call model handles the incoming calls and their statuses and prices.

    Ivr Model

    The TaylorNetwork\LaravelNexmo\Models\Ivr model handles what the caller hears and what happens when they call in.

    Each Ivr model has many IvrSteps which handle everything.

    You can build the IVR menu by using the build() or respond() method.

    build()

    Will build the entire NCCO for the menu and return the NCCO as an array.

    respond()

    Will convert the built menu from the build() method and convert it to an Illuminate\Http\JsonResponse

    In your controller you can do something like:

    public function incomingIvr(Ivr $ivr, Request $request) 
    {
    	return $ivr->respond();
    }

    IvrStep Model

    The TaylorNetwork\LaravelNexmo\Models\IvrStep model has the action, options and order of it in the corresponding IVR menu.

    Sms Model

    The TaylorNetwork\LaravelNexmo\Models\Sms model handles all incoming and outgoing SMS messages, including actually sending the messages.

    send()

    Calling this method will send the message if it’s hasn’t been sent yet, as long as it’s an outgoing message.

    Vue Components

    Setup

    If you’re going to be using the included Vue components you’ll need to make sure you have all the required dependencies.

    $ npm install --save vue vue-template-compiler axios pusher-js v-jsoneditor

    Or import into your package.json

    {
     "dependencies": {
        "vue": "^2.6.11",
        "vue-template-compiler": "^2.6.11",
        "axios": "^0.19.2",
        "pusher-js": "^5.1.1",
        "v-jsoneditor": "^1.2.3"
      }
    }

    Set your Pusher app key in laravel-nexmo.js

    // laravel-nexmo.js
    
    window.pusherInstance = new Pusher('your-pusher-app-key', {
        cluster: 'us2',
        forceTLS: true,
        encrypted: true,
    });

    Require laravel-nexmo.js in your app.js file after window.Vue = require('vue'); and before creating a new Vue instance.

    // app.js
    
    window.Vue = require('vue');
    
    // This assumes your app.js file is at resources/js
    require('../vendor/taylornetwork/laravel-nexmo/laravel-nexmo');
    
    const app = new Vue({
        el: '#app',
    });

    IvrApp

    The IvrApp component will allow you to create and edit IVR menus and steps

    <ivr-app></ivr-app>

    Where $ivr is an instance of TaylorNetwork\LaravelNexmo\Models\Ivr

    ComposeSms

    The ComposeSms component is an easy starting point to send an SMS to a number using the nexmo number you’ve previously set up.

    <compose-sms></compose-sms>

    Messenger

    The Messenger component is a very basic chat app using Pusher.

    <!-- Minimum --> <messenger number="(number of the person the chat is with NOT your number)"></messenger> <!-- With a contact name --> <messenger number="(contact's number)" name="(contact's name)"></messenger> <!-- With a contact name and existing messages --> <messenger number="(contact's number)" name="(contact's name)" :messages="{{ $loadedMessagesFromDatabase }}"></messenger>

    License

    MIT

    Visit original content creator repository
    https://github.com/taylornetwork/laravel-nexmo

  • IlseDynamo

    IlseDynamo

    An utility collection of Dynamo nodes wrapping repetitive tasks of some authoring tools in AEC.

    GGUStratig Nodes

    DrillingProbes

    Read and transform data of drilling probes given as GGUStratic XML files. The script will read an example and transfer the data to an Excel sheet wrapping soil layers into columns while storing each probe as a new row.

    Example Dynamo file: GGU-Data-Export-Excel.dyn

    GGU-Data-Export-Excel.dyn

    Allplan Nodes

    AttributeDefinition

    • Reading Allplan’s local attribute definition schema
    • Merging, diffing and dumping definition data to data matrixes

    Example Dynamo file: AllplanAttributeCollection-Example.dyn

    AllplanAttributeCollection-Example.png

    AttributeFavourite

    • Reading Allplan’s local attribute favourite files (atfanfx – extension)
    • Resolving against attribute definition
    • Modifying favourites
    • Saving and dumping to data matrixes (i.e. for reporting)

    Example Dynamo file: AllplanAttributeFavourite-Example.dyn

    AllplanAttributeFavourite-Example.png

    AttributeLevel and AttributeMatrix

    Those are custom nodes which wrap a Level-Of-Information concept. Basically LoI is a cumulative aggregation of attributes associated to a numerical level. Higher levels will include lower levels. A LoI matrix wraps a table of attributes referring to their “first occurance” level.

    • Reading/importing LOI definition (minimum LOI and attribute name)
    • Resolving against definition and favourites
    • Creating attribute favourites based on specific LOI level

    Example Dynamo file: AllplanAttributeLevel-Example.dyn

    AllplanAttributeLevel-Example.png

    Visit original content creator repository https://github.com/il-se/IlseDynamo