Author: 6nmx0zvpmu84

  • embedded-fonts

    Introduction

    althrough embedded-graphics defaultly support mono fonts. but is it not enough for other language, e.g. chinese, kerea, japan and so on.

    This project includes a small tool convert-bdf to split(optional) and convert the BDF file format into the internal data structure for text render by the embedded-graphics library. this work is based on embedded-graphic BDF utils. attention: below section also describe how to convert ttf/pcf to bdf.

    With this crate, you can only import the required glyphs into your project. For example, only 35 characters “中国欢迎China welcomes日本へようこそWelcome to Japan북한 환영Welcome North Korea” are introduced, which is very meaningful in MCUs with limited space, such as avr.

    convert-bdf tool introduction

    tool convert-bdf to split(optional) and convert the BDF file format into the internal data structure for text render by the embedded-graphics library.

    convert-bdf result is rust code, the result can be merge to you rust crate to display text. usage please refer the examples.

    install/uninstall convert-bdf

    install binary convert-bdf through below command:

    # install
    #$ cargo install --path . --features build-binary
    $ cargo install --git https://github.com/flyingyizi/embedded-fonts --features build-binary                                          
      Updating git repository `https://github.com/flyingyizi/embedded-fonts`                  
      Installing embedded-fonts v0.1.0 (https://github.com/flyingyizi/embedded-fonts#ac02aec3)
      ....
      Installing D:\prog\Scoop\persist\rustup\.cargo\bin\convert-bdf.exe
       Installed package `embedded-fonts v0.1.0 (https://github.com/flyingyizi/embedded-fonts#ac02aec3)` (executable `convert-bdf.exe`) 
    
    #uninstall
    $ cargo install --list
      ....
    embedded-fonts v0.1.0 (https://github.com/flyingyizi/embedded-fonts#ac02aec3):
        convert-bdf.exe
      .....
    $ cargo uninstall -p embedded-fonts
        Removing ~\.cargo\bin\convert-bdf.exe
    
    #help information
    $ convert-bdf --help
    convert-bdf
    
    USAGE:
        convert-bdf [OPTIONS] <BDF_FILE>
    
    ARGS:
        <BDF_FILE>    BDF input
    
    OPTIONS:
        -h, --help                       Print help information
        -o, --output <OUTPUT>            output rust embedded glyphs [default: ./]
    
            --range <RANGE>              export characters list,defaultly export all glyphs in the bdf.
                                         e.g --range "abc" means only export a,b and c code's glyphs.
                                         if exist range and range-* options at the same time. merge them
                                         as final exporting glyphs scope
            --range-file <RANGE_FILE>    same as range option, but through characters file.
            --range-path <RANGE_PATH>    same as range option, but through rust source directory. it
                                         will colllect the first paraments of all Text::new stmts as the
                                         characters list
    
    $convert-bdf  --range "中國zhongguo"  wenquanyi_12pt.bdf
    output rust glyphs file :"./wenquanyi_12pt.rs"
    
    $convert-bdf --range-path ./examples .\examples\testdata\wenquanyi_12pt.bdf
    output rust glyphs file :"./wenquanyi_12pt.rs"


    BDF to rust-file conversion

    Use the tool convert-bdf (part of this project) to create a rust-file:

    $ convert-bdf   --range "中国欢迎China welcomes日本へようこそWelcome to Japan북한 환영Welcome North Korea"   wenquanyi_12pt.bdf

    TTF (truetype font) conversion

    Overview

    This is the conversion procedure for truetype fonts:

    • 1.Find out a suitable point size (ftview)
    • 2.Convert TTF to BDF (otf2bdf)
    • 3.Convert BDF to a rust code (convert-bdf)

    TTF point size

    A truetype font often does not look very well with every point size. You can use the unix command ftview from the freetype tool collection to check the font with different point sizes:

    $ftview 8 <fontname>.ttf

    Different point sizes can be accessed with cursor up and down. Often it is useful to turn off aliasing by pressing “a”.

    TTF to BDF conversion

    The tool otf2bdf can convert the truetype font into bitmap format (bdf). For a linux environment, otf2bdf should be available as software package.

    This conversion is done for a specific point size:

    $otf2bdf -p <pointsize> -r 75 -o <fontname>.bdf <fontname>.ttf

    The result can be checked with font tools, e.g. fontforge.

    BDF to rust-file conversion

    refer the tool convert-bdf (part of this project) introduction.

    Add font to a project

    refer examples
    PCF (Portable Compiled Format) conversion

    Fonts distributed in the .pcf or .pcf.gz file format are part of the X11 distribution. Steps are:

    • 1.Convert PCF to BDF (pcf2bdf)
    • 2.Convert BDF to the internal representation (through convert-bdf)

    pcf2bdf is often available as a software package on a linux system:

    for example:

    $sudo apt-get install xfonts-wqy
    
    $apt-file list xfonts-wqy
    xfonts-wqy: /etc/X11/fonts/misc/xfonts-wqy-1.alias
    xfonts-wqy: /etc/fonts/conf.avail/85-xfonts-wqy-1.conf
    xfonts-wqy: /usr/share/doc/xfonts-wqy/AUTHORS.gz
    xfonts-wqy: /usr/share/doc/xfonts-wqy/LOGO.png
    xfonts-wqy: /usr/share/doc/xfonts-wqy/README.gz
    xfonts-wqy: /usr/share/doc/xfonts-wqy/changelog.Debian.gz
    xfonts-wqy: /usr/share/doc/xfonts-wqy/copyright
    xfonts-wqy: /usr/share/fonts/X11/misc/wenquanyi_10pt.pcf
    xfonts-wqy: /usr/share/fonts/X11/misc/wenquanyi_11pt.pcf
    xfonts-wqy: /usr/share/fonts/X11/misc/wenquanyi_12pt.pcf
    xfonts-wqy: /usr/share/fonts/X11/misc/wenquanyi_13px.pcf
    xfonts-wqy: /usr/share/fonts/X11/misc/wenquanyi_9pt.pcf
    
    # uncompress , then get bdf file
    $sudo apt-get install pcf2bdf
    $pcf2bdf -v -o wenquanyi_9pt.bdf  wenquanyi_9pt.pcf 
    

    See the section for truetype conversion for further handling of the BDF file.

    Create new BDF fonts

    There are several tools available for the creation of new fonts:

    gbdfed.
    fontforge Both tools can export to the BDF file format.

    BDF to rust-file conversion

    refer the tool convert-bdf (part of this project) introduction.

    Add font to a project

    refer examples
    Visit original content creator repository
    https://github.com/flyingyizi/embedded-fonts

  • DEU-Dolmus-Taxi

    DEU Dolmus Taxi

    Goal
    In this assignment you are expected to simulate and solve “DEU Dolmuş Taxi” synchronization problem, which its details are given.

    On your days at the university, you are waiting for a long time at the entrance of the campus to reach the department or library almost every time. We are launching the DEU Dolmuş Taxi application to facilitate this. This will prevent both all students to create long queues and to move the taxis before be full. Also it will provide a safe and comfortable transportation because taxis will carry students up to the capacity.

    With your simulation and solution with mutex and semaphores students and taxis hopefully will no longer wait so long for their courses.

    General Requirements:

    • For this assignment you will work individual.

    • The POSIX library (pthread) will be used.

    • We compile your code on Debian 8 OS with this code: gcc StudentNumber.c –o StudentNumber –lpthread

    Scenario (Implementation Requirements):

    • Each taxi has 4 students capacity.

    • Students will come to taxi-stop continuously and random periods.

    • The taxi stop has 10 taxis and also 10 taxi drivers. Also each taxi contains one taxi driver.

    • The states for each taxi:

      o Collect student state: Driver will announce to the students his remaining places to get in the taxi, if it has one or more students in the taxi. For example, each taxi has 2 students and wait two more students, driver call “The last two students, let’s get up!”

      o Idle (Empty) state: If there is no student at the taxi stop, the drivers will sleep. The driver does not like to be awake, if not necessary, i.e. no student are waiting.

      o Full and transport state: If there are 4 students in the taxi, the taxi will leave from the taxi stop.

    • The states for each student:

      o Waiting in taxi: When a student comes at stop, she/he gets in the nearly full capacity taxi. If no student in taxi, first student wakes driver if he is sleeping. And the students will study or relax in the taxi until the taxi’s full.

      o Waiting at taxi stop: If there is no taxi at the taxi stop, she/he’s gonna wait for a taxi at the stop.

    • You should do not do the same taxi work constantly so that others can work overtime, so consider the status of starvation.

    Visit original content creator repository
    https://github.com/ozgurhepsag/DEU-Dolmus-Taxi

  • ex_algo

    ExAlgo

    ExAlgo is a collection of data structures and algorithms implemented in Elixir. This is the authors attempt to see algorithms through Elixir’s lens.

    The sole purpose of this is to use as a learning tool for algorithms in a functional language set-up. I am also thinking of using this to host some algorithms that could come in handy while solving Advent of Code. Almost all algorithms mentioned here have well tested and production ready libraries so I see little use that anyone would want to use this for anything serious.

    Development

    Download this repo and get the dependencies with mix deps.get. Go to iex -S mix to try out the algorithms in the REPL. mix test runs all the tests.

    Detailed Documentation

    TODO – Add ex_doc pages with detailed explanations of each categories.

    Catalogue

    Graph

    Name Implementation Test Benchmark Link Note

    Heap

    Name Implementation Test Benchmark Link Note

    List

    Name Implementation Test Benchmark Link Note
    Linked List linked_list.ex Yes No
    Circular List circular_list.ex Yes No
    BidirectionalList bidirectional_list.ex Yes No WIP
    Maximum Subarray Sum algorithms.ex Yes No Kadane’s Algorithm

    Functional/Immutable

    Name Implementation Test Benchmark Link Note

    Queue

    Name Implementation Test Benchmark Link Note
    Queue queue.ex Yes No

    Search

    Name Implementation Test Benchmark Link Note
    Binary Search binary_search.ex Yes No

    Set

    Name Implementation Test Benchmark Link Note
    Disjoint Set disjoint_set.ex Yes No

    Sort

    Name Implementation Test Benchmark Link Note
    Bubble Sort exchange.ex Yes No
    Insertion Sort insertion.ex Yes No
    Merge Sort merge.ex Yes No
    Pigeonhole Sort distribution.ex Yes No
    Quick Sort exchange.ex Yes No
    Selection Sort selection.ex Yes No

    Stack

    Name Implementation Test Benchmark Link Note
    Stack stack.ex Yes No
    Min-Max Stack min_max_stack.ex Yes No

    String

    Name Implementation Test Benchmark Link Note

    Tree

    Name Implementation Test Benchmark Link Note
    Binary Search Tree binary_search_tree.ex Yes No
    Tree Traversals traversal.ex Yes No

    Counting

    Name Implementation Test Benchmark Link Note
    Permutations combinatorics.ex::permutations Yes No Naive
    Combinations combinatorics.ex::combinations Yes No Naive

    Trie

    Name Implementation Test Benchmark Link Note

    Dynamic Programming

    Name Implementation Test Benchmark Link Note
    Subset Sum subset_sum.ex Yes No FIXME: Not all subsets are listed. Need to work on that.

    Numbers

    Name Implementation Test Benchmark Link Note
    Chinese Remainder Theorem chinese_remainder.ex Yes No
    Catalan Numbers (Recursive) catalan.ex::recursive Yes No
    Catalan Numbers (Dynamic) catalan.ex::dp Yes No
    Divisors arithmetics.ex::divisors Yes No


    Visit original content creator repository
    https://github.com/code-shoily/ex_algo

  • Cash-Register

    Cash-Register

    Design a cash register drawer function checkCashRegister() that accepts purchase price as the first argument (price), payment as the second argument (cash), and cash-in-drawer (cid) as the third argument.

    cid is a 2D array listing available currency.

    The checkCashRegister() function should always return an object with a status key and a change key.

    Return {status: “INSUFFICIENT_FUNDS”, change: []} if cash-in-drawer is less than the change due, or if you cannot return the exact change.

    Return {status: “CLOSED”, change: […]} with cash-in-drawer as the value for the key change if it is equal to the change due.

    Otherwise, return {status: “OPEN”, change: […]}, with the change due in coins and bills, sorted in highest to lowest order, as the value of the change key.

    Currency Unit Amount

    Penny $0.01 (PENNY)

    Nickel $0.05 (NICKEL)

    Dime $0.1 (DIME)

    Quarter $0.25 (QUARTER)

    Dollar $1 (ONE)

    Five Dollars $5 (FIVE)

    Ten Dollars $10 (TEN)

    Twenty Dollars $20 (TWENTY)

    One-hundred Dollars $100 (ONE HUNDRED)

    See below for an example of a cash-in-drawer array:

    [

    [“PENNY”, 1.01],

    [“NICKEL”, 2.05],

    [“DIME”, 3.1],

    [“QUARTER”, 4.25],

    [“ONE”, 90],

    [“FIVE”, 55],

    [“TEN”, 20],

    [“TWENTY”, 60],

    [“ONE HUNDRED”, 100]

    ]

    Tests

    checkCashRegister(19.5, 20, [[“PENNY”, 1.01], [“NICKEL”, 2.05], [“DIME”, 3.1], [“QUARTER”, 4.25], [“ONE”, 90], [“FIVE”, 55], [“TEN”, 20], [“TWENTY”, 60], [“ONE HUNDRED”, 100]]) should return an object.

    checkCashRegister(19.5, 20, [[“PENNY”, 1.01], [“NICKEL”, 2.05], [“DIME”, 3.1], [“QUARTER”, 4.25], [“ONE”, 90], [“FIVE”, 55], [“TEN”, 20], [“TWENTY”, 60], [“ONE HUNDRED”, 100]]) should return {status: “OPEN”, change: [[“QUARTER”, 0.5]]}.

    checkCashRegister(3.26, 100, [[“PENNY”, 1.01], [“NICKEL”, 2.05], [“DIME”, 3.1], [“QUARTER”, 4.25], [“ONE”, 90], [“FIVE”, 55], [“TEN”, 20], [“TWENTY”, 60], [“ONE HUNDRED”, 100]]) should return {status: “OPEN”, change: [[“TWENTY”, 60], [“TEN”, 20], [“FIVE”, 15], [“ONE”, 1], [“QUARTER”, 0.5], [“DIME”, 0.2], [“PENNY”, 0.04]]}.

    checkCashRegister(19.5, 20, [[“PENNY”, 0.01], [“NICKEL”, 0], [“DIME”, 0], [“QUARTER”, 0], [“ONE”, 0], [“FIVE”, 0], [“TEN”, 0], [“TWENTY”, 0], [“ONE HUNDRED”, 0]]) should return {status: “INSUFFICIENT_FUNDS”, change: []}.

    checkCashRegister(19.5, 20, [[“PENNY”, 0.01], [“NICKEL”, 0], [“DIME”, 0], [“QUARTER”, 0], [“ONE”, 1], [“FIVE”, 0], [“TEN”, 0], [“TWENTY”, 0], [“ONE HUNDRED”, 0]]) should return {status: “INSUFFICIENT_FUNDS”, change: []}.

    checkCashRegister(19.5, 20, [[“PENNY”, 0.5], [“NICKEL”, 0], [“DIME”, 0], [“QUARTER”, 0], [“ONE”, 0], [“FIVE”, 0], [“TEN”, 0], [“TWENTY”, 0], [“ONE HUNDRED”, 0]]) should return {status: “CLOSED”, change: [[“PENNY”, 0.5], [“NICKEL”, 0], [“DIME”, 0], [“QUARTER”, 0], [“ONE”, 0], [“FIVE”, 0], [“TEN”, 0], [“TWENTY”, 0], [“ONE HUNDRED”, 0]]}.

    Visit original content creator repository
    https://github.com/Nobledsmarts/Cash-Register

  • newPortfolio

    🌟 NewPortfolio 🌟

    Next.js Tailwind CSS TypeScript

    🎨 Project Description

    NewPortfolio is a modern portfolio website built with Next.js, Tailwind CSS, and AceternityUI. The project showcases my programming skills and the portfolio of projects I have worked on. ✨

    🛠 Technologies Used

    • Next.js: A React framework for building server-side rendered applications.
    • Tailwind CSS: A utility-first CSS framework for rapid UI development.
    • AceternityUI: A UI component library.
    • TypeScript: A statically typed superset of JavaScript.

    🚀 Features

    • Responsive Design: The website is fully responsive and adapts to different screen sizes.
    • Animations: Utilizes CSS animations for a better user experience.
    • Optimization: Optimized loading of pages and components.

    📥 Getting Started

    To get a local copy up and running, follow these simple steps:

    1. Clone the repository:
      git clone https://github.com/BartlomiejSadza/newPortfolio.git
    2. Navigate to the project directory:
      cd newPortfolio
    3. Install dependencies:
      npm install
    4. Run the development server:
      npm run dev
      # or
      yarn dev
      # or
      pnpm dev
      # or
      bun dev

    Open http://localhost:3000 with your browser to see the result. 🌐

    You can start editing the page by modifying app/page.tsx. The page auto-updates as you edit the file. 🔄

    To change my data to your personal info look at data/index.ts. 📸

    🌐 Live

    Check out live: https://bartlomiejsadza.me/

    📬 Contact

    If you have any questions or suggestions, feel free to reach out:


    Created with ❤️ by Me ;p

    Visit original content creator repository https://github.com/BartlomiejSadza/newPortfolio
  • carbon

    Carbon Cover

    License C Standard C++ Standard Latest Git Tag OpenSSF Best Practices SCLA signatures count Weekly commit frequency

    Carbon has been a dream so far, we haven’t found a single bug and it’s super easy to work with. (⸮)

    • ¯\_(ツ)_/¯

    Carbon (/ˈkɑːbᵊn/) is the ultimate tiny and easy to use high-level library for C/C++ (с реализацией на этих языках).
    It even can be used to test any piece of C/C++ code; thus, working as a full-fledged testing suite.
    If you’d like to make a contribution, you can check the project’s guidelines; also, keep an eye on both security issues reporting instructions and our Code of Conduct. Furthermore, if you do something cool with Carbon, don’t forget to add the #sk-cbn tag to your topics! 👍


    We use CI/CD to ensure the final product has the expected level of quality, if not more 🚀. This is the summary of the pipelines being run:

    KindTargetStatus
    CI (Continuous Integration)master
    CD (Continuous Delivery)master
    CD (Continuous Deployment)master/docs/www

    Do you want to keep up with changes or do you have a question that doesn’t require you to open an issue?
    Join the GitHub Discussions forum, meet other users like you. The more we are, the better for everyone.
    There you can ask questions, exchange ideas, share some of your work, make polls, stay up to date with new updates and announcements of the library, and much more.

    Do you want to support Carbon? Consider becoming a sponsor, or making a donation via Ko-fi or Buy Me a Coffee. Many thanks to all of you who are reading this; I hope it’ll be useful and it’ll make you enjoy programming a little bit more.

    Warning

    Carbon is currently in an alpha quality stage, and is not production-ready yet.

    Table of Contents

    Usage

    Carbon is in essence a two-part library: the static/dynamic lib pkg itself (where all symbols and instructions are defined), and the C/C++ header file (which gets generated by the build process as an amalgamation of all internal headers the library uses).

    Get the code

    We can get Carbon in our preferred way of managing dependencies or external libraries in our projects. It’s important to do so via the OFFICIAL Git repository hosted on GitHub, and not through any other website or server. Appart from that, any ref can be checked out, being master (the trunk of all dev progress), a tagged commit (e.g. v1.0), an actively maintained version branch (e.g. v1.0.y/stable) or a LTS version branch (e.g. v1.0.y/lts) the preferred ones.

    Here are the main options of obtaining it:

    Git Clone:

    git clone --recursive https://github.com/sparky-game/carbon

    Git Submodule:

    git submodule add https://github.com/sparky-game/carbon vendor/carbon
    git submodule update --init --recursive

    CMake FetchContent:

      —  Мои соболезнования.

    include(FetchContent)
    FetchContent_Declare(
      carbon
      GIT_REPOSITORY "https://github.com/sparky-game/carbon"
      GIT_TAG        [...]
      GIT_PROGRESS   TRUE
    )
    FetchContent_MakeAvailable(carbon)

    Pre-compiled Package:

    You might want to take a look to the latest release available and download the appropriate pre-compiled package for your CPU’s architecture and OS.

    Build from source

    If wanted to build Carbon from source yourself, it can be done without any problems. We use a custom make utility (which uses Carbon under the hood) as our build system to manage testing, compiling and packaging the library, both static and dynamic.

    This custom build system can rebuild itself properly (using our preferred compilation flags), which means that you’ll only need to bootstrap it once:

    cc src/make.c -o make

    Once built, we can take a look at the available subcommands and options by issuing the command ./make help. To run the full build pipeline it’s just as easy as:

    ./make

    Tip

    Checkout the installation instructions to make Carbon available on your system as any other library (the PREFIX is customizable according to your needs).

    Examples

    A good place to start learning and discovering all the things you can do with Carbon is reading and executing the examples. One can issue the command ./make examples to build them all: for each example source file (.c or .cc) it produces a .bin executable file, which can be run normally without problems.

    Furthermore, you can also take a look at the amalgamated distributable header file (carbon.h), where each module of the library is declared and documented. This is all the documentation you’ll ever need, and it’s also a good place to find new things Carbon can do.

    Lastly, for a more advanced understanding of all available and tested functionality that Carbon provides, reading the tests is a great next step. There it can be learnt both how to work with the different modules, and how to use Carbon itself to test your own applications and programs. One can issue the command ./make test to build and run all tests.

    Licensing

    Copyright (C) Wasym A. Alonso. All Rights Reserved.

    Carbon is free software: you can redistribute it and/or modify it under the terms of the GNU Affero General Public License Version 3 (GNU AGPL-3.0) as published by the Free Software Foundation (FSF) on November 19th 2007.
    Carbon is distributed in the hope that it will be useful, but WITHOUT ANY WARRANTY; without even the implied warranty of MERCHANTABILITY or FITNESS FOR A PARTICULAR PURPOSE. See the GNU Affero General Public License Version 3 for more details.
    For more information, see https://www.gnu.org/licenses/agpl-3.0.

    As mentioned above, Carbon is licensed under the GNU’s AGPL-3.0-only, which means that any software created or that uses it is also subject to the same license. This implies that if you develop an application using Carbon, it must also be released as free software under the GNU’s AGPL-3.0-only. This ensures that the freedoms to use, study, modify and share the software are preserved for everyone.

    If you prefer to release your application under a different, more commercially friendly license, there is an option available. You can purchase a copy of the Carbon Runtime Library Exception (CRLE), which is in essence a distinct commercial license, for you to use this library without releasing your software under GNU’s AGPL-3.0-only. Some key aspects of the CRLE are the following:

    • One-Time Purchase (OTP): Once obtaining a copy of the CRLE, it lasts forever without expiration date.
    • Project-specific: Each CRLE is tied to a single project of yours.
    • Version compatibility: Each CRLE applies to a specific branch or minor version of Carbon (e.g. v1.0.y/lts), enabling you to update the library to a more up-to-date version with the same CRLE.
    • Professional support: You also gain access to more advanced support regarding the library, as well as a private channel to make high-priority requests such as bug fixes or security vulnerabilities.

    For more details and to acquire a copy of the CRLE, please visit https://libcarbon.org.

    References

    1. Alshahwan, N., Chheda, J., Finegenova, A., Gokkaya, B., Harman, M., Harper, I., Marginean, A., Sengupta, S., Wang, E. (2024, February 14). Automated Unit Test Improvement using Large Language Models at Meta [Paper]. arXiv, Cornell University. https://doi.org/10.48550/arXiv.2402.09171
    2. Barrett, S. (2015, June 7). Advice for Writing Small Programs in C [Video]. YouTube. https://www.youtube.com/watch?v=eAhWIO1Ra6M
    3. Catto, E. (2024, August 27). Determinism [Article]. Box2D. https://box2d.org/posts/2024/08/determinism/
    4. Gallego Durán, F. J. (2021, December 7). C++ Slotmap: qué es y por qué usarlo en tu motor de videojuegos [Video]. YouTube. https://www.youtube.com/watch?v=GKfRDAUvFoE
    5. Gallego Durán, F. J. (2021, December 10). C++ Programamos un Slotmap para nuestro motor de videojuegos ECS [Video]. YouTube. https://www.youtube.com/watch?v=ZfWF9tqQOh0
    6. Gallego Durán, F. J. (2022, January 28). C++ Template Metaprogramming: Introducción [Video]. YouTube. https://www.youtube.com/watch?v=4NKbmCfZ9OI
    7. Gallego Durán, F. J. (2022, March 2). C++ Operadores: cómo programar un vector 3D [Video]. YouTube. https://www.youtube.com/watch?v=cBMbhJPuw1w
    8. Holden, D. (2021, April 16). orangeduck/Cello: Higher level programming in C [Code]. GitHub. https://github.com/orangeduck/Cello
    9. Immisch, L., Wilstrup C. (2017, January 1). PCM Terminology and Concepts [Article]. pyalsaaudio’s Website. https://larsimmisch.github.io/pyalsaaudio/terminology.html
    10. Kutepov, A. (2023, June 30). tsoding/nn.h: Simple stb-style header-only library for Neural Networks [Code]. GitHub. https://github.com/tsoding/nn.h
    11. Kutepov, A. (2024, November 5). tsoding/nob.h: Next generation of the NoBuild idea [Code]. GitHub. https://github.com/tsoding/nob.h
    12. Kutepov, A. (2025, February 3). tsoding/coroutines: Custom coroutines implementation in GNU C [Code]. GitHub. https://github.com/tsoding/coroutines
    13. Matsumoto, M., Nishimura, T. (1998, January 1). Mersenne twister: a 623-dimensionally equidistributed uniform pseudo-random number generator [Paper]. Transactions on Modeling and Computer Simulation (TOMACS), Association for Computing Machinery (ACM). https://doi.org/10.1145/272991.272995
    14. Matsumoto, M., Nishimura, T. (2004, September 29). A C-program for MT19937-64 (2004/9/29 version) [Code]. Department of Mathematics, Hiroshima University. http://www.math.sci.hiroshima-u.ac.jp/m-mat/MT/VERSIONS/C-LANG/mt19937-64.c
    15. Nishimura, T. (2000, October 1). Tables of 64-bit Mersenne twisters [Paper]. Transactions on Modeling and Computer Simulation (TOMACS), Association for Computing Machinery (ACM). https://doi.org/10.1145/369534.369540
    16. OptumSoft. (2016, January 5). Dangers of using dlsym() with RTLD_NEXT [Article]. OptumSoft. https://optumsoft.com/dangers-of-using-dlsym-with-rtld_next/
    17. Rice, B. (2018, January 23). You Can’t Unit Test C, Right? [Video]. YouTube. https://www.youtube.com/watch?v=z-uWt5wVVkU
    18. Viotti, J. C. (2023, December 1). Understanding Objective-C by transpiling it to C++ [Article]. jviotti.com. https://www.jviotti.com/2023/12/01/understanding-objective-c-by-transpiling-it-to-cpp.html
    Visit original content creator repository https://github.com/sparky-game/carbon
  • app-crud

    Typing SVG

    O objetivo deste projeto é criar um aplicativo CRUD para gerenciamento de tarefas, permitindo aos usuários: criar, visualizar, editar e excluir tarefas de forma eficiente.

    Requisitos Funcionais Implementados

    📄 Título 📋 Descrição
    🏠 Página Inicial
    • 🔍 Foi criada uma página inicial limpa e intuitiva usando Bootstrap para listar as tarefas atuais.
    • 📅 A lista de tarefas é exibida, incluindo título, descrição, status, responsável, prazo e data de criação.
    Criar ➕
    • 📝 Um formulário foi implementado para adicionar novas tarefas.
    • ✅ Os campos obrigatórios, como título e descrição da tarefa, foram configurados com validação de formulário para garantir o preenchimento adequado.
    Editar ✏️
    • 🔄 Foi adicionada a funcionalidade de edição de tarefas existentes.
    • 📝 Os usuários podem modificar o título, descrição, responsável e a data de conclusão da tarefa.
    Excluir 🗑️
    • ❌ Os usuários podem excluir tarefas individualmente.
    • 🤔 Uma confirmação é solicitada antes da exclusão.
    Requisitos Técnicos

    • O back-end do aplicativo foi criado em PHP para lidar com a lógica de negócios e a interação com o banco de dados.
    • JavaScript foi usado para adicionar interatividade à interface do usuário, incluindo validação de formulário, confirmação de exclusão e carregamento dinâmico de dados.
    • Bootstrap foi utilizado para criar um design atraente e responsivo para o aplicativo.
    • Os dados das tarefas são armazenados em um banco de dados MySQL, com tabelas apropriadas criadas para a finalidade.

    Banco de dados

    Crie um banco de dados e execute as instruções SQLs abaixo para criar as tabelas projects, users e tasks:

    -- Criação da tabela "projects"
    CREATE TABLE projects (
        id INT(10) UNSIGNED NOT NULL AUTO_INCREMENT,
        titulo VARCHAR(255) NOT NULL COLLATE utf8mb4_general_ci,
        description TEXT NOT NULL COLLATE utf8mb4_general_ci,
        ativo ENUM('s','n') NOT NULL COLLATE utf8mb4_general_ci,
        date TIMESTAMP NOT NULL DEFAULT current_timestamp() ON UPDATE current_timestamp(),
        PRIMARY KEY (id)
    );
    
    -- Criação da tabela "users"
    CREATE TABLE users (
        id INT(10) UNSIGNED NOT NULL AUTO_INCREMENT,
        name VARCHAR(100) NOT NULL COLLATE utf8mb4_general_ci,
        email VARCHAR(150) NOT NULL COLLATE utf8mb4_general_ci,
        password VARCHAR(20) NOT NULL COLLATE utf8mb4_general_ci,
        username VARCHAR(10) COLLATE utf8mb4_general_ci,
        PRIMARY KEY (id)
    );
    
    -- Criação da tabela "tasks"
    CREATE TABLE tasks (
        id INT(11) UNSIGNED NOT NULL AUTO_INCREMENT,
        idProject INT(11) NOT NULL,
        name VARCHAR(50) NOT NULL COLLATE utf8mb4_general_ci,
        description VARCHAR(300) NOT NULL COLLATE utf8mb4_general_ci,
        completed TINYINT(1) NOT NULL,
        notes VARCHAR(150) COLLATE utf8mb4_general_ci DEFAULT NULL,
        deadline DATE NOT NULL,
        createdAt DATETIME NOT NULL,
        updatedAt DATETIME NOT NULL,
        PRIMARY KEY (id),
        KEY idx_idProject (idProject)
    );

    Configuração

    As credenciais do banco de dados estão no arquivo config.php e você deve alterar para as configurações do seu ambiente (HOST, NAME, USER e PASS).

    ℹ️ Nota: Certifique-se de que seu ambiente de desenvolvimento está configurado adequadamente e que as dependências, como PHP e MySQL, estão instaladas.

    Tecnologias

    Frontend: HTML5 CSS3 JavaScript Bootstrap

    Backend: Php

    Database: MySQL

    Versionamento: Git GitHub

    IDEs: VSCode

    Contribuições

    Contribuições são bem-vindas! Se você quiser contribuir para o desenvolvimento deste projeto, siga as práticas recomendadas para contribuição, incluindo a criação de um fork e a abertura de uma solicitação pull.

    Criado por Amanda Ribeiro. Logo Akm
    Visit original content creator repository https://github.com/amanda-ribeiroc/app-crud
  • flowsurface

    Flowsurface

    An experimental open-source desktop charting application. Currently supports Binance and Bybit

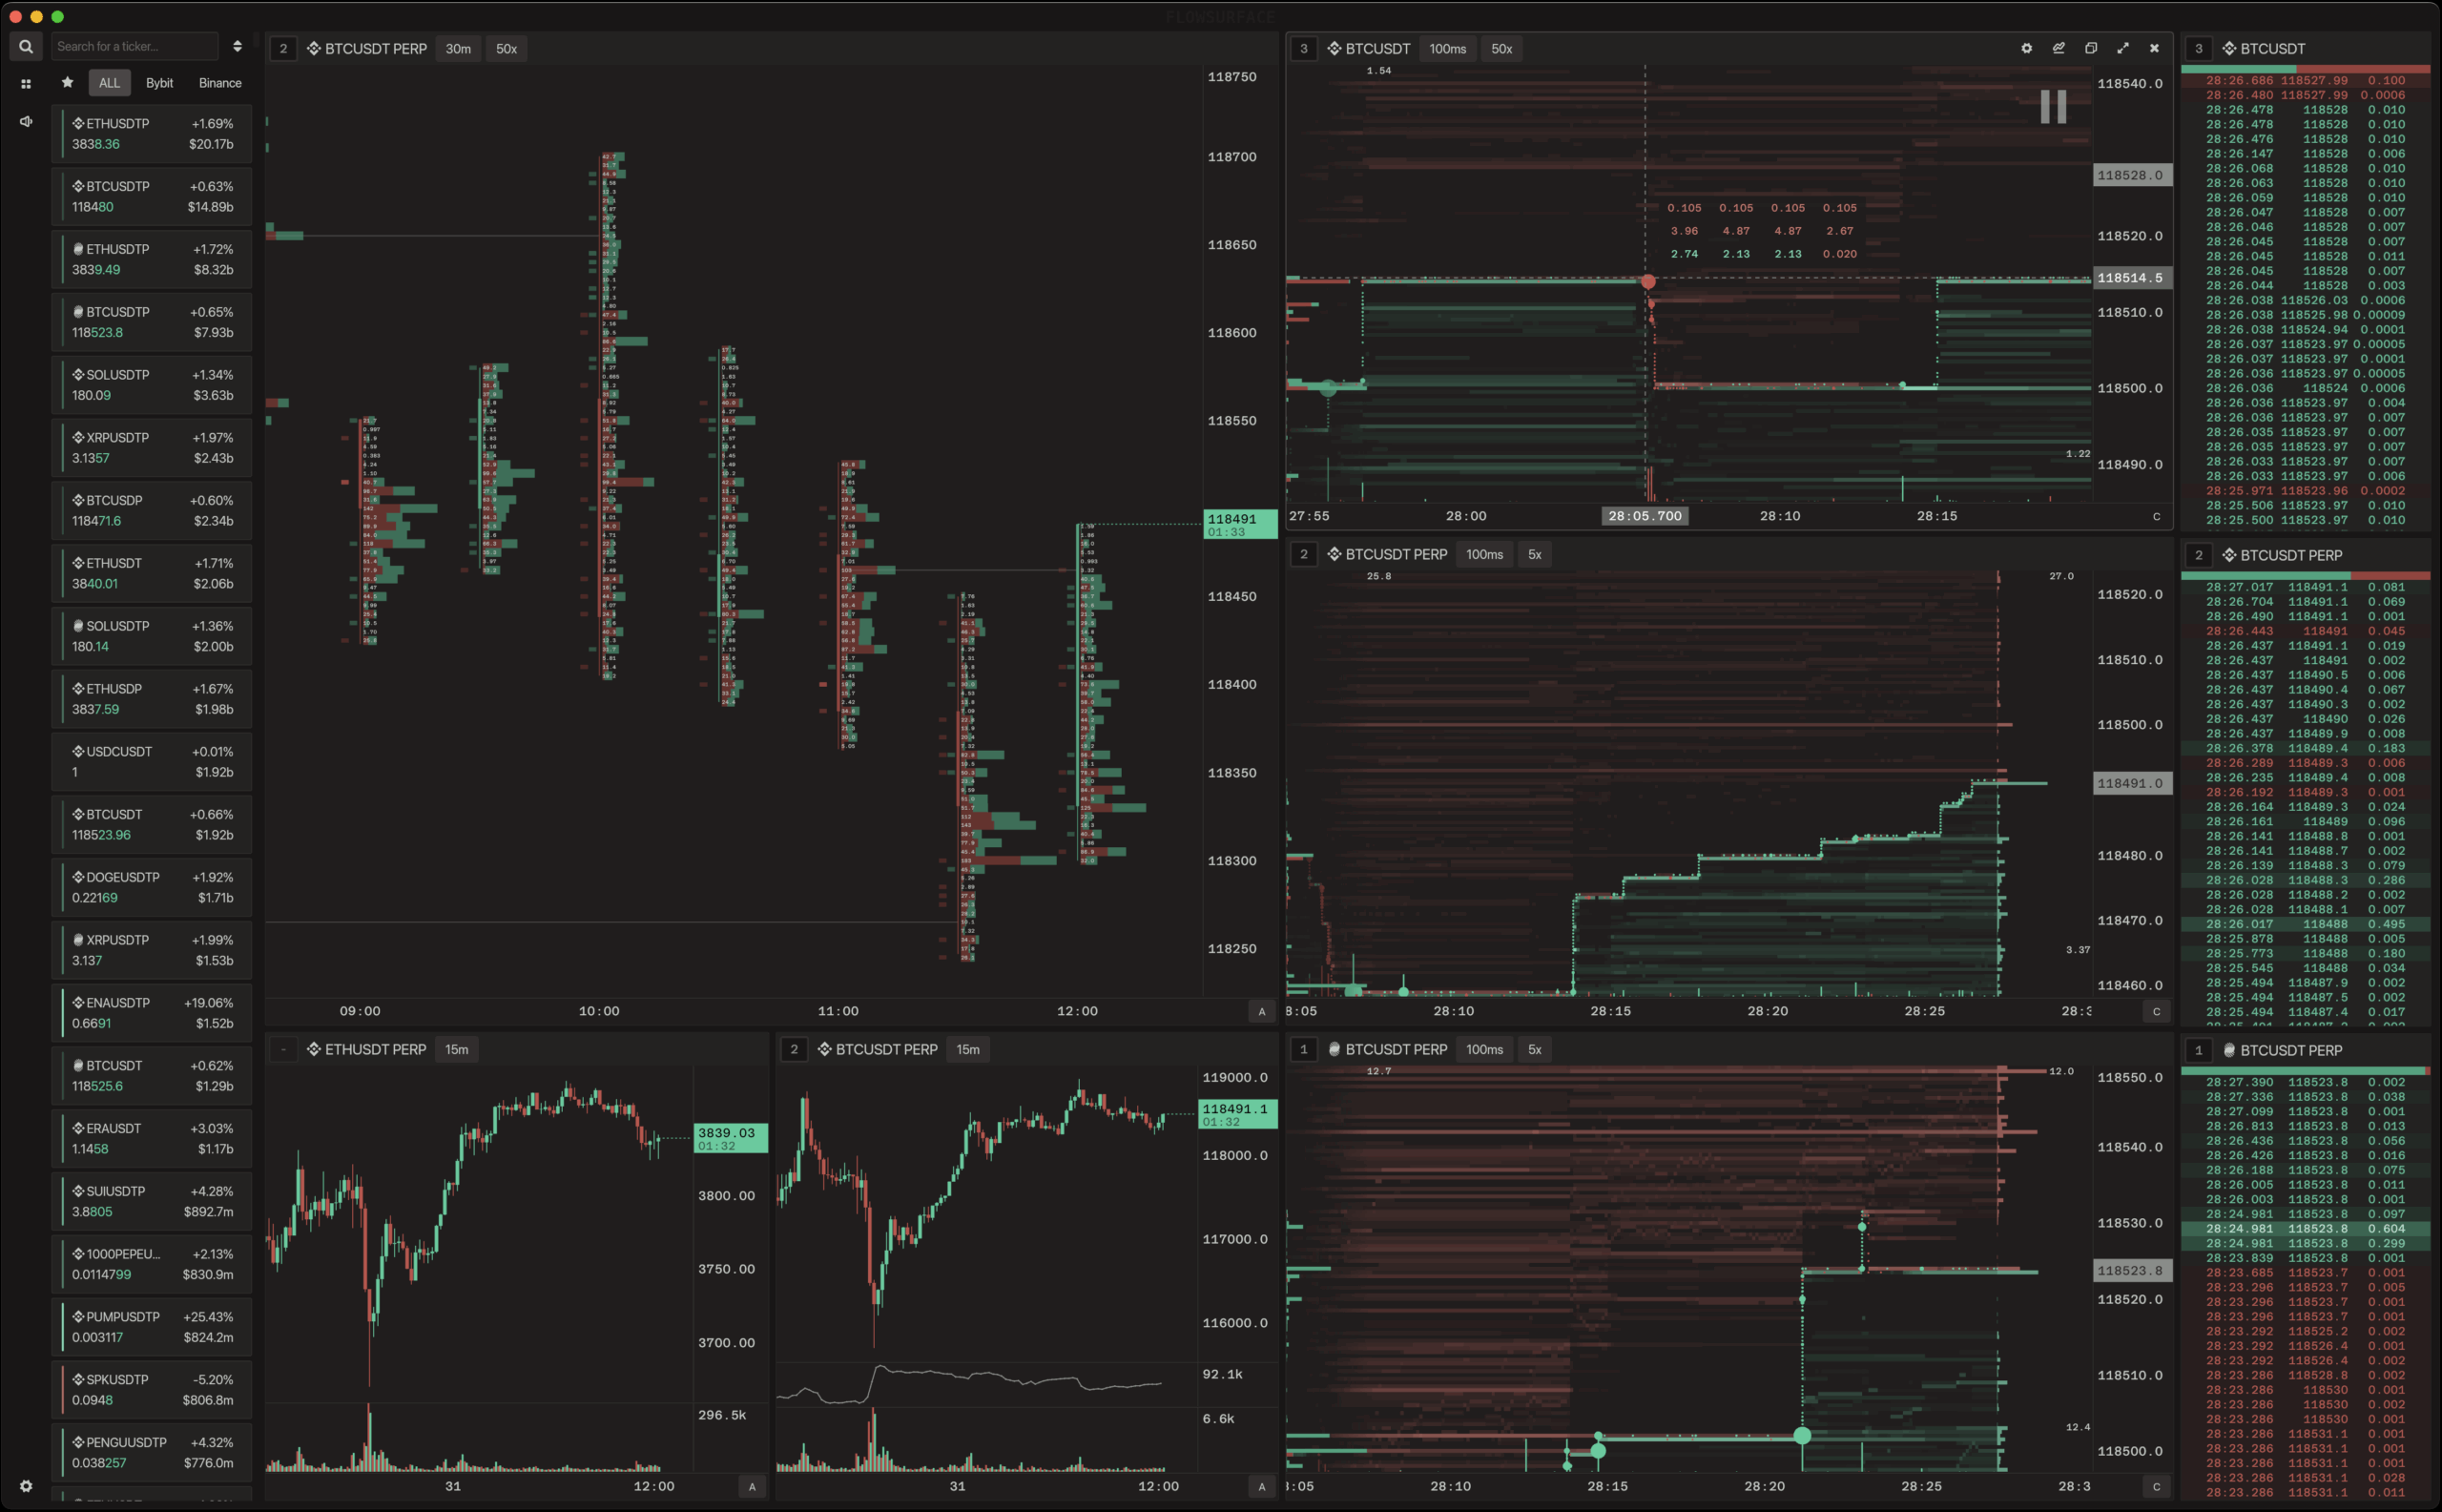
    overview-layout-1

    Key Features

    • Multiple chart/panel types:
      • Heatmap (Historical DOM): Uses live trades and L2 orderbook data to create a time-series heatmap chart. Supports customizable price grouping and selectable time intervals. Includes a configurable fixed or visible range volume profile.
      • Candlestick: Traditional kline chart supporting both time-based and custom tick-based intervals.
      • Footprint: Price-grouped and interval-aggregated views for trades on top of candlestick chart; supports different clustering methods. Includes configurable imbalance and naked-POC studies.
      • Time & Sales: Scrollable list of live trades.
    • Real-time sound effects driven by trade streams
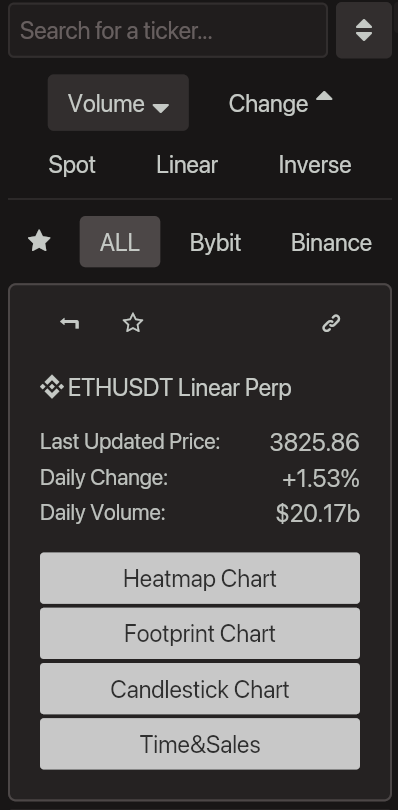
    • Pane linking and grouping for quickly switching tickers across multiple panes
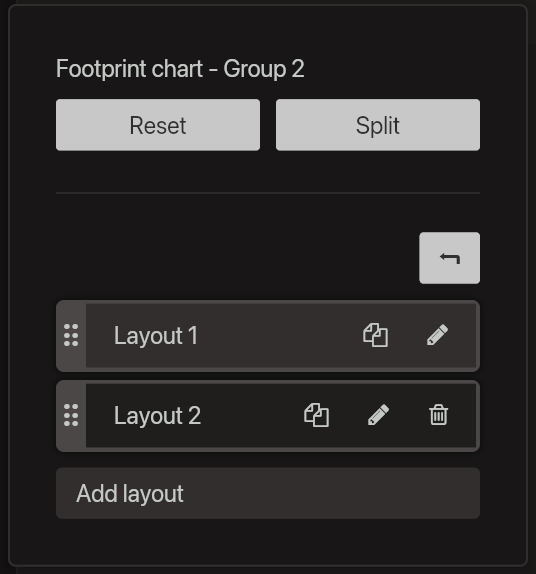
    • Customizable and persistent layouts, themes, panel and chart settings
    expanded-ticker-card layout-manager
    Market data is received directly from exchanges’ public REST APIs and WebSockets.

    Historical Trades on Footprint Charts

    • By default, FootprintChart captures and plots live trades in real time via WebSocket.
    • For Binance tickers, you can optionally backfill the visible time range by enabling trade fetching in the settings:
      • data.binance.vision: Fast daily bulk downloads (no intraday).
      • REST API (e.g., /fapi/v1/aggTrades): Slower, paginated intraday fetching (subject to rate limits).
      • The Binance connector can use either or both methods to retrieve historical data as needed.
    • Trade fetching for Bybit tickers is not supported, as they lack a suitable REST API.

    Installation

    Using Prebuilt Binaries

    Prebuilt binaries for Windows, macOS, and Linux are available on the Releases page.

    Build from Source

    Requirements

    • Rust toolchain
    • Git version control system
    • System dependencies:
      • Linux:
        • Debian/Ubuntu: sudo apt install build-essential pkg-config libasound2-dev
        • Arch: sudo pacman -S base-devel alsa-lib
        • Fedora: sudo dnf install gcc make alsa-lib-devel
      • macOS: Install Xcode Command Line Tools: xcode-select --install
      • Windows: No additional dependencies required

    Build and Run

    # Clone the repository
    git clone https://github.com/akenshaw/flowsurface
    
    cd flowsurface
    
    # Build and run
    cargo build --release
    cargo run --release

    Visit original content creator repository https://github.com/akenshaw/flowsurface
  • Analysis_of_Shopping_Cart_Data

    Analysis of Shopping Cart Data

    Index 💱


    Introduction 🇦🇺

    This project seeks to apply Data Analysis skills to a shopping cart dataset of Australian State.


    Installation

    To install the project, it is advisable to use a virtual enviroment, installing all dependencies in the requirementes.txt

    Execution

    To execute, simply run the project main with the command:

    python3 main.py


    Dataset Composition 🚻

    Summary of the data set so far. These are some points we have:

    • Customer Order and product data:

      • We have a total of 1000 rows and 22 columns
      • There are no missing values
      • customer_name: 1000 uniqueness variable(s)
      • gender : 8 uniqueness variable(s)
      • home_address : 1000 variable(s) of uniqueness
      • city : 961 variable(s) of uniqueness
      • state : 8 uniqueness variable(s)
      • country : 1 uniqueness variable(s)
      • order_date : 291 uniqueness variable(s)
      • delivery_date : 305 uniqueness variable(s)
      • product_type : 3 uniqueness variable(s)
      • product_name : 28 variable(s) of uniqueness
      • size : 5 uniqueness variable(s)
      • color : 7 uniqueness variable(s)
      • description : 1000 variable(s) of uniqueness
    • Sales data:

      • There are no missing values
      • There are no uniqueness values

    All data types in this data are Int 64. Next, we will try to do some explorations and visualizations.


    Data Analysis and Visualization (EDA) 🏧

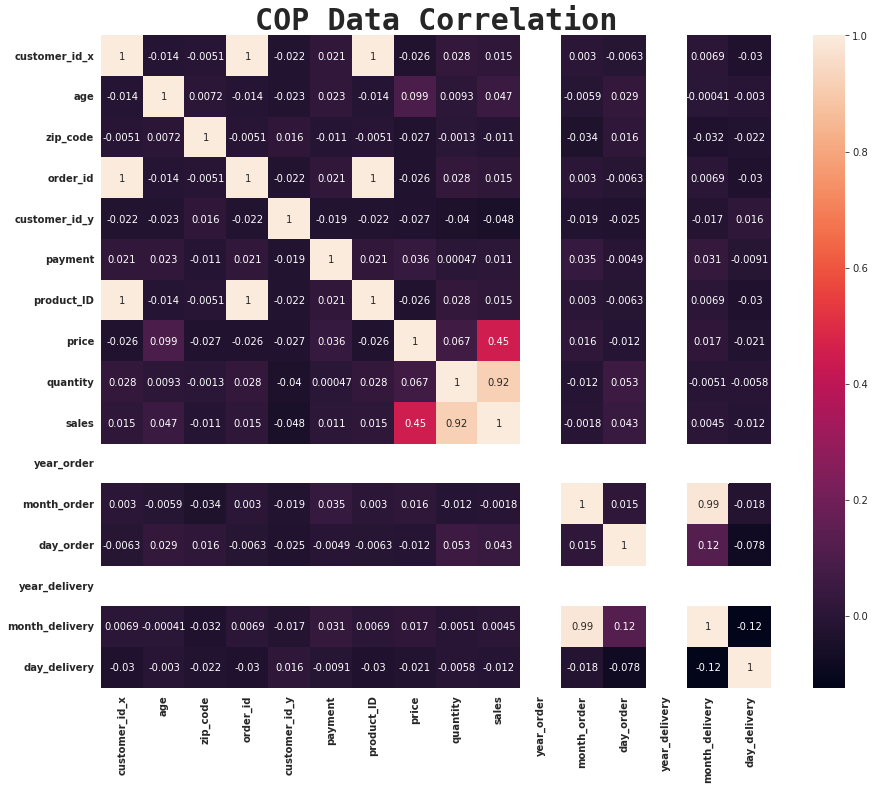
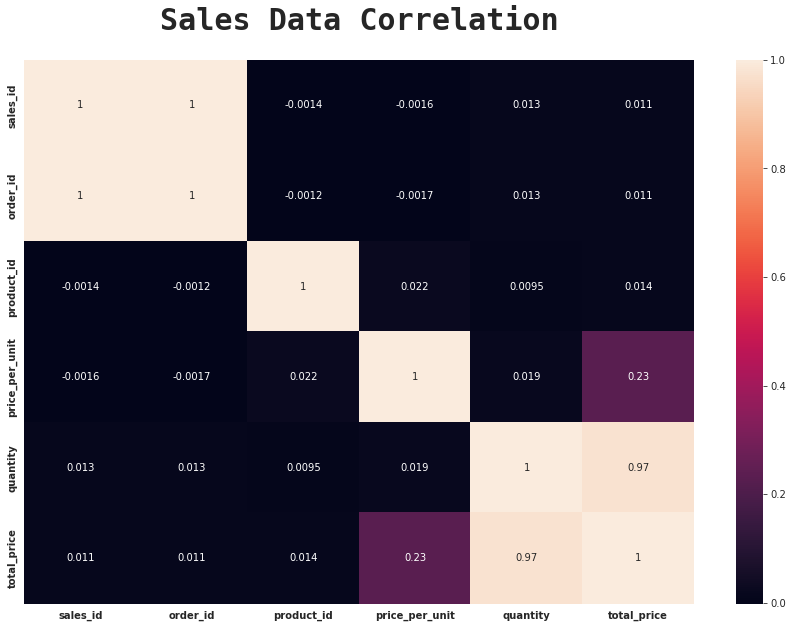
    By printing the data it’s possible see the correlation value is between -1 and 1. The closer the values are to 1 or -1, the greater the correlation. Exactly 1 or -1 represents perfect correlation. 0 represents no correlation.

    Note: NaN is expected if the values do not vary. To understand why, take a look at the correlation formula:


    $$ cor(i,j) = \frac{cov(i,j)}{[stedev(i)stdev(j)]} $$


    If the values of variables i or j do not vary, the respective standard deviation will be zero and so will the denominator of the fraction. Therefore, the correlation will be NaN.


    matrix


    We can see that some features appear to be highly correlated with each other.

    For instance:

    • Sales and Price are highly correlated meaning one affects the other.
    • If the price is high, sales will go down and vice-versa.

    matrix


    Univariate Data Analysis

    Sales

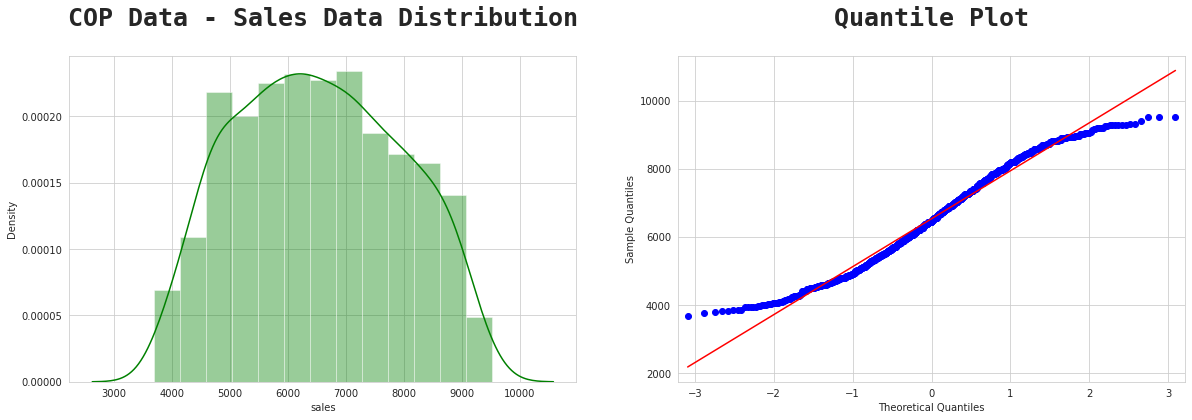
    Find the proportion that lies in between two standard deviation ( $𝜎$ ) from mean ( $𝜇$ ), and interprete that.

    In the Sales Data, the $𝜇$=6533 and the $𝜎$=1409. You can calculate that using pandas mean() function on the sales data.


    Calculation:

    • 6533−2(1409)=3715

    • 6533+2(1409)=9531

    i.e the mean minus 2 standard deviation and the mean plus 2 standard deviation.


    Interpretation:

    At least 75% of the Shopping Cart Database Sales customer population in Australia has sales ranging from 3715−9531 (Australian Dollars).

    Sales

    Age

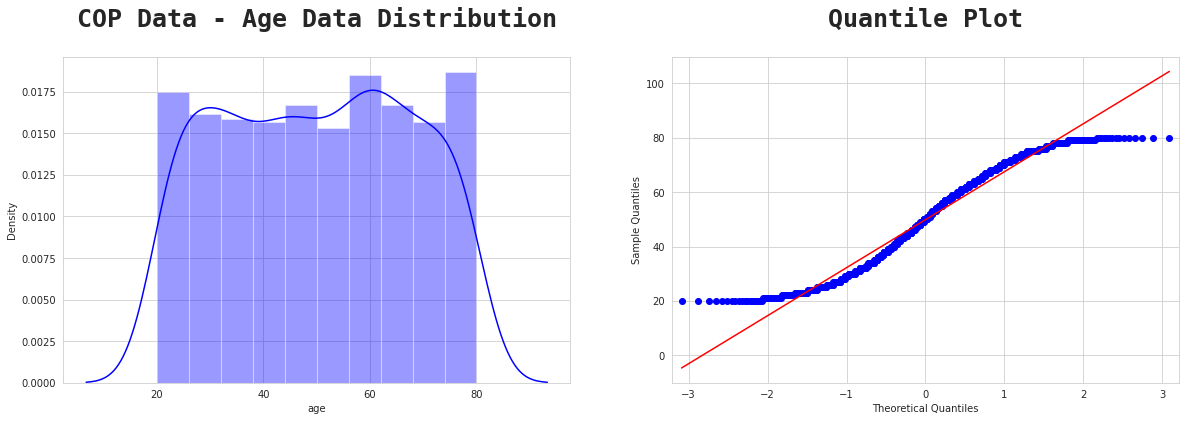
    Find the proportion that lies in between two standard deviation ( $𝜎$ ) from mean ( $𝜇$ ), and interprete that. In the Age Data, the $𝜇$=49.8 and the $𝜎$=17.6.


    Calculation:

    • 49.8−2(17.6)=14.59

    • 49.8+2(17.6)=85.0


    Interpretation:

    At least 75% of the Shopping Cart Database customer population in Australia has an age range of 14−85 years.

    Sales

    Price

    Find the proportion that lies in between two standard deviation ( $𝜎$ ) from mean ( $𝜇$ ), and interprete that. In the Price Data, the $𝜇$=108.095 and the $𝜎$=9.15.


    Calculation:

    • 108.095−2(9.15)=89.795

    • 108.095+2(9.15)=126.395


    Interpretation:

    At least 75% of Shopping Cart population in the product price database in Australia has a price range from 89,795−126,395 (Australian Dollars).

    Sales

    Quantity

    Find the proportion that lies in between two standard deviation ( $𝜎$ ) from mean ( $𝜇$ ), and interprete that. In the Quantity Data, the $𝜇$=60.3 and the $𝜎$=11.6


    Calculation:

    • 60.3−2(11.6)=37

    • 60.3+2(11.6)=83.5


    Interpretation:

    At least 75% of the Shopping Cart Database Quantity ordered population in Australia has a quantity range from 37−83.5 quantity ordered.

    Quantity

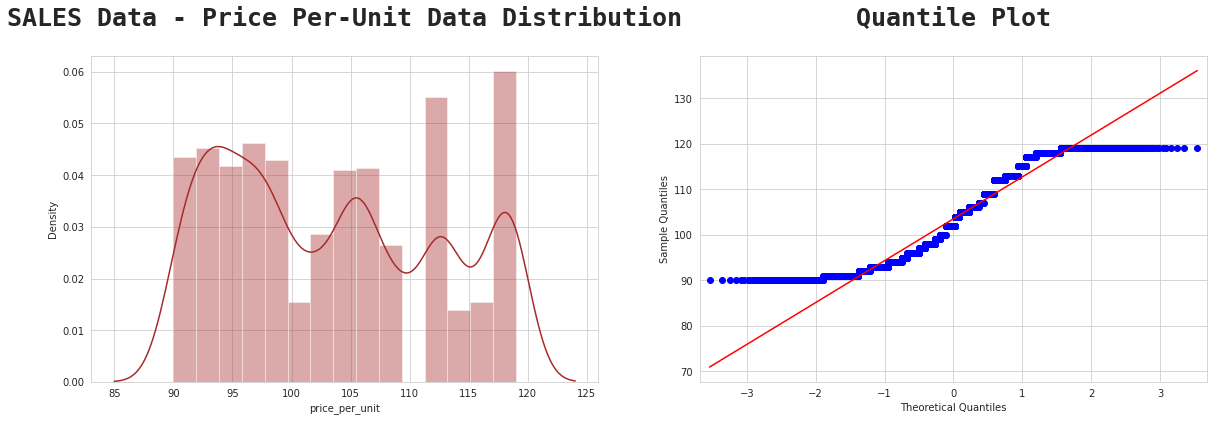
    Price Per-Unit

    Find the proportion that lies in between two standard deviation ( $𝜎$ ) from mean ( $𝜇$ ), and interprete that. In the Price Per Unit Data, the $𝜇$=103.5 and the $𝜎$=9.1

    Calculation:


    103.5−2(9.1)=85.3

    103.5+2(9.1)=121.7


    Interpretation:

    At least 75% of the population of the Shopping Cart Database, the per unit price range is in between 85.3 to 121.7 (Australian Dollars).

    Unit

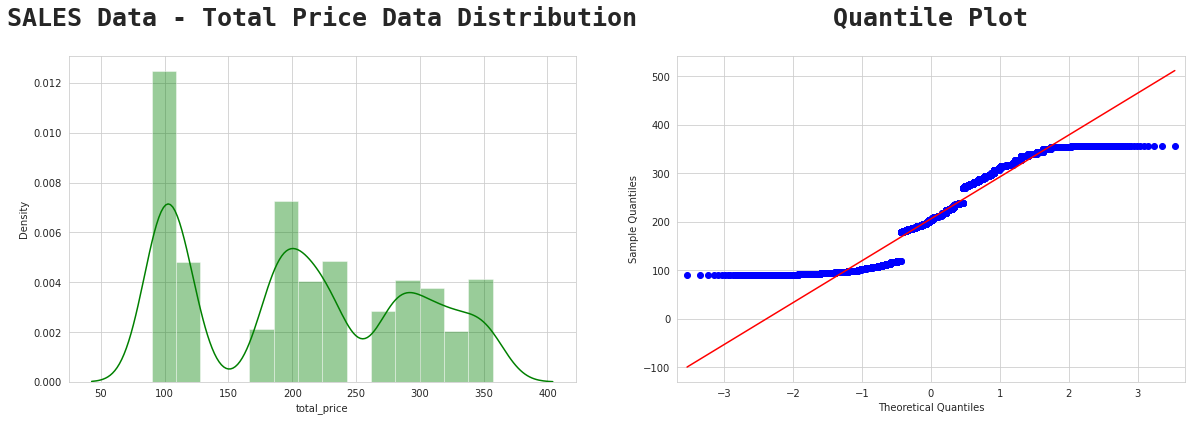
    Total Price

    Find the proportion that lies in between two standard deviation ( $𝜎$ ) from mean ( $𝜇$ ), and interprete that. In the Total Price Data, the $𝜇$=206.3 and the $𝜎$=86.3

    Calculation:


    206.3−2(86.3)=33.7

    206.3+2(86.3)=378.9


    Interpretation:

    At least 75% of the sales data has a total price range from 33.7 to 378.9 (Australian Dollars).

    Unit

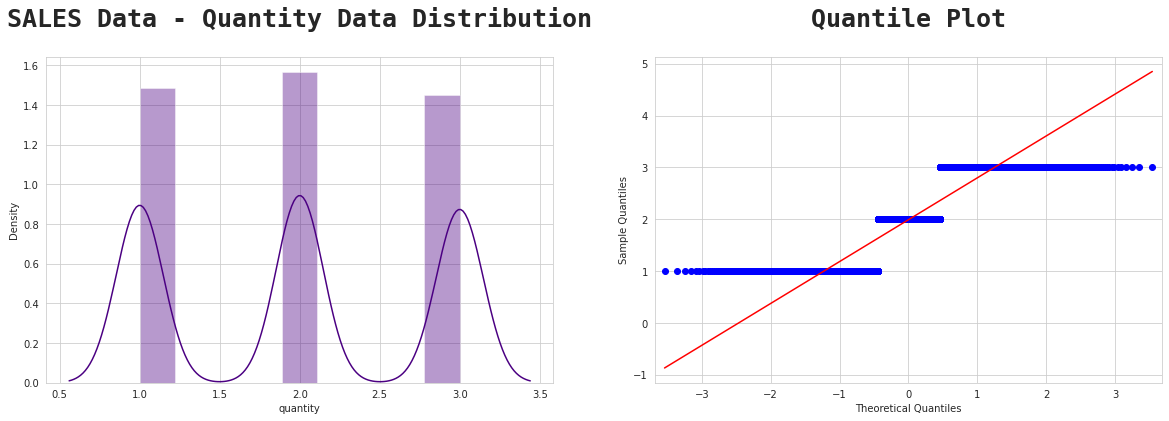
    Quantity2

    Find the proportion that lies in between two standard deviation ( $𝜎$ ) from mean ( $𝜇$ ), and interprete that. and In the Quantity Data, the $𝜇$=2 and the $𝜎$=1 , if we round it.

    Calculation:


    2−2(1)=0

    2+2(1)=4


    Interpretation:

    At least 75% of the population of Shopping Cart Database Quantity ordered in Australia has a total quantity range from 0−4 quantity ordered.

    quant2


    Result ‼️

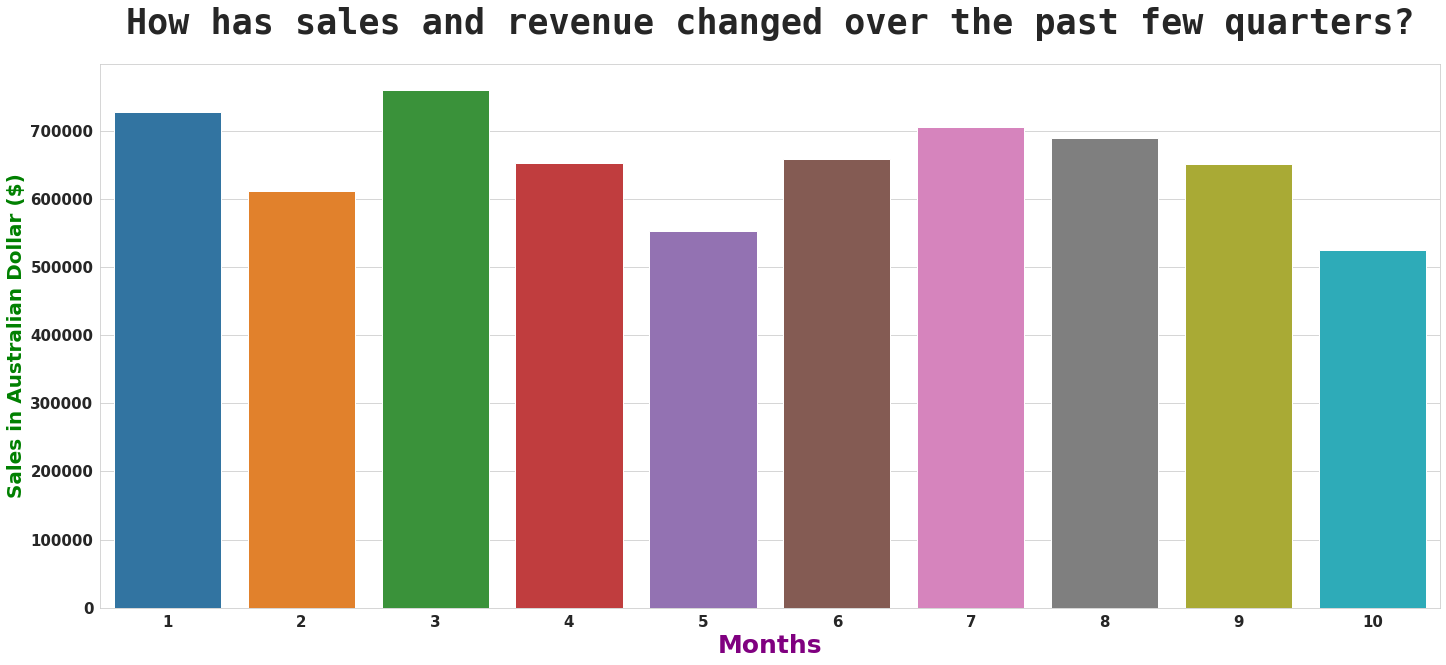
    Which products were sold the most in the last month?

    month


    Understanding Customer demographics and their preferences 🏳️‍🌈

    preferences1

    Read more about the different types of gender here


    preferences2


    Quite suprising how male managed to shop more than females…lol

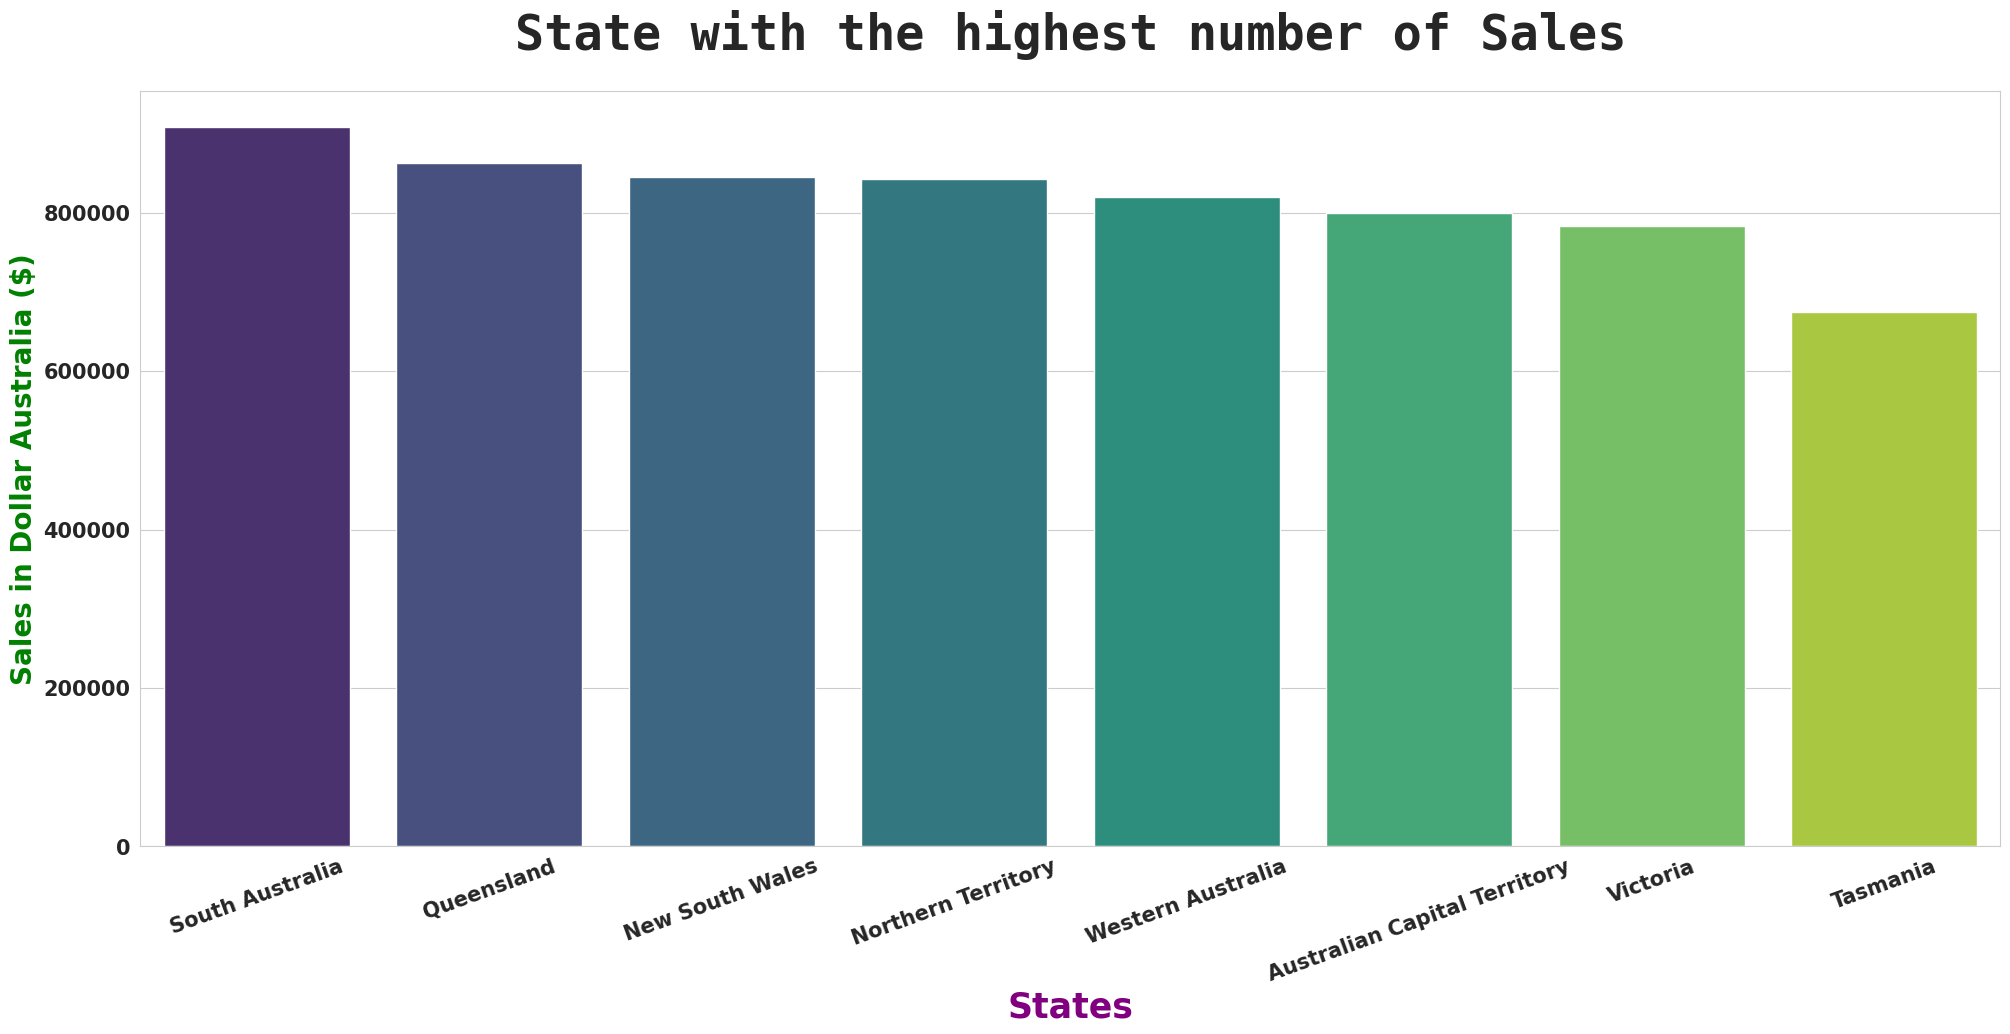
    State with highest number of Sales 💲

    state


    South Australia took first place with the highest total sales of 907.400 (Dollar Australia), and Queensland took second place with sales of 862.965 (Dollar Australia).

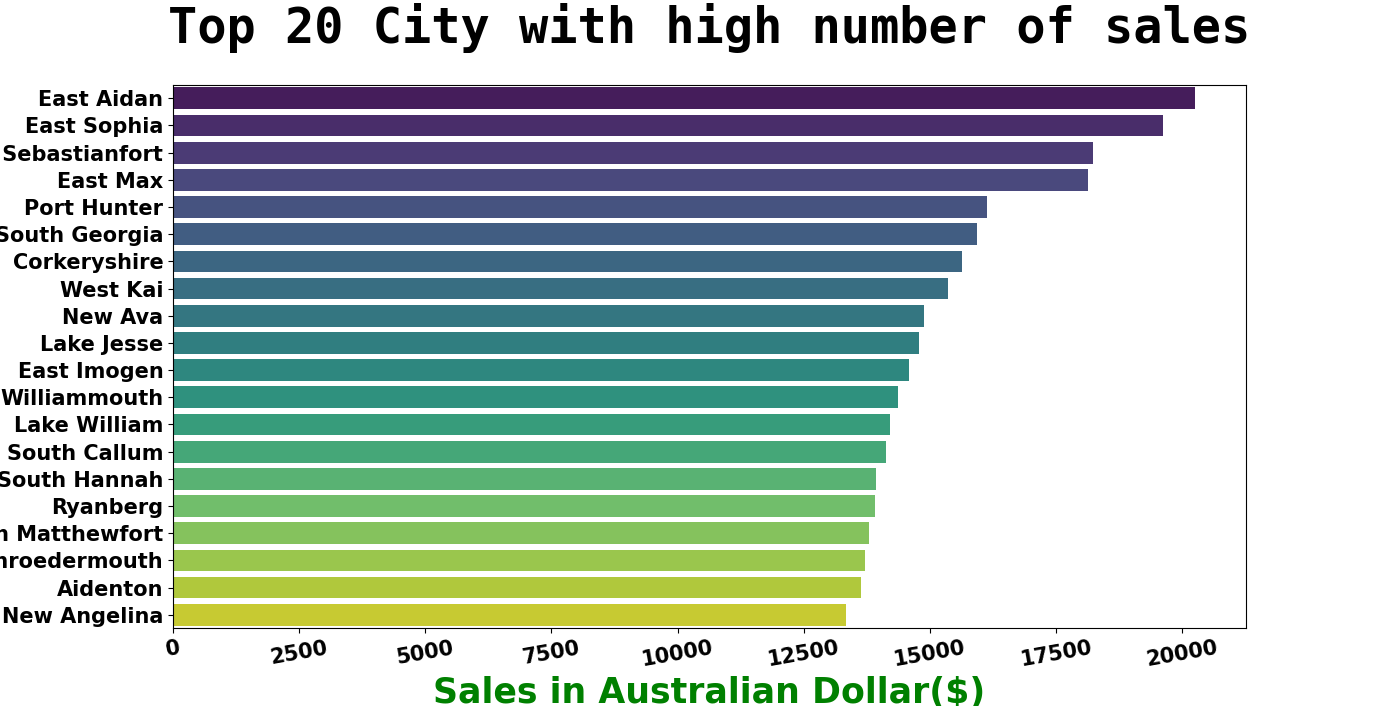
    Top 20 city with high number of sales ✔️

    top


    East Aidan occupies the first position in the city with the highest number of sales with total sales of 20.247 (Dollar Australia), and the second position is occupied by East Sophia with total sales of 19.628 (Dollar Australia).


    Enjoy 2F

    Visit original content creator repository https://github.com/F-a-b-r-i-z-i-o/Analysis_of_Shopping_Cart_Data
  • zeebe-cloud-canary

    Zeebe Cloud Canary

    Use this package to allow your Zeebe applications to alert when they are not able to receive work from the broker – whether due to a broker outage or a dropped connection. Read more about the use-cases on the Zeebe blog.

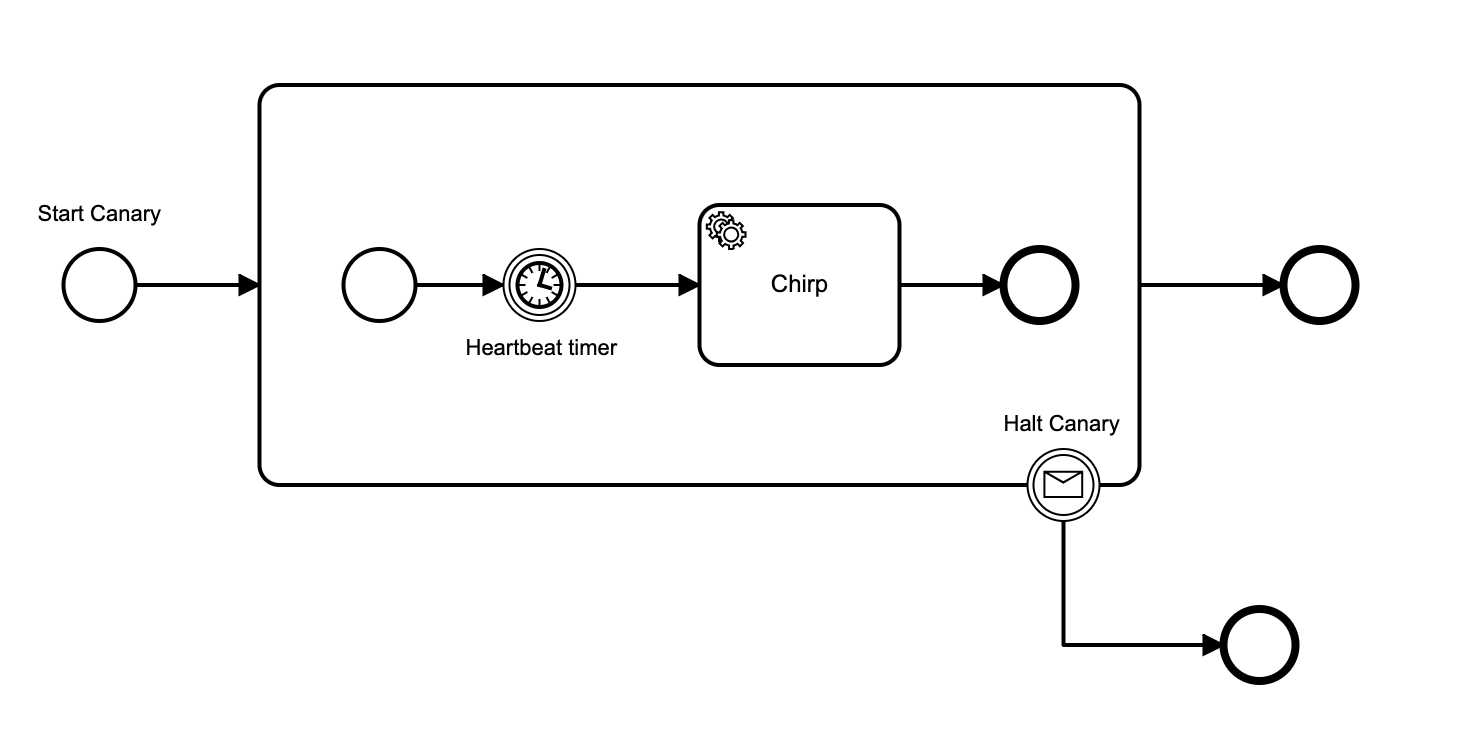
    The ZeebeCanary class deploys a workflow to the broker that starts a loop with a user-configured heartbeat interval, and spawns a worker that services the loop.

    Whenever the canary worker services the loop task, it pings the “chirp” url.

    If the canary does not get a chirp task in 1.5x the heartbeat interval, it can ping a “squawk” url.

    The worker starts the next loop iteration as a new workflow instance, so that you are not running a non-reapable long-running process (that would mess with your snapshot size on disk and recovery time).

    The canary uses micromustache to template the ZeebeCanary.CanaryId into the workflow before it is deployed, to allow you to have canaries for multiple applications / instances running on the same broker.

    Installation

    npm i zeebe-cloud-canary

    Use

    import { ZeebeCanary } from 'zeebe-cloud-canary';
    
    // Uses the zeebe-node zero-conf constructor, either localhost or from ENV
    const canary = new ZeebeCanary({
        ChirpUrl: `${healthchecks_io_url}`,
        CanaryId: 'some-application-id',
        HeartbeatPeriodSeconds: 300
    })

    You can pass in the ZBClient constructor options explicitly, like this:

    import { ZeebeCanary } from 'zeebe-cloud-canary';
    
    // Uses an explicit ZBClient constructor for configuration
    const canary = new ZeebeCanary({
        ChirpUrl: '',
        CanaryId: 'some-application-id',
        HeartbeatPeriodSeconds: 300,
        ZBConfig: {
            hostname: `${zeebe_address}:${optional_port}`,
            longPoll: 55000
        }
    })

    If you use an external healthcheck ping like healthchecks.io for the ChirpUrl, it will squawk if the canary does not chirp on time, and if the canary process dies, so it will also alert you on client application failure.

    You can use your own SquawkUrl, and it will be pinged if the canary does not get a chirp task in 1.5x the heartbeat interval – but not if the canary process itself (your application) dies.

    Running in Docker

    You can run a fully dockerised Zeebe Cloud Canary like this:

    ZEEBE_ADDRESS=<some_url_reachable_from_docker> docker-compose up

    By default the canary chirps and squawks in the container log.

    You can set the following environment variables:

    CANARY_HEARTBEAT_SEC
    CHIRP_URL
    DEBUG
    SQUAWK_URL
    ZEEBE_ADDRESS
    ZEEBE_CLIENT_ID
    ZEEBE_CLIENT_SECRET
    
    Visit original content creator repository https://github.com/jwulf/zeebe-cloud-canary